HP 4100n HP LaserJet 4100mfp -User Guide - Page 148
compare the new menu map to the map that you printed - firmware update
 |
View all HP 4100n manuals
Add to My Manuals
Save this manual to your list of manuals |
Page 148 highlights
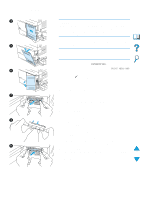
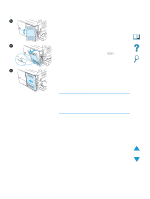
10 10 Close the DIMM access door. Make sure that it locks into place. 11 Insert the bottom of the cover into the slot and rotate the cover upward. 12 Slide the cover toward the front of the MFP until the cover clicks into place. Plug in the power cord, reconnect all cables, and turn the MFP on. 11 13 Follow this procedure to verify that the DIMM is installed correctly: q Check that the control panel shows READY. If an error message appears, the DIMM might have been incorrectly installed. Review the installation if necessary. See "Understanding control panel messages" on page 86 for more information. 12 q Print a new menu map and configuration page and compare the new menu map to the map that you printed out before the DIMM installation. If any values are different, make the appropriate changes in the affected menus. q Compare the new configuration page with the one that you printed earlier. Note If you installed a new firmware DIMM, the Firmware Datacode listed in the upper-left block of the page should have been updated to reflect the DIMM replacement. If any values are different and cannot be changed using the menus, call for support. 146 Appendix D - System administrator guide EN
-
 1
1 -
2
-
3
-
4
-
5
-
6
-
7
-
8
-
9
-
10
-
11
-
12
-
13
-
14
-
15
-
16
-
17
-
18
-
19
-
20
-
21
-
22
-
23
-
24
-
25
-
26
-
27
-
28
-
29
-
30
-
31
-
32
-
33
-
34
-
35
-
36
-
37
-
38
-
39
-
40
-
41
-
42
-
43
-
44
-
45
-
46
-
47
-
48
-
49
-
50
-
51
-
52
-
53
-
54
-
55
-
56
-
57
-
58
-
59
-
60
-
61
-
62
-
63
-
64
-
65
-
66
-
67
-
68
-
69
-
70
-
71
-
72
-
73
-
74
-
75
-
76
-
77
-
78
-
79
-
80
-
81
-
82
-
83
-
84
-
85
-
86
-
87
-
88
-
89
-
90
-
91
-
92
-
93
-
94
-
95
-
96
-
97
-
98
-
99
-
100
-
101
-
102
-
103
-
104
-
105
-
106
-
107
-
108
-
109
-
110
-
111
-
112
-
113
-
114
-
115
-
116
-
117
-
118
-
119
-
120
-
121
-
122
-
123
-
124
-
125
-
126
-
127
-
128
-
129
-
130
-
131
-
132
-
133
-
134
-
135
-
136
-
137
-
138
-
139
-
140
-
141
-
142
-
 143
143 -
 144
144 -
 145
145 -
 146
146 -
 147
147 -
 148
148 -
 149
149 -
 150
150 -
 151
151 -
 152
152 -
 153
153 -
154
-
155
-
156
-
157
-
158
-
159
-
160
-
161
-
162
-
163
-
164
 |
 |
