HP 4215 HP Officejet 4200 series all-in-one - (English) Setup Poster - Page 1
HP 4215 - Officejet All-in-One Color Inkjet Manual
 |
UPC - 829160155845
View all HP 4215 manuals
Add to My Manuals
Save this manual to your list of manuals |
Page 1 highlights
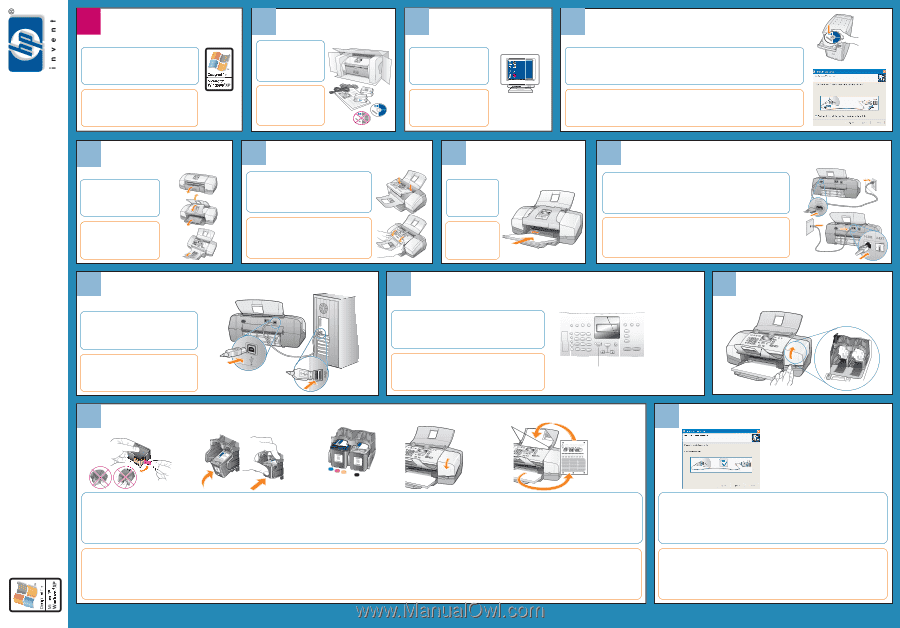
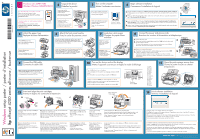
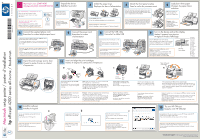
*Q5600-90149* *Q5600-90149* Q5600-90149 Windows setup poster / poster d'installation hp officejet 4200 series all-in-one / tout-en-un 1 Windows users START HERE Utilisateurs Windows COMMENCEZ ICI This side of the poster is for Windows users only. Follow the steps on this poster in order. Do not connect the USB cable until the software prompts you to do so. Cette face du poster ne s'adresse qu'aux utilisateurs de Windows. Suivez les étapes de ce poster dans l'ordre. Ne branchez pas le câble USB ; attendez que le logiciel vous y invite. Windows 98, 2000, ME, XP 2 Unpack the device Déballez le produit Remove tape and the cardboard packaging from inside the device. See the box for exact contents and system requirements. Retirez la bande adhésive et l'emballage en carton accompagnant le produit. Déballez la boîte pour en connaître le contenu exact et savoir quelle est la configuration système requise. CD Macintosh 3 Turn on the computer Mettez l'ordinateur sous tension Turn on your computer and wait for the Windows PC desktop to appear. Close any open programs. CD Windows Mettez votre ordinateur sous tension et attendez que le bureau du PC Windows s'affiche. Fermez tous les programmes ouverts. Windows PC desktop Bureau du PC Windows 4 Begin software installation Commencez l'installation du logiciel a a Insert the Windows HP Officejet CD. Follow the onscreen instructions, and wait while the software installs files. If nothing appears on your computer screen after inserting the CD, locate and double-click the setup.exe file on the CD. b b When you see the Set Up Your Device Now screen (shown at the right), leave your computer and proceed to step 5. Do not connect the USB cable yet. a Insérez le CD HP Officejet Windows. Suivez les instructions à l'écran et patientez pendant l'installation des fichiers du logiciel. Si rien ne s'affiche à l'écran de l'ordinateur après l'insertion du CD, recherchez le fichier setup.exe sur le CD et cliquez deux fois dessus. b Lorsque l'écran Configurez votre périphérique maintenant (présenté à droite) apparaît, quittez votre ordinateur et passez à l'étape 5. Ne branchez pas encore le câble USB. 5 Unfold the paper trays Déployez les bacs d'alimentation Unfold all three paper trays. Pull out the cardboard packaging from inside the device. Déployez les trois bacs d'alimentation. Enlevez l'emballage en carton se trouvant à l'intérieur du produit. 9 Connect the USB cable Connectez le câble USB Make sure that you see the Set Up Your Device Now screen on your computer (shown in step 4), then connect the USB cable. Do not connect the USB cable to a keyboard or a non-powered USB hub. Vérifiez que l'écran Configurez votre périphérique maintenant est affiché sur votre ordinateur (présenté à l'étape 4), puis branchez le câble USB. Ne connectez pas le câble USB à un clavier ou à un concentrateur USB non alimenté. 6 Attach the front panel overlay Fixez le cache du panneau avant Insert the front panel overlay tabs into the slots on top of the device. Press the overlay down firmly on both front corners until the overlay snaps securely in place. Make sure it is aligned evenly with the device. Insérez les languettes du cache du panneau avant dans les fentes situées sur la partie supérieure de l'appareil. Appuyez fermement sur les deux côtés avant du cache jusqu'à ce que celui-ci se mette correctement en place. Vérifiez qu'il est bien positionné sur le produit. 7 Load plain white paper Chargez du papier blanc ordinaire Note: Forcing paper too far into the paper tray might cause a paper jam. Remarque : évitez d'enfoncer le papier trop loin dans le bac d'alimentation, vous risqueriez de provoquer un bourrage papier. 8 Connect the power and phone cords Branchez les cordons d'alimentation et téléphonique a Connect the power cord. a b Connect one end of the supplied phone cord to the 1-LINE jack on the device and the other end to a wall jack. To connect other equipment such as an answering machine, or to use a different phone cord, see the Fax Setup chapter in the User Guide. a Branchez le cordon d'alimentation. b Raccordez l'une des extrémités du cordon téléphonique fourni à la fiche 1-LINE située sur le produit et l'autre à une prise murale. b Pour brancher d'autres appareils tels qu'un répondeur, ou utiliser un cordon téléphonique différent, consultez le chapitre Configuration du télécopieur du Guide de l'utilisateur. 10 Turn on the device and set the display Mettez l'appareil sous tension et réglez le mode d'affichage Press the On button to turn on the device. When prompted, enter the code for your language, and press the OK button. Enter the code for your country/region, and press the OK button. Appuyez sur le bouton Activer pour mettre l'appareil sous tension. Lorsque le système vous y invite, entrez le code correspondant à votre langue, et appuyez sur le bouton OK. Entrez le code de votre pays/région, et appuyez sur le bouton OK. On button Bouton Activer 11 English 12 Français 13 Deutsch 14 Español 15 Italiano 16 Svenska 17 Dansk 18 Norsk 19 Nederlands 20 Suomi 21 Português 22 23 Polski 24 Türkçe 25 Magyar 26 Ceštinu 27 11 Open the print-carriage access door Ouvrez la porte d'accès au chariot d'impression 12 Insert and align the print cartridges Insérez et alignez les cartouches d'impression a b c d Paper width guides Guides papier e 13 Finish software installation Terminez l'installation du logiciel Remove the bright pink tape from both print cartridges. Do not touch the ink nozzles or the goldcolored contacts, and do not re-tape the cartridges. Note: Make sure the power is on and you have removed the cardboard from inside the device. Hold the black print cartridge with the large HP label on top. Slide the print cartridge at a slight upward angle into the right side of the print carriage. Press firmly until the cartridge snaps up into place. Tri-color Trois couleurs Black Noir Repeat step b to install the tri-color print cartridge on the left side of the print carriage. Make sure both cartridges are secure. Close the print-carriage access door. Note: You must install both cartridges in order for your HP Officejet to work. When prompted, press OK to print an alignment page. Remove the alignment page and load the top of the page face down in the document feeder tray between the paper width guides, and press OK. When "Alignment Complete" appears on the front panel display, the alignment is complete. Retirez la bande adhésive rose fluo des deux cartouches d'encre. Ne touchez pas les buses d'encre ou les contacts de couleur or, et ne recollez pas la bande adhésive. Remarque : vérifiez que l'appareil est bien alimenté et que vous avez retiré le carton situé à l'intérieur. Tenez la cartouche d'encre noire avec le grand logo HP vers le haut. Faites glisser la cartouche dans le côté droit du chariot d'impression en l'inclinant légèrement vers le haut. Appuyez fermement sur la cartouche jusqu'à ce qu'elle se mette correctement en place. Répétez l'étape b pour installer la cartouche d'impression trois couleurs sur le côté gauche du chariot d'impression. Assurez-vous que les deux cartouches sont bien en place. Fermez la porte d'accès au chariot d'impression. Remarque : vous devez installer les deux cartouches pour que votre appareil HP Officejet fonctionne. Lorsque le système vous y invite, appuyez sur OK pour imprimer une page d'alignement. Retirez la page d'alignement et placez le haut de la page, face imprimée vers le bas, dans le bac d'alimentation automatique entre les guides papier et appuyez sur OK. Lorsque le message "Alignement terminé" s'affiche sur le panneau avant, l'alignement est terminé. Hardware setup is now complete. Return to your computer. Click Next on the screen with the green checkmark. Depending on your system, it may take 20 minutes or more to finish installing the software. After you restart your computer, the Fax Setup Wizard appears. Follow the onscreen instructions. When the Congratulations screen appears, you are ready to use your HP Officejet. If you encounter problems during setup, see the User Guide. L'installation matérielle est maintenant terminée. Retournez devant votre ordinateur. Cliquez sur Suivant dans la boîte de dialogue affichant la coche verte. En fonction de votre système, il faudra au minimum 20 minutes pour terminer l'installation du logiciel. Une fois que vous avez redémarré votre ordinateur, l'Assistant de configuration du télécopieur s'affiche. Suivez les instructions à l'écran. Lorsque l'écran Félicitations apparaît, votre appareil HP Officejet est prêt à fonctionner. Si vous rencontrez des problèmes pendant l'installation, consultez le Guide de l'utilisateur. www.hp.com/support © 2003 Copyright Hewlett-Packard Development Company, LP Printed in [country] / Printed in [country]
-
 1
1 -
 2
2
 |
 |