HP 4400 HP Disk Drive Replacement Instructions (652989-001, June 2011) - Page 3
Description, LED Status, LED Color, Storage system > Hardware >, Disk enclosure > Bay, Disk
 |
View all HP 4400 manuals
Add to My Manuals
Save this manual to your list of manuals |
Page 3 highlights
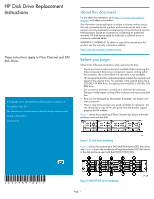
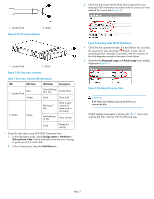
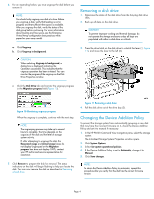
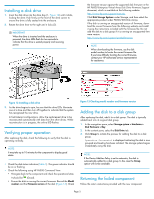
3. Check the disk Node World Wide Name against the error message UUID information recorded earlier to ensure you have selected the correct disk (Figure 8). 1. Locate/Fault 2. Status Figure 6 FC disk status indicators . 1. Locate/Fault 2. Status Figure 7 SAS disk status indicators . Table 1 Disk status indicator LED descriptions LED LED Color LED Status Description 1. Locate/Fault Blue Amber Slow blinking (0.5 Hz) Locate drive Solid Drive fault 2. Status Green Blinking (1 Hz) Fast blinking (4 Hz) Drive is spinning up or down and is not ready Drive activity Solid Ready for activity • Check the disk status using HP P6000 Command View: 1. In the Navigation pane, select Storage system > Hardware > Disk enclosure > Bay. Use the information from the error message to guide you to the correct disk. 2. In the Content pane, select the Disk Drive tab. Figure 8 Checking Node World Wide Name . 4. Check the disk operational state. If a hard failure has occurred, the operational state should be (Failed). A disk with an impending failure indicates Good status until the condition of the disk degrades enough to become a hard failure. 5. Verify that the Requested usage and Actual usage boxes display Ungrouped (Figure 9). Figure 9 Checking disk group status . CAUTION: Both fields must display Ungrouped before you remove the disk. If fields display Ungrouped, continue with Step 7. If you must ungroup the disk, continue with the following step. Page 3
-
 1
1 -
 2
2 -
 3
3 -
 4
4 -
 5
5
 |
 |
