HP 5200tn HP LaserJet 5200 Series Printer - Software Technical Reference (Exte - Page 154
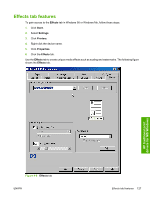
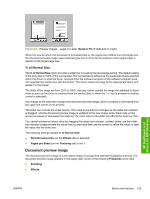
Watermark Message, Message Angle, Document preview image, Font Attributes
 |
UPC - 882780123762
View all HP 5200tn manuals
Add to My Manuals
Save this manual to your list of manuals |
Page 154 highlights
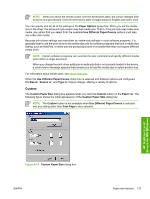
To create a new watermark, click New. The new watermark appears in the Current Watermarks list and in the Watermark Message edit box as Untitled until you name it. To name the new watermark, type the selected watermark text in the Watermark Message edit box. To delete a watermark, select the watermark in the Current Watermarks list and click Delete. NOTE You can have no more that 30 watermarks in the Current Watermarks list at one time. When you reach the limit of 30 watermarks, the New button is disabled, and a Bubble Help message appears that explains why the button is disabled and how to make it available. To edit an existing watermark, select the watermark in the Current Watermarks list. If you change the Watermark Message for that watermark, you are, in effect, creating a new watermark. Watermark Message The Watermark Message is also the name that identifies the watermark in the Current Watermarks list, except when more than one watermark has the same message. For example, you might want several different watermarks with the message DRAFT, each in a different font or size. When this occurs, the string is appended with a space, a pound sign, and a number (for example, Draft #2). When a number is added, the number two is used first, but if the resulting name is also in the list, then the number increases until the name is unique (Draft #3, Draft #4, and so on). Message Angle Use the controls in the Message Angle group box to print the watermark in different orientations on the page. All settings center the watermark string within the page; the selection of a particular setting affects only the angle of the string placement. The following settings are available: ● Diagonal. This is the default setting. Select this setting to place the text along a line that spans the lower-left to upper-right corners of the page. ● Horizontal. Select this setting to place the text along a line that spans the mid-left and mid-right edges of the page. ● Custom. Select this setting to place the text at the specified angle across the page. Use the numeric spin box to select the angle. Document preview image The document preview image is a line-drawn image of a page that represents graphics and text. The document preview image appears in the upper-right corner of the Watermark Details dialog box. The document preview image changes to reflect the modifications that you make in the Watermark Details dialog box. Font Attributes Use the controls in the Font Attributes group box to change the font and the shading, size, and style of the font. HP traditional print drivers for MS Windows 132 Chapter 4 HP traditional print drivers for MS Windows ENWW
-
 1
1 -
2
-
3
-
4
-
5
-
6
-
7
-
8
-
9
-
10
-
11
-
12
-
13
-
14
-
15
-
16
-
17
-
18
-
19
-
20
-
21
-
22
-
23
-
24
-
25
-
26
-
27
-
28
-
29
-
30
-
31
-
32
-
33
-
34
-
35
-
36
-
37
-
38
-
39
-
40
-
41
-
42
-
43
-
44
-
45
-
46
-
47
-
48
-
49
-
50
-
51
-
52
-
53
-
54
-
55
-
56
-
57
-
58
-
59
-
60
-
61
-
62
-
63
-
64
-
65
-
66
-
67
-
68
-
69
-
70
-
71
-
72
-
73
-
74
-
75
-
76
-
77
-
78
-
79
-
80
-
81
-
82
-
83
-
84
-
85
-
86
-
87
-
88
-
89
-
90
-
91
-
92
-
93
-
94
-
95
-
96
-
97
-
98
-
99
-
100
-
101
-
102
-
103
-
104
-
105
-
106
-
107
-
108
-
109
-
110
-
111
-
112
-
113
-
114
-
115
-
116
-
117
-
118
-
119
-
120
-
121
-
122
-
123
-
124
-
125
-
126
-
127
-
128
-
129
-
130
-
131
-
132
-
133
-
134
-
135
-
136
-
137
-
138
-
139
-
140
-
141
-
142
-
143
-
144
-
145
-
146
-
147
-
148
-
 149
149 -
 150
150 -
 151
151 -
 152
152 -
 153
153 -
 154
154 -
 155
155 -
 156
156 -
 157
157 -
 158
158 -
 159
159 -
160
-
161
-
162
-
163
-
164
-
165
-
166
-
167
-
168
-
169
-
170
-
171
-
172
-
173
-
174
-
175
-
176
-
177
-
178
-
179
-
180
-
181
-
182
-
183
-
184
-
185
-
186
-
187
-
188
-
189
-
190
-
191
-
192
-
193
-
194
-
195
-
196
-
197
-
198
-
199
-
200
-
201
-
202
-
203
-
204
-
205
-
206
-
207
-
208
-
209
-
210
-
211
-
212
-
213
-
214
-
215
-
216
-
217
-
218
-
219
-
220
-
221
-
222
-
223
-
224
-
225
-
226
-
227
-
228
-
229
-
230
-
231
-
232
-
233
-
234
-
235
-
236
-
237
-
238
-
239
-
240
-
241
-
242
-
243
-
244
-
245
-
246
-
247
-
248
-
249
-
250
-
251
-
252
-
253
-
254
-
255
-
256
-
257
-
258
-
259
-
260
-
261
-
262
-
263
-
264
-
265
-
266
-
267
-
268
-
269
-
270
-
271
-
272
-
273
-
274
-
275
-
276
-
277
-
278
-
279
-
280
-
281
-
282
-
283
-
284
-
285
-
286
-
287
-
288
-
289
-
290
-
291
-
292
-
293
-
294
-
295
-
296
-
297
-
298
-
299
-
300
-
301
-
302
-
303
-
304
-
305
-
306
-
307
-
308
-
309
-
310
-
311
-
312
-
313
-
314
-
315
-
316
-
317
-
318
-
319
-
320
-
321
-
322
-
323
-
324
-
325
-
326
-
327
-
328
-
329
-
330
-
331
-
332
-
333
-
334
-
335
-
336
-
337
-
338
-
339
-
340
-
341
-
342
-
343
-
344
-
345
-
346
-
347
-
348
-
349
-
350
-
351
-
352
-
353
-
354
-
355
-
356
-
357
-
358
-
359
-
360
-
361
-
362
-
363
-
364
-
365
-
366
-
367
-
368
-
369
-
370
-
371
-
372
-
373
-
374
-
375
-
376
-
377
-
378
-
379
-
380
-
381
-
382
-
383
-
384
-
385
-
386
-
387
-
388
 |
 |