HP 6100 HP StorageWorks Fibre Channel Disk Drive Replacement Instructions (569 - Page 2
Checking system redundancy, Verifying component failure - windows 7
 |
View all HP 6100 manuals
Add to My Manuals
Save this manual to your list of manuals |
Page 2 highlights
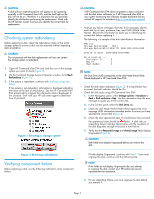
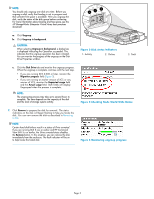
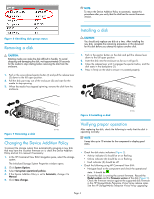
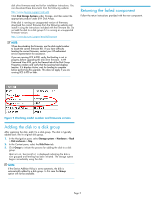
CAUTION: A disk with an impending failure will appear to be operating normally in HP Command View EVA, and the fault light on the disk will not be on. Therefore, it is important that you positively identify the disk before performing the replacement. Work with the HP Solution Center to ensure you identify the correct disk for replacement. Checking system redundancy Before replacing a disk, check the redundancy status of the entire storage system to ensure a disk can be removed without impacting data availability. CAUTION: Do not proceed with the disk replacement until you are certain the storage system is redundant. 1. Open HP Command View EVA and click the icon of the storage system you want to check (Figure 1). 2. On the Initialized Storage System Properties window, click Check Redundancy (Figure 2). 3. If the system is redundant, continue with Verifying component failure. If the system is not redundant, information is displayed indicating the cause of the lack of redundancy. See the HP Command View EVA online help to interpret the information that is displayed. In this situation, work with your HP call center agent to determine how to proceed. Figure 1 Selecting a storage system CAUTION: If HP Command View EVA does not present a status consistent with the disk status indicators, or if HP Command View EVA or your system monitoring tool indicates multiple hardware failures, contact HP support for assistance (http://www.hp.com/support). • Analyze any failure messages received. Error messages identify each disk by its rack, enclosure, bay, and UUID (World Wide Name). Record this information to assist you in identifying the correct disk before replacing it. The following is a sample of the disk identification information: FRU List: Storage System Name: EVA_1 Storage System World Wide ID: 5000-1FE1-0015-42A0 Disk Drive UUID: 2000-0000-871D-FE60 Drive Location --- Enclosure ID: 8 Bay ID: 1 Rack Number: 0 NOTE: The Disk Drive UUID corresponds to the disk Node World Wide Name displayed in HP Command View EVA. • Check the disk status indicators (Figure 3). If a hard failure has occurred, the fault indicator should be On. • Check the disk status using HP Command View EVA: 1. In the Navigation pane, select Storage system > Hardware > Rack > Disk enclosure > Bay. Use the information from the error message to guide you to the correct disk. 2. In the Content pane, select the Disk Drive tab. 3. Check the disk Node World Wide Name against the error message UUID information recorded earlier to ensure you have selected the correct disk (Figure 4). 4. Check the disk operational state. If a hard failure has occurred, the operational state should be Failed. A disk with an impending failure indicates Good status until the condition of the disk degrades enough to become a hard failure. 5. Verify that the Requested usage and Actual usage fields display Ungrouped (Figure 6). CAUTION: Both fields must display Ungrouped before you remove the disk. Figure 2 Checking redundancy Verifying component failure Before replacing a disk, use the following methods to verify component failure: If fields display Ungrouped, continue with Step 7. If you must ungroup the disk, continue with the following step. NOTE: If the fields do not display Ungrouped after you attempt to ungroup the disk, contact your HP-authorized service representative for assistance. 6. For an impending failure, you must ungroup the disk before you remove it: Page 2
-
 1
1 -
 2
2 -
 3
3 -
 4
4 -
 5
5
 |
 |
