HP 722c (English) Setup Guide - C5870-90005 - Page 6
Insert the Print, Cartridges - printer
 |
View all HP 722c manuals
Add to My Manuals
Save this manual to your list of manuals |
Page 6 highlights
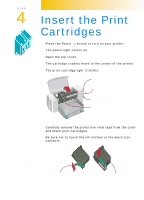
STEP 4 Insert the Print Cartridges 1 Press the Power button to turn on your printer. The power light comes on. 2 Open the top cover. The cartridge cradles move to the center of the printer. The print cartridge light blinks. Power button and light (on) Resume button and light (off) Print cartridge light (blinking) Cartridge cradles It is a good idea to keep spare ink cartridges on hand. When buying ink cartridges check part numbers carefully to make sure you buy the right ones. Black 51645A Color C1823A These print cartridges have been specifically designed to work with your printer. 3 Carefully remove the protective vinyl tape from the color and black print cartridges. Be sure not to touch the ink nozzles or the electrical contacts. Black ink cartridge Color ink cartridge Remove tape Remove tape
-
 1
1 -
 2
2 -
 3
3 -
 4
4 -
 5
5 -
 6
6 -
 7
7 -
 8
8 -
 9
9 -
 10
10 -
 11
11 -
 12
12 -
13
-
14
-
15
-
16
 |
 |
