HP 7650 User's Manual - Page 15
How to scan slides and negatives, Tips for scanning transparent items, Plug in the transparent - scanjet
 |
UPC - 829160621579
View all HP 7650 manuals
Add to My Manuals
Save this manual to your list of manuals |
Page 15 highlights
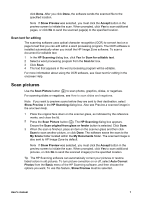
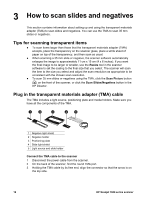
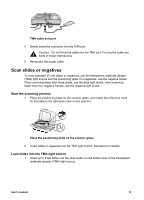
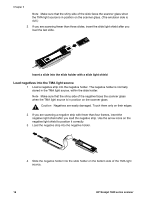
3 How to scan slides and negatives This section contains information about setting up and using the transparent materials adapter (TMA) to scan slides and negatives. You can use the TMA to scan 35 mm slides or negatives. Tips for scanning transparent items ● To scan items larger than those that the transparent materials adapter (TMA) accepts, place the transparency on the scanner glass, place a white sheet of paper on top of the transparency, and then scan as usual. ● When scanning a 35 mm slide or negative, the scanner software automatically enlarges the image to approximately 11 cm x 15 cm (4 x 6 inches). If you want the final image to be larger or smaller, use the Resize tool in the scanner software to set the scaling to the final size that you select. The scanner will scan the item to the size you select and adjust the scan resolution as appropriate to be consistent with the chosen scan resolution. ● To scan 35 mm slides or negatives using the TMA, click the Scan Picture button ( ) on the front of the scanner, or click the Scan Slides/Negatives button in the HP Director. Plug in the transparent materials adapter (TMA) cable The TMA includes a light source, positioning plate and media holders. Make sure you have all the components of the TMA. 1 Negative light shield 2 Negative holder 3 Positioning plate 4 Slide light shield 5 Light source and slide holder Connect the TMA cable to the scanner 1 Disconnect the power cable from the scanner. 2 On the back of the scanner, find the round TMA port. 3 Holding the TMA cable by its free end, align the connector so that the arrow is on the top side. 12 HP Scanjet 7600 series scanner
-
 1
1 -
2
-
3
-
4
-
5
-
6
-
7
-
8
-
9
-
 10
10 -
 11
11 -
 12
12 -
 13
13 -
 14
14 -
 15
15 -
 16
16 -
 17
17 -
 18
18 -
 19
19 -
 20
20 -
21
-
22
-
23
-
24
-
25
-
26
-
27
-
28
-
29
-
30
-
31
-
32
-
33
 |
 |
