HP 7650 User's Manual - Page 18
Complete the scanning process, Scan Slides/Negatives - scanner software
 |
UPC - 829160621579
View all HP 7650 manuals
Add to My Manuals
Save this manual to your list of manuals |
Page 18 highlights
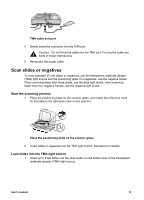
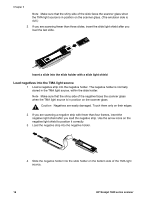
Complete the scanning process 1 Place the transparent materials adapter (TMA) light source into the positioning plate with the slides or negatives facing down. The TMA cable should fit in the groove that is on the same end of the positioning plate as the reference marks. Place the TMA light source on the positioning plate 2 Press the Scan Picture button ( ) on the front of the scanner. 3 In the HP Scanning dialog box, select Scan slides using transparent materials adapter or Scan negatives using transparent materials adapter. Click Scan. 4 When you are finished scanning, click Scan to scan another slide or negative, or click Done. If you want more control of the final selection area of the image for scanning, select Show Preview in the HP Scanning dialog box, or use the Scan Slides/Negatives button in HP Director. In the Preview dialog box, you can select the area of the slide or negative that you want to scan. Click and hold a selection handle and adjust the area to frame the final scan area of the image. You must then click the Accept button in the preview screen to initiate the scan. The software sends the image to HP Image Zone. Final scan area Note For information about rotating the image, adjusting color or size, or making other changes to the image, see "Edit an image in the preview" section of the onscreen Help. User's manual 15
-
 1
1 -
2
-
3
-
4
-
5
-
6
-
7
-
8
-
9
-
10
-
11
-
12
-
 13
13 -
 14
14 -
 15
15 -
 16
16 -
 17
17 -
 18
18 -
 19
19 -
 20
20 -
 21
21 -
 22
22 -
 23
23 -
24
-
25
-
26
-
27
-
28
-
29
-
30
-
31
-
32
-
33
 |
 |
