HP 8/80 Brocade EZSwitchSetup Administrator's Guide v6.2.0 (53-1001193-02, Apr - Page 23
Set Switch IP Address screen, are setting up the switch for the first time
 |
View all HP 8/80 manuals
Add to My Manuals
Save this manual to your list of manuals |
Page 23 highlights
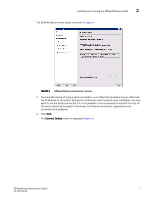
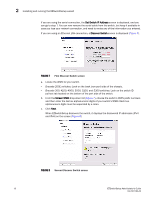
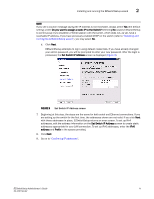
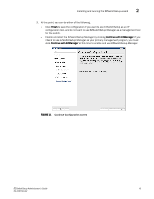
Installing and running the EZSwitchSetup wizard 2 NOTE If you see a caution message saying the IP address is not reachable, always select Yes (the default setting) under Do you want to assign a static IP to the Switch? Selecting No causes EZSwitchSetup to continuously try to establish a Telnet session with the switch, which does not, as yet, have a reachable IP address. If you have previously enabled DHCP on the switch (refer to "Installing and running the EZSwitchSetup wizard"), you may select No. d. Click Next. EZSwitchSetup attempts to log in using default credentials. If you have already changed your admin password, you will be prompted to enter your new password. After the login is processed, the Set Switch IP Address screen is displayed (Figure 9). FIGURE 9 Set Switch IP Address screen 7. Beginning at this step, the steps are the same for both serial and Ethernet connections. If you are setting up the switch for the first time, the addresses shown are not valid. If you click Next with these addresses in place, EZSwitchSetup returns an error screen. To set up IPv4 addresses, edit the address information on the Set Switch IP Address screen to create static addresses appropriate for your LAN connection. To set up IPv6 addresses, enter the IPv6 address and Prefix in the spaces provided. 8. Click Next. 9. Go on to "Confirming IP addresses". EZSwitchSetup Administrator's Guide 11 53-1001193-02
-
 1
1 -
2
-
3
-
4
-
5
-
6
-
7
-
8
-
9
-
10
-
11
-
12
-
13
-
14
-
15
-
16
-
17
-
 18
18 -
 19
19 -
 20
20 -
 21
21 -
 22
22 -
 23
23 -
 24
24 -
 25
25 -
 26
26 -
 27
27 -
 28
28 -
29
-
30
-
31
-
32
-
33
-
34
-
35
-
36
-
37
-
38
-
39
-
40
-
41
-
42
-
43
-
44
-
45
-
46
-
47
-
48
-
49
-
50
-
51
-
52
-
53
-
54
-
55
-
56
-
57
-
58
-
59
-
60
-
61
-
62
-
63
-
64
 |
 |
