HP 8750 Quick Start - Page 8
Ethernet software installation Windows, Instalación del software con Ethernet Windows, Installation - photosmart professional
 |
UPC - 829160741741
View all HP 8750 manuals
Add to My Manuals
Save this manual to your list of manuals |
Page 8 highlights
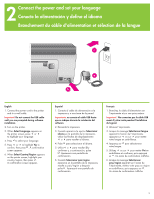
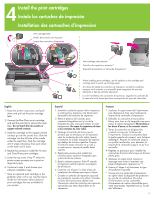
5Windows Ethernet software installation (Windows) Instalación del software con Ethernet (Windows) Installation logicielle Ethernet (Windows) Windows only English Windows® 98, Me, 2000 Professional, XP Home, XP Professional For Windows USB installation, see page 11. Note: Keep the Networking appendix of the User's Guide nearby to use as a reference during installation. You need the following to connect the printer to the network: • A CAT-5 Ethernet cable equipped with an RJ-45 plug. (This is not the same as a USB cable or a regular phone wire, the use of which can damage the printer or other network devices.) • A network access point such as a hub, router, or switch with an open port. Connect the network cable 1. Connect one end of the Ethernet cable to the back of the printer. 2. Connect the other end of the Ethernet cable to an empty port on the hub, router, or switch. Do not connect the printer directly to a computer using an Ethernet cable. Peer-topeer networking is not supported. Print a network configuration page Follow the instructions in the Networking appendix of the User's Guide to print a network configuration page. You may need the information on that page during software installation. Install the printer software You must install the software on every computer that will print to the HP Photosmart printer. 1. Insert the HP Photosmart software CD into the computer and follow the onscreen instructions. 2. On the Connection Type screen, select Through the network, then click Next. The Searching screen appears. 3. Select a printer to install: If the Printer Found screen appears, select Yes, install this printer and click Next. If the Printer Not Found screen appears, click Next and follow the onscreen instructions to locate the printer. If the Check Cable Connection screen appears, refer to the Networking appendix of the User's Guide for detailed network installation instructions and for instructions on assigning a static IP address. 4. When prompted, click Finish to exit the installation. Sólo Windows Español Windows® 98, Me, 2000 Professional, XP Home, XP Professional Para obtener información sobre la instalación en Windows con USB, consulte la página 11. Nota: tenga a mano el apéndice Conexión a red de la Guía del usuario para utilizarlo como referencia durante la instalación. Deberá disponer de los siguientes elementos para conectar la impresora a la red: • Un cable Ethernet CAT-5 equipado con un conector RJ-45. (No se trata de un cable USB ni de un cable de línea telefónica normal, cuyo uso podría dañar la impresora o los dispositivos en red.) • Un punto de acceso a red, como un enrutador, concentrador o conmutador con un puerto abierto. Conecte el cable de red 1. Conecte un extremo del cable Ethernet a la parte posterior de la impresora. 2. Conecte el otro extremo del cable Ethernet a un puerto vacío del concentrador, enrutador o conmutador. No conecte la impresora directamente a un equipo con un cable Ethernet. La instalación de redes de igual a igual no está admitida. (continúa en la página 9) 8
-
 1
1 -
2
-
 3
3 -
 4
4 -
 5
5 -
 6
6 -
 7
7 -
 8
8 -
 9
9 -
 10
10 -
 11
11 -
 12
12 -
 13
13 -
14
-
15
-
16
 |
 |
