HP 9040 HP MFP Digital Sending Software v. 4 - User Guide - Page 10
Steps for sending, Using the Digital Sending Software
 |
UPC - 829160792927
View all HP 9040 manuals
Add to My Manuals
Save this manual to your list of manuals |
Page 10 highlights
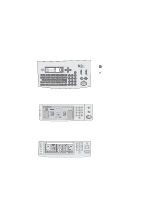
Steps for sending Note Using the Digital Sending Software 1 Place the document on the glass or in the ADF. 2 Select the type of destination: E-mail Fax Folder Secondary e-mail Workflow The secondary e-mail name on the conrol panel can be changed by the Administrator. 3 If prompted, type your user name and password. For more information, see: „ "Authentication" on page 6. 4 Type the information that is needed for sending to the specific file destination. E-mail Fax Folder Secondary e-mail Workflow Complete the From:, To:, CC:, BCC:, Subject:, and Message: fields. Your user name or e-mail address might appear in the From: field. If so, you will not be able to change it. Complete the Fax Numbers: field. Select a folder destination from the list, or type a folder path if you are an authenticated user. Complete the From:, To:, CC:, BCC:, Subject:, and Message: fields. Your user name or e-mail address might appear in the From: field. If so, you cannot change it. Select a workflow destination. Type the requested information for the document. 5 Optional. Use Settings to change the default settings for the scanned document that you are creating (for example, change the type of file format that you want). For more information, see: „ "Scan settings" on page 8. 6 Optional. Use Describe Original to change the default settings (for example, document size) for the document that you are sending. If you are sending a double-sided document, you must describe the original as a two-sided document. For more information, see: „ "Describe original settings" on page 7. 7 Press START to begin sending. 8 When you are finished, remove the document from the glass or ADF. 4 Steps for sending ENWW
-
 1
1 -
2
-
3
-
4
-
 5
5 -
 6
6 -
 7
7 -
 8
8 -
 9
9 -
 10
10 -
 11
11 -
 12
12 -
 13
13 -
 14
14 -
 15
15 -
16
-
17
-
18
 |
 |