HP A3550A Battery Backup Unit Installation Guide (10 and 30 Slot Disk Arrays) - Page 2
PA3661-96003 - manual
 |
View all HP A3550A manuals
Add to My Manuals
Save this manual to your list of manuals |
Page 2 highlights
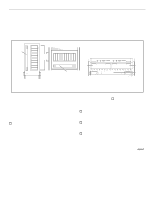
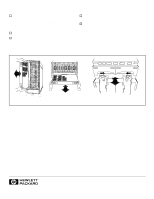
Step 3: Install the BBU o Locate the slot where the BBU is to be installed (Figure 1) and remove the failed BBU or the BBU filler panel if present (Figure 2). To remove the BBU, slide the black latches toward the center of the unit and extract the BBU. o Install the BBU as shown in Figure 2. o Push the BBU into the disk array chassis until the latches on the BBU lock and audible clicks are heard. When the latches are locked, the BBU cannot be pulled out again without using the latches. o If installing a BBU in a 10-slot disk array, install the front bezel on the ballstuds. o If installing a BBU in a 30-slot disk array, close the fan pack by carefully swinging the fan pack up and firmly pressing it onto the latch until an audible click is heard. When the fan pack is properly latched, it cannot be opened without using the release button. For more information on BBU installation procedures and recharge times, see the disk array user guide. deskside 10-slot disk array rackmount 10-slot disk array Figure 2. 30-slot disk array, rackmount only (fan pack not shown for clarity) Manual Part Number A3661-90003 E0897 Copyright © 1997 Hewlett-Packard Company *PA3661-96003* A3661-96003
-
 1
1 -
 2
2
 |
 |
