HP BL10e Setting up a Linux PXE server and integrating clients - Page 5
Static, Dynamic, Optional step, Edit the /etc/sysconfig/network as follows
 |
UPC - 808736933599
View all HP BL10e manuals
Add to My Manuals
Save this manual to your list of manuals |
Page 5 highlights
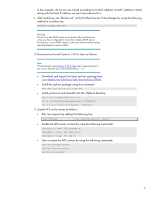
• Edit the /etc/sysconfig/network as follows: Static: NETWORKING=yes HOSTNAME="pxe1.pxe.net" Dynamic: NETWORKING=yes HOSTNAME="pxe1.pxe.net" DHCP_HOSTNAME="pxe1.pxe.net" 5. Set up the DHCP service. • A sample /etc/dhcpd.conf configuration file is located at /usr/share/doc/dhcp3.0pl1/dhcpd.conf.sample. Copy this sample to /etc/dhcpd.conf. • If more than one network card resides in the DHCP server, HP recommends specifying which interfaces the DHCP server will use. Edit /etc/sysconfig/dhcpd by adding the appropriate interface to the DHCPDARGS= line. The entry in /etc/sysconfig/dhcpd should appear as follows: DHCPDARGS=eth0 • Run the following command to ensure that the DHCP service will be started at each boot: chkconfig --level 345 dhcpd on 6. Configure xinetd and TFTP services. At this point, the TFTP server should be installed. • Enable the TFTP server by using the chkconfig command line utility as follows: chkconfig tftp on • Ensure that xinetd is enabled, as TFTP is started and stopped by xinetd, using the following command: chkconfig --level 345 xinetd on • Notify xinetd that the TFTP service has been enabled. Use the following command: service xinetd restart 7. Add the next-server and filename options into the /etc/dhcpd.conf files. To accomplish this task, add the following to the global section: if substring (option vendor-class-identifier, 0, 9) = "PXEClient" { filename "pxelinux.0"; next-server 172.48.0.1; } 8. Optional step: Assign fixed addresses to each of the clients. The benefit is having the ability to access the clients with the same IP address. The alternative s to use name resolution such as DNS: host 00080246e75d { hardware ethernet 00:08:02:46:e7:5d; fixed-address 172.48.1.253; } 5
-
 1
1 -
 2
2 -
 3
3 -
 4
4 -
 5
5 -
 6
6 -
 7
7 -
 8
8 -
 9
9 -
 10
10 -
 11
11 -
12
-
13
-
14
-
15
-
16
-
17
-
18
-
19
-
20
-
21
 |
 |
