HP Brocade 8/12c Web Tools Administrator's Guide (53-1001772-01, June - Page 161
Renaming zone configurations, Zone Administration, Zone Config, Rename, Rename a Config
 |
View all HP Brocade 8/12c manuals
Add to My Manuals
Save this manual to your list of manuals |
Page 161 highlights
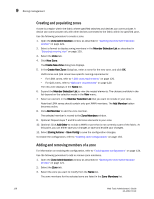
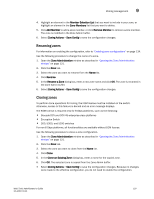
DRAFT: BROCADE CONFIDENTIAL Zone configuration and zoning database management 9 Renaming zone configurations The new name cannot exceed 64 characters and can contain alphabetic, numeric, and underscore characters. Use the following procedure to change the name of a zone configuration. NOTE You cannot rename the currently enabled configuration. Use the following procedure to rename the zone configuration. 1. Open the Zone Administration window as described in "Opening the Zone Administration window" on page 121. 2. Select the Zone Config tab. 3. Select the configuration you want to rename from the Name list and click Rename. 4. In the Rename a Config dialog box, enter a new configuration name and click OK. The configuration is renamed in the configuration database. 5. Select Zoning Actions > Save Config to save the configuration changes. Cloning zone configurations You must use Web Tools with the EGM license to perform cloning operations for zone configurations; otherwise, access to this feature is denied and an error message displays. Use the following procedure to clone a zone configuration. 1. Open the Zone Administration window as described in "Opening the Zone Administration window" on page 121. 2. Select the Zone Config tab. 3. Select the zone configuration you want to clone from the Name list. 4. Click Clone. 5. In the Copy An Existing Zone Config dialog box, enter a name for the copied zone and click OK. The selected zone is copied from the Zone Admin buffer. 6. Select Zoning Actions > Save Config to save the configuration changes. No changes were made to the effective configuration. You do not need to enable the configuration. Deleting zone configurations Use the following procedure to delete a zone configuration. NOTE You cannot delete a enabled configuration. 1. Open the Zone Administration window as described in "Opening the Zone Administration window" on page 121. 2. Select the Zone Config tab. Web Tools Administrator's Guide 133 53-1001772-01
-
 1
1 -
2
-
3
-
4
-
5
-
6
-
7
-
8
-
9
-
10
-
11
-
12
-
13
-
14
-
15
-
16
-
17
-
18
-
19
-
20
-
21
-
22
-
23
-
24
-
25
-
26
-
27
-
28
-
29
-
30
-
31
-
32
-
33
-
34
-
35
-
36
-
37
-
38
-
39
-
40
-
41
-
42
-
43
-
44
-
45
-
46
-
47
-
48
-
49
-
50
-
51
-
52
-
53
-
54
-
55
-
56
-
57
-
58
-
59
-
60
-
61
-
62
-
63
-
64
-
65
-
66
-
67
-
68
-
69
-
70
-
71
-
72
-
73
-
74
-
75
-
76
-
77
-
78
-
79
-
80
-
81
-
82
-
83
-
84
-
85
-
86
-
87
-
88
-
89
-
90
-
91
-
92
-
93
-
94
-
95
-
96
-
97
-
98
-
99
-
100
-
101
-
102
-
103
-
104
-
105
-
106
-
107
-
108
-
109
-
110
-
111
-
112
-
113
-
114
-
115
-
116
-
117
-
118
-
119
-
120
-
121
-
122
-
123
-
124
-
125
-
126
-
127
-
128
-
129
-
130
-
131
-
132
-
133
-
134
-
135
-
136
-
137
-
138
-
139
-
140
-
141
-
142
-
143
-
144
-
145
-
146
-
147
-
148
-
149
-
150
-
151
-
152
-
153
-
154
-
155
-
 156
156 -
 157
157 -
 158
158 -
 159
159 -
 160
160 -
 161
161 -
 162
162 -
 163
163 -
 164
164 -
 165
165 -
 166
166 -
167
-
168
-
169
-
170
-
171
-
172
-
173
-
174
-
175
-
176
-
177
-
178
-
179
-
180
-
181
-
182
-
183
-
184
-
185
-
186
-
187
-
188
-
189
-
190
-
191
-
192
-
193
-
194
-
195
-
196
-
197
-
198
-
199
-
200
-
201
-
202
-
203
-
204
-
205
-
206
-
207
-
208
-
209
-
210
-
211
-
212
-
213
-
214
-
215
-
216
-
217
-
218
-
219
-
220
-
221
-
222
-
223
-
224
-
225
-
226
-
227
-
228
-
229
-
230
-
231
-
232
-
233
-
234
-
235
-
236
-
237
-
238
-
239
-
240
-
241
-
242
-
243
-
244
-
245
-
246
-
247
-
248
-
249
-
250
-
251
-
252
-
253
-
254
-
255
-
256
-
257
-
258
-
259
-
260
-
261
-
262
-
263
-
264
-
265
-
266
-
267
-
268
-
269
-
270
-
271
-
272
-
273
-
274
-
275
-
276
-
277
-
278
-
279
-
280
-
281
-
282
-
283
-
284
-
285
-
286
-
287
-
288
-
289
-
290
-
291
-
292
-
293
-
294
-
295
-
296
-
297
-
298
-
299
-
300
-
301
-
302
-
303
-
304
-
305
-
306
-
307
-
308
-
309
-
310
 |
 |