HP Brocade BladeSystem 4/24 Brocade EZSwitchSetup Administrator's Guide v6.2.0 - Page 22
Set Switch IP Address, Discover Switch, Screen WWN
 |
View all HP Brocade BladeSystem 4/24 manuals
Add to My Manuals
Save this manual to your list of manuals |
Page 22 highlights
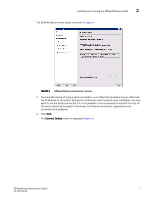
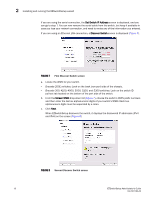
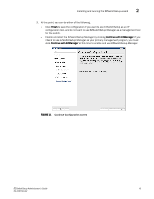
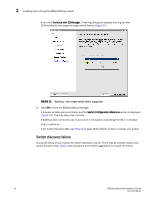
2 Installing and running the EZSwitchSetup wizard If you are using the serial connection, the Set Switch IP Address screen is displayed, and you can go to step 7. You can now remove the serial cable from the switch, but keep it available in case you lose your network connection, and need to revise any of the information you entered. If you are using an Ethernet LAN connection, a Discover Switch screen is displayed (Figure 7). FIGURE 7 First Discover Switch screen a. Locate the WWN for your switch. - Brocade 200E switches: Look on the back (non-port) side of the chassis. - Brocade 300, 4100, 4900, 5000, 5100, and 5300 switches: Look on the switch ID pull-out tab located on the bottom of the port side of the switch. b. From the Screen WWN drop-down list (Figure 7), choose the switch's WWN prefix numbers and then enter the last six alphanumeric digits of your switch's WWN. Each two alphanumeric digits must be separated by a colon. c. Click Next. When EZSwitchSetup discovers the switch, it displays the discovered IP addresses (IPv4 and IPv6) on the screen (Figure 8). FIGURE 8 Second Discover Switch screen 10 EZSwitchSetup Administrator's Guide 53-1001193-02
-
 1
1 -
2
-
3
-
4
-
5
-
6
-
7
-
8
-
9
-
10
-
11
-
12
-
13
-
14
-
15
-
16
-
 17
17 -
 18
18 -
 19
19 -
 20
20 -
 21
21 -
 22
22 -
 23
23 -
 24
24 -
 25
25 -
 26
26 -
 27
27 -
28
-
29
-
30
-
31
-
32
-
33
-
34
-
35
-
36
-
37
-
38
-
39
-
40
-
41
-
42
-
43
-
44
-
45
-
46
-
47
-
48
-
49
-
50
-
51
-
52
-
53
-
54
-
55
-
56
-
57
-
58
-
59
-
60
-
61
-
62
-
63
-
64
 |
 |
