HP C5580 Setup Guide
HP C5580 - Photosmart All-in-One Color Inkjet Manual
 |
UPC - 883585914500
View all HP C5580 manuals
Add to My Manuals
Save this manual to your list of manuals |
HP C5580 manual content summary:
- HP C5580 | Setup Guide - Page 1
WARNING: To ensure that the software is installed correctly, do not connect the USB cable until prompted. ES ATENCIÓN: Para asegurarse de que el software se ha instalado correctamente, no re à bien voir ce qui y est affiché. HP Photosmart C5500 All-in-One series/HP Photosmart C5500 Tout-en-un série - HP C5580 | Setup Guide - Page 2
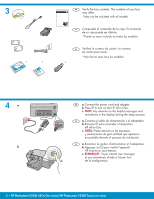
the HP All-in-One. c. NOTE: Pay attention to the helpful messages and animations in the display during the setup HP Tout-en-un sous tension. c. REMARQUE : Soyez attentif aux messages et aux animations d'aide à l'écran lors de la configuration. 2 • HP Photosmart C5500 All-in-One series/HP Photosmart - HP C5580 | Setup Guide - Page 3
set the language and country/region, use the arrows to select your language from the list of up to 4 languages, press OK to confirm. Select your country/region, press OK to confirm. • When a prompt appears asking to install print cartridges, go to the next step in this guide. FR Procédez comme suit - HP C5580 | Setup Guide - Page 4
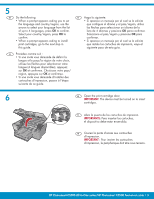
cartouches. EN a. Hold the cartridges with the HP logo on top. b. Insert the tri-color cartridge in the left cartridge slot and the black cartridge in the right cartridge slot. c. Make sure you push the cartridges in firmly until they snap into place. d. Close the print cartridge door and press OK - HP C5580 | Setup Guide - Page 5
de salida. FR a. Soulevez le bac de sortie. b. Faites glisser le guide de largeur vers la gauche. c. Chargez du papier blanc ordinaire dans le bac d'alimentation principal et appuyez sur OK. d. Abaissez le bac de sortie. HP Photosmart C5500 All-in-One series/HP Photosmart C5500 Tout-en-un série • 5 - HP C5580 | Setup Guide - Page 6
b. Una vez impresa esta página, presione b. Appuyez sur OK une fois la page el botón OK. d'alignement imprimée. Cuando la página está impresa, el proceso L'alignement est alors terminé. de alineación ha finalizado. 6 • HP Photosmart C5500 All-in-One series/HP Photosmart C5500 Tout-en-un série - HP C5580 | Setup Guide - Page 7
-en-un, puis sur n'importe quel port USB de l'ordinateur. b. Suivez les instructions affichées à l'écran pour installer le logiciel. Allez à la page 9 pour découvrir les fonctionnalités de votre appareil HP Tout-en-un. HP Photosmart C5500 All-in-One series/HP Photosmart C5500 Tout-en-un série • 7 - HP C5580 | Setup Guide - Page 8
CD. b. Double-click the HP Photosmart CD icon on the desktop. c. Double-click the HP Installer icon. Follow the onscreen instructions. d. Complete the Setup Assistant screen. Go to page 9 to explore your HP All-in-One. ES a. Introduzca el CD. b. Haga doble clic en el icono del CD de HP Photosmart - HP C5580 | Setup Guide - Page 9
en su equipo, pruebe algunas de las funciones del dispositivo HP All-in-One. FR Une fois le logiciel HP Photosmart installé sur votre ordinateur, vous pouvez tester une fonctionnalité du périphérique HP Tout-en-un. EN Print a 4 x 6 inch photo ES Imprima una foto de 4 x 6 pulgadas FR Impression - HP C5580 | Setup Guide - Page 10
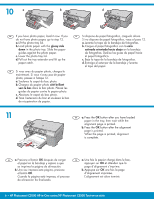
photo. c. Press the up arrow button to increase the number of photos. d. Press OK to preview the selected photo. e. Press PRINT PHOTOS to print the photo. ES a. Cuando aparece . 8.5 x 11 paper Next Settings Print 10 • HP Photosmart C5500 All-in-One series/HP Photosmart C5500 Tout-en-un série - HP C5580 | Setup Guide - Page 11
inscriptible, reportez-vous au Guide d'utilisation. EN Troubleshooting ES Solución de problemas FR Dépannage www.hp.com/support EN Problem: (Windows) The Microsoft Add Hardware screen appears. Action: Cancel all screens. Unplug the USB cable, and then insert the HP All-in-One CD. Refer to Step 12 - HP C5580 | Setup Guide - Page 12
pas. Action : Cliquez sur Annuler sur tous les écrans affichés. Retirez le CD-ROM HP Tout-en-un, puis introduisez-le de nouveau. Reportez-vous à l'étape 12. EN Problem: (Windows only) The Device Setup Has Failed To Complete screen appears. Action: Unplug the device and plug it in again. Check all
-
 1
1 -
 2
2 -
 3
3 -
 4
4 -
 5
5 -
 6
6 -
 7
7 -
8
-
9
-
10
-
11
-
12
 |
 |
HP Photosmart C5500 All-in-One series/HP Photosmart C5500 Tout-en-un série
2
1
AVERTISSEMENT :
Pour garantir une installation correcte
du logiciel, ne connectez pas le câble USB avant que
cela ne vous le soit demandé.
Retirez le ruban adhésif, les languettes et le
fi
lm
de protection du couvercle, ainsi que de l’avant
et de l’arrière du périphérique. Retirez le
fi
lm
de protection de l’écran.
Positionnez l’écran de manière à bien voir ce qui
y est af
fi
ché.
a.
b.
Commencez ici
Comience aquí
ATENCIÓN:
Para asegurarse de que el software se
ha instalado correctamente, no conecte el cable USB
hasta que se le indique.
Retire las cintas, las lengüetas y la película
protectora que se encuentran en la tapa y
en la parte anterior y posterior del dispositivo.
Retire la película protectora de la pantalla.
Ajuste el ángulo de la pantalla en una posición
adecuada para la visualización.
a.
b.
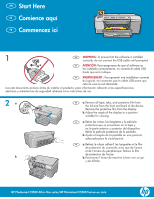
Start Here
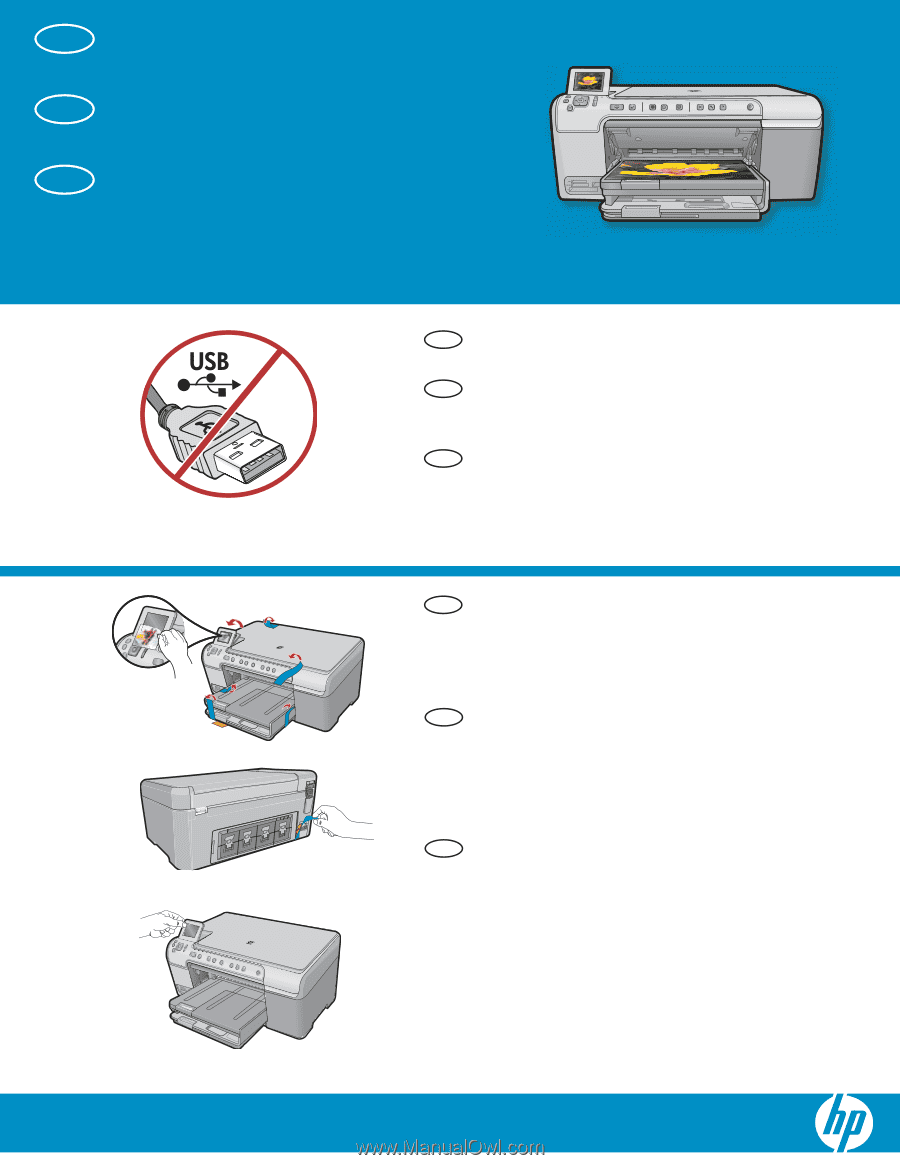
Remove all tape, tabs, and protective
fi
lm from
the lid and from the front and back of the device.
Remove the protective
fi
lm from the display.
Adjust the angle of the display to a position
suitable for viewing.
a.
b.
WARNING:
To ensure that the software is installed
correctly, do not connect the USB cable until prompted.
a
b
FR
FR
FR
EN
EN
EN
ES
ES
ES
Lea este documento primero antes de instalar el producto, para información referente a las especi
fi
caciones
eléctricas y advertencias de seguridad re
fi
érase a los instructivos de uso.