HP CC378A HP Color LaserJet CP1510 Series - User Guide - Page 100
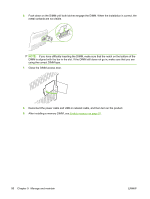
Close the DIMM access door., Reconnect the power cable and USB or network cable
 |
View all HP CC378A manuals
Add to My Manuals
Save this manual to your list of manuals |
Page 100 highlights
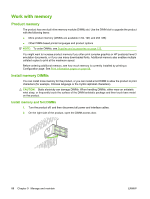
6. Push down on the DIMM until both latches engage the DIMM. When the installation is correct, the metal contacts are not visible. NOTE: If you have difficulty inserting the DIMM, make sure that the notch on the bottom of the DIMM is aligned with the bar in the slot. If the DIMM still does not go in, make sure that you are using the correct DIMM type. 7. Close the DIMM access door. 8. Reconnect the power cable and USB or network cable, and then turn on the product. 9. After installing a memory DIMM, see Enable memory on page 91. 90 Chapter 9 Manage and maintain ENWW
-
 1
1 -
2
-
3
-
4
-
5
-
6
-
7
-
8
-
9
-
10
-
11
-
12
-
13
-
14
-
15
-
16
-
17
-
18
-
19
-
20
-
21
-
22
-
23
-
24
-
25
-
26
-
27
-
28
-
29
-
30
-
31
-
32
-
33
-
34
-
35
-
36
-
37
-
38
-
39
-
40
-
41
-
42
-
43
-
44
-
45
-
46
-
47
-
48
-
49
-
50
-
51
-
52
-
53
-
54
-
55
-
56
-
57
-
58
-
59
-
60
-
61
-
62
-
63
-
64
-
65
-
66
-
67
-
68
-
69
-
70
-
71
-
72
-
73
-
74
-
75
-
76
-
77
-
78
-
79
-
80
-
81
-
82
-
83
-
84
-
85
-
86
-
87
-
88
-
89
-
90
-
91
-
92
-
93
-
94
-
 95
95 -
 96
96 -
 97
97 -
 98
98 -
 99
99 -
 100
100 -
 101
101 -
 102
102 -
 103
103 -
 104
104 -
 105
105 -
106
-
107
-
108
-
109
-
110
-
111
-
112
-
113
-
114
-
115
-
116
-
117
-
118
-
119
-
120
-
121
-
122
-
123
-
124
-
125
-
126
-
127
-
128
-
129
-
130
-
131
-
132
-
133
-
134
-
135
-
136
-
137
-
138
-
139
-
140
-
141
-
142
-
143
-
144
-
145
-
146
-
147
-
148
-
149
-
150
-
151
-
152
-
153
-
154
-
155
-
156
-
157
-
158
-
159
-
160
-
161
-
162
-
163
-
164
-
165
-
166
-
167
-
168
 |
 |

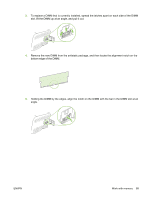
6.
Push down on the DIMM until both latches engage the DIMM. When the installation is correct, the
metal contacts are not visible.
NOTE:
If you have difficulty inserting the DIMM, make sure that the notch on the bottom of the
DIMM is aligned with the bar in the slot. If the DIMM still does not go in, make sure that you are
using the correct DIMM type.
7.
Close the DIMM access door.
8.
Reconnect the power cable and USB or network cable, and then turn on the product.
9.
After installing a memory DIMM, see
Enable memory
on page
91
.
90
Chapter 9
Manage and maintain
ENWW