HP Cisco MDS 9134 Cisco Nexus 5000 Series Hardware Installation Guide (OL-1590 - Page 73
Connecting to the Ethernet Connector Port
 |
View all HP Cisco MDS 9134 manuals
Add to My Manuals
Save this manual to your list of manuals |
Page 73 highlights
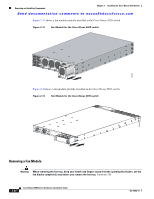
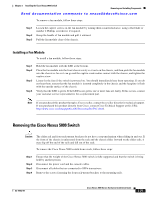
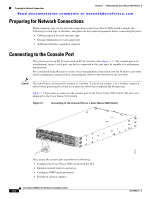
Chapter 3 Connecting the Cisco Nexus 5000 Switch Connecting to the Ethernet Connector Port Send documentation comments to [email protected] You can use the console port to perform the following: • Configure the Cisco Nexus 5010 switch from the CLI. • Monitor network statistics and errors. • Configure SNMP agent parameters. • Download software updates. Note To connect the console port to a computer terminal, the computer must support VT100 terminal emulation. The terminal emulation software (frequently an application such as HyperTerminal or Procomm Plus) makes communication between the Cisco Nexus 5000 switch and a computer possible during setup and configuration. To connect the console port to a computer terminal, follow these steps: Step 1 Step 2 Configure the terminal emulator program to match the following default port characteristics: 9600 baud, 8 data bits, 1 stop bit, no parity. Connect the RJ-45 connector of the console cable to the console port (see Figure 3-1) and the DB-9 connector to the computer serial port. Note For configuration instructions, see the Cisco Nexus 5000 Series CLI Configuration Guide. Connecting to the Ethernet Connector Port Caution To prevent an IP address conflict, do not connect the management port to the network until the initial configuration is complete. For configuration instructions, see the Cisco Nexus 5000 Series Switch Configuration Guide. The Ethernet connector port has an RJ-45 interface. To connect the Ethernet connector port to an external hub, switch, or router, follow these steps: Step 1 Step 2 Connect the appropriate modular cable to the Ethernet connector port: • Use modular, RJ-45, straight-through UTP cables to connect the Ethernet connector port to an Ethernet switch port or hub. • Use a cross-over cable to connect to a router interface. Connect the other end of the cable to the device. OL-15902-01 Cisco Nexus 5000 Series Hardware Installation Guide 3-3
-
 1
1 -
2
-
3
-
4
-
5
-
6
-
7
-
8
-
9
-
10
-
11
-
12
-
13
-
14
-
15
-
16
-
17
-
18
-
19
-
20
-
21
-
22
-
23
-
24
-
25
-
26
-
27
-
28
-
29
-
30
-
31
-
32
-
33
-
34
-
35
-
36
-
37
-
38
-
39
-
40
-
41
-
42
-
43
-
44
-
45
-
46
-
47
-
48
-
49
-
50
-
51
-
52
-
53
-
54
-
55
-
56
-
57
-
58
-
59
-
60
-
61
-
62
-
63
-
64
-
65
-
66
-
67
-
 68
68 -
 69
69 -
 70
70 -
 71
71 -
 72
72 -
 73
73 -
 74
74 -
 75
75 -
 76
76 -
 77
77 -
 78
78 -
79
-
80
-
81
-
82
-
83
-
84
-
85
-
86
-
87
-
88
-
89
-
90
-
91
-
92
-
93
-
94
-
95
-
96
-
97
-
98
-
99
-
100
-
101
-
102
-
103
-
104
-
105
-
106
-
107
-
108
-
109
-
110
-
111
-
112
 |
 |
