HP Cisco MDS 9134 Cisco Nexus 5000 Series Hardware Installation Guide (OL-1590 - Page 79
Removing and Installing Cables into SFP Transceivers, Installing a Cable into an SFP Transceiver
 |
View all HP Cisco MDS 9134 manuals
Add to My Manuals
Save this manual to your list of manuals |
Page 79 highlights
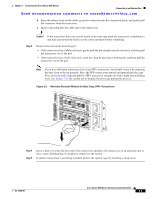
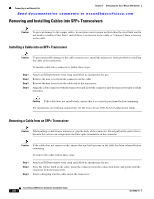
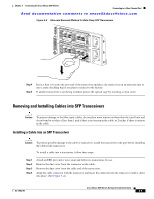
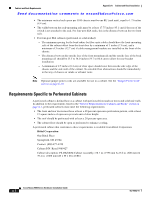
Chapter 3 Connecting the Cisco Nexus 5000 Switch Connecting to a Fibre Channel Port Send documentation comments to [email protected] Figure 3-3 Alternate Removal Method for Bale Clasp SFP Transceivers 186903 Step 4 Step 5 Insert a dust cover into the port end of the transceiver and place the transceiver on an antistatic mat or into a static-shielding bag if you plan to return it to the factory. If another transceiver is not being installed, protect the optical cage by inserting a clean cover. Removing and Installing Cables into SFP Transceivers Caution To prevent damage to the fiber-optic cables, do not place more tension on them than the rated limit and do not bend to a radius of less than 1 inch if there is no tension in the cable, or 2 inches if there is tension in the cable. Installing a Cable into an SFP Transceiver Caution To prevent possible damage to the cable or transceiver, install the transceiver in the port before installing the cable in the transceiver. To install a cable into a transceiver, follow these steps: Step 1 Step 2 Step 3 Step 4 Attach an ESD-preventive wrist strap and follow its instructions for use. Remove the dust cover from the connector on the cable. Remove the dust cover from the cable end of the transceiver. Align the cable connector with the transceiver and insert the connector into the transceiver until it clicks into place. (See Figure 3-4). OL-15902-01 Cisco Nexus 5000 Series Hardware Installation Guide 3-9
-
 1
1 -
2
-
3
-
4
-
5
-
6
-
7
-
8
-
9
-
10
-
11
-
12
-
13
-
14
-
15
-
16
-
17
-
18
-
19
-
20
-
21
-
22
-
23
-
24
-
25
-
26
-
27
-
28
-
29
-
30
-
31
-
32
-
33
-
34
-
35
-
36
-
37
-
38
-
39
-
40
-
41
-
42
-
43
-
44
-
45
-
46
-
47
-
48
-
49
-
50
-
51
-
52
-
53
-
54
-
55
-
56
-
57
-
58
-
59
-
60
-
61
-
62
-
63
-
64
-
65
-
66
-
67
-
68
-
69
-
70
-
71
-
72
-
73
-
 74
74 -
 75
75 -
 76
76 -
 77
77 -
 78
78 -
 79
79 -
 80
80 -
 81
81 -
 82
82 -
 83
83 -
 84
84 -
85
-
86
-
87
-
88
-
89
-
90
-
91
-
92
-
93
-
94
-
95
-
96
-
97
-
98
-
99
-
100
-
101
-
102
-
103
-
104
-
105
-
106
-
107
-
108
-
109
-
110
-
111
-
112
 |
 |
