HP Color LaserJet Enterprise MFP 5800f User Guide - Page 103
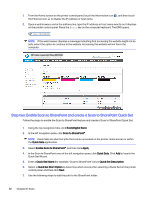
Set up Scan to SharePoint, Introduction, Before you begin, Step one: Access the HP Embedded Web
 |
View all HP Color LaserJet Enterprise MFP 5800f manuals
Add to My Manuals
Save this manual to your list of manuals |
Page 103 highlights
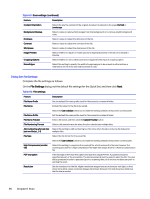
Table 6-10 File settings (continued) Feature Description Quality and File Size Select the quality for the file. Higher-quality images require a larger file size than lower-quality images, and they take more time to send. Color/Black Specify whether copies are to be printed in color, black and gray, or black only. Suppress blank pages If the Suppress blank pages option is enabled, blank pages will be ignored. Metadata File Format Use the drop-down list to select the file format for metadata information. Create Multiple Files Select this setting to scan pages into separate files based on a predetermined maximum number of pages per file. Dialog six: Summary On the Summary dialog, review the Summary dialog, and then click Finish. Step three: Complete the configuration Use the following steps to complete Scan to Network Folder setup. 1. In the left navigation pane, click Scan to Network Folder. 2. On the Scan to Network Folder page, review the selected settings, and then click Apply to complete the setup. Set up Scan to SharePoint Use Scan to SharePoint to scan documents directly to a Microsoft SharePoint site. This feature eliminates the need to scan the documents to a network folder, USB flash drive, or email message, and then manually upload the files to the SharePoint site. Introduction Set up the Scan to SharePoint feature, and then scan documents directly to a SharePoint site. Scan to SharePoint supports all scanning options, including the ability to scan documents as images or use the OCR features to create text files or searchable PDFs. The feature is disabled by default. Enable Save to Sharepoint in the HP Embedded Web Server (EWS). Before you begin Before this procedure can be completed, the destination folder that the scanned files will be saved to must exist on the SharePoint site, and write access must be enabled to the destination folder. Scan to SharePoint is disabled by default. Step one: Access the HP Embedded Web Server (EWS) Open the EWS to start the setup process. NOTE: The figure in this topic shows an EWS screen for a color printer. However, the procedure below is valid for both color and mono printers. Dialog six: Summary 91
-
 1
1 -
2
-
3
-
4
-
5
-
6
-
7
-
8
-
9
-
10
-
11
-
12
-
13
-
14
-
15
-
16
-
17
-
18
-
19
-
20
-
21
-
22
-
23
-
24
-
25
-
26
-
27
-
28
-
29
-
30
-
31
-
32
-
33
-
34
-
35
-
36
-
37
-
38
-
39
-
40
-
41
-
42
-
43
-
44
-
45
-
46
-
47
-
48
-
49
-
50
-
51
-
52
-
53
-
54
-
55
-
56
-
57
-
58
-
59
-
60
-
61
-
62
-
63
-
64
-
65
-
66
-
67
-
68
-
69
-
70
-
71
-
72
-
73
-
74
-
75
-
76
-
77
-
78
-
79
-
80
-
81
-
82
-
83
-
84
-
85
-
86
-
87
-
88
-
89
-
90
-
91
-
92
-
93
-
94
-
95
-
96
-
97
-
 98
98 -
 99
99 -
 100
100 -
 101
101 -
 102
102 -
 103
103 -
 104
104 -
 105
105 -
 106
106 -
 107
107 -
 108
108 -
109
-
110
-
111
-
112
-
113
-
114
-
115
-
116
-
117
-
118
-
119
-
120
-
121
-
122
-
123
-
124
-
125
-
126
-
127
-
128
-
129
-
130
-
131
-
132
-
133
-
134
-
135
-
136
-
137
-
138
-
139
-
140
-
141
-
142
-
143
-
144
-
145
-
146
-
147
-
148
-
149
-
150
-
151
-
152
-
153
-
154
-
155
-
156
-
157
-
158
-
159
-
160
-
161
-
162
-
163
-
164
-
165
-
166
-
167
-
168
-
169
-
170
-
171
-
172
-
173
-
174
-
175
-
176
-
177
-
178
-
179
-
180
-
181
-
182
-
183
-
184
-
185
-
186
-
187
-
188
-
189
-
190
-
191
-
192
-
193
-
194
-
195
-
196
-
197
-
198
-
199
-
200
-
201
-
202
-
203
-
204
-
205
-
206
-
207
-
208
-
209
-
210
-
211
-
212
-
213
-
214
-
215
-
216
-
217
-
218
-
219
-
220
-
221
-
222
-
223
-
224
-
225
-
226
-
227
-
228
-
229
-
230
-
231
-
232
-
233
-
234
-
235
-
236
-
237
-
238
-
239
-
240
-
241
-
242
-
243
-
244
-
245
-
246
-
247
-
248
-
249
-
250
-
251
-
252
-
253
-
254
-
255
-
256
-
257
-
258
-
259
-
260
-
261
-
262
-
263
-
264
-
265
-
266
-
267
-
268
-
269
-
270
-
271
-
272
-
273
-
274
-
275
-
276
-
277
-
278
-
279
-
280
-
281
-
282
 |
 |
