HP DL760 DVD-ROM Drive Installation Instructions for HP ProLiant DL760 Generat - Page 2
Remove the CD-ROM drive from the tray.
 |
UPC - 613326397428
View all HP DL760 manuals
Add to My Manuals
Save this manual to your list of manuals |
Page 2 highlights
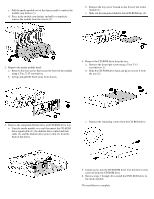
c. Pull the media module out of the chassis until it contacts the module stop latches (1). d. Press in the module stop latches and pull to completely remove the module from the chassis (2). b. Remove the tray screw located on the front of the media module (1). c. Slide out the integrated diskette drive/CD-ROM tray (2). 2. Remove the media module bezel. a. Remove the four screws that secure the bezel to the module using a Torx T-15 screwdriver. b. Lift up and pull the bezel away from chassis. 4. Remove the CD-ROM drive from the tray. a. Remove the front right screw using a Torx T-15 screwdriver (1). b. Slide the CD-ROM drive back and up to remove it from the tray (2). 3. Remove the integrated diskette drive and CD-ROM drive tray. a. Turn the media module over and disconnect the CD-ROM drive signal cable (1), the diskette drive control and data cable (2), and the diskette drive power cable (3) from the back of the drives. c. Remove the remaining screws from the CD-ROM drive. 5. Install screws into the DVD-ROM drive. Use the three screws removed from the CD-ROM drive. 6. Reverse steps 1 through 4b to install the DVD-ROM drive in the media module. The installation is complete. HP CONFIDENTIAL Writer: Anna Roberts/Melinda LeBoeuf Codename:Pioneer Part Number: 339392-001 Last Saved On: 5/21/03 2:57 PM
-
 1
1 -
 2
2
 |
 |
