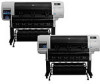
HP Designjet T7100 HP Designjet T7100 and T7100 Monochrome printer series: Use - Page 32
Change the graphic language setting - pdf
 |
View all HP Designjet T7100 manuals
Add to My Manuals
Save this manual to your list of manuals |
Page 32 highlights
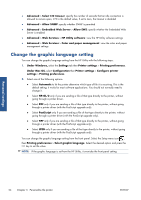
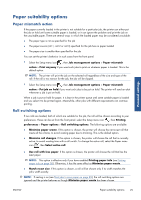
Personal settings ● Advanced > Select I/O timeout: specify the number of seconds that an idle connection is allowed to remain open, 270 is the default value, if set to zero, the timeout is disabled ● Advanced > Allow SNMP: specify whether SNMP is permitted ● Advanced > Embedded Web Server > Allow EWS: specify whether the Embedded Web Server is enabled ● Advanced > Web Services > HP Utility software: view the HP Utility software settings ● Advanced > Web Services > Color and paper management: view the color and paper management settings Change the graphic language setting You can change the graphic language setting from the HP Utility with the following steps. 1. Under Windows, select the Settings tab then Printer settings > Printing preferences. Under Mac OS, select Configuration then Printer settings > Configure printer settings > Printing preferences. 2. Select one of the following options. ● Select Automatic to let the printer determine which type of file it is receiving. This is the default setting; it works for most software applications. You should not normally need to change it. ● Select HP-GL/2 only if you are sending a file of that type directly to the printer, without going through a printer driver. ● Select PDF only if you are sending a file of that type directly to the printer, without going through a printer driver (with the PostScript upgrade only). ● Select PostScript only if you are sending a file of that type directly to the printer, without going through a printer driver (with the PostScript upgrade only). ● Select TIFF only if you are sending a file of that type directly to the printer, without going through a printer driver (with the PostScript upgrade only). ● Select JPEG only if you are sending a file of that type directly to the printer, without going through a printer driver (with the PostScript upgrade only). You can change the graphic language setting from the front panel. Select the Setup menu icon , then Printing preferences > Select graphic language. Select the desired option and press the OK key to set the value. NOTE: If the graphic language is set from the HP Utility, it overrides the front panel setting. 24 Chapter 3 Personalize the printer ENWW
-
 1
1 -
2
-
3
-
4
-
5
-
6
-
7
-
8
-
9
-
10
-
11
-
12
-
13
-
14
-
15
-
16
-
17
-
18
-
19
-
20
-
21
-
22
-
23
-
24
-
25
-
26
-
 27
27 -
 28
28 -
 29
29 -
 30
30 -
 31
31 -
 32
32 -
 33
33 -
 34
34 -
 35
35 -
 36
36 -
 37
37 -
38
-
39
-
40
-
41
-
42
-
43
-
44
-
45
-
46
-
47
-
48
-
49
-
50
-
51
-
52
-
53
-
54
-
55
-
56
-
57
-
58
-
59
-
60
-
61
-
62
-
63
-
64
-
65
-
66
-
67
-
68
-
69
-
70
-
71
-
72
-
73
-
74
-
75
-
76
-
77
-
78
-
79
-
80
-
81
-
82
-
83
-
84
-
85
-
86
-
87
-
88
-
89
-
90
-
91
-
92
-
93
-
94
-
95
-
96
-
97
-
98
-
99
-
100
-
101
-
102
-
103
-
104
-
105
-
106
-
107
-
108
-
109
-
110
-
111
-
112
-
113
-
114
-
115
-
116
-
117
-
118
-
119
-
120
-
121
-
122
-
123
-
124
-
125
-
126
-
127
-
128
-
129
-
130
-
131
-
132
-
133
-
134
-
135
-
136
-
137
-
138
-
139
-
140
-
141
-
142
-
143
-
144
-
145
-
146
-
147
-
148
-
149
-
150
-
151
-
152
-
153
-
154
-
155
-
156
-
157
-
158
-
159
-
160
-
161
-
162
-
163
-
164
-
165
-
166
-
167
-
168
-
169
-
170
-
171
-
172
-
173
-
174
-
175
-
176
-
177
-
178
-
179
-
180
-
181
-
182
-
183
-
184
-
185
-
186
-
187
-
188
-
189
-
190
-
191
-
192
-
193
-
194
-
195
-
196
-
197
-
198
-
199
-
200
-
201
-
202
-
203
-
204
-
205
-
206
-
207
-
208
-
209
-
210
-
211
-
212
-
213
-
214
-
215
-
216
-
217
 |
 |