HP Deskjet 400 Solutions Guide - Page 52
Use only a recommended print cartridge. See table 1-5 for the part numbers. If you did not install
 |
View all HP Deskjet 400 manuals
Add to My Manuals
Save this manual to your list of manuals |
Page 52 highlights
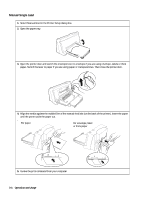
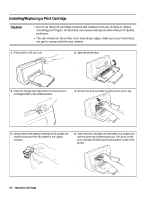
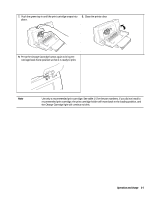
7. Push the green top in until the print cartridge snaps into 8. Close the printer door. place. 9. Press the Change Cartridge button again to bring the carriage back home position so that it is ready to print. Note Use only a recommended print cartridge. See table 1-5 for the part numbers. If you did not install a recommended print cartridge, the print cartridge holder will move back to the loading position, and the Change Cartridge light will continue to blink. Operation and Usage 3-7
-
 1
1 -
2
-
3
-
4
-
5
-
6
-
7
-
8
-
9
-
10
-
11
-
12
-
13
-
14
-
15
-
16
-
17
-
18
-
19
-
20
-
21
-
22
-
23
-
24
-
25
-
26
-
27
-
28
-
29
-
30
-
31
-
32
-
33
-
34
-
35
-
36
-
37
-
38
-
39
-
40
-
41
-
42
-
43
-
44
-
45
-
46
-
 47
47 -
 48
48 -
 49
49 -
 50
50 -
 51
51 -
 52
52 -
 53
53 -
 54
54 -
 55
55 -
 56
56 -
 57
57 -
58
-
59
-
60
-
61
-
62
-
63
-
64
-
65
-
66
-
67
-
68
-
69
-
70
-
71
-
72
-
73
-
74
-
75
-
76
-
77
-
78
-
79
-
80
-
81
-
82
-
83
-
84
-
85
-
86
-
87
-
88
-
89
-
90
-
91
-
92
-
93
-
94
-
95
-
96
-
97
-
98
-
99
-
100
-
101
-
102
-
103
-
104
-
105
-
106
-
107
-
108
-
109
-
110
-
111
-
112
-
113
-
114
-
115
-
116
-
117
-
118
-
119
-
120
-
121
-
122
-
123
-
124
-
125
 |
 |

Operation and Usage
3-7
7.
Push the green top in until the print cartridge snaps into
place.
8.
Close the printer door.
9.
Press the Change Cartridge button again to bring the
carriage back home position so that it is ready to print.
Note
Use only a recommended print cartridge. See table 1-5 for the part numbers. If you did not install a
recommended print cartridge, the print cartridge holder will move back to the loading position, and
the Change Cartridge light will continue to blink.