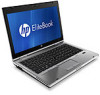
HP EliteBook 2560p Installing SATA Drivers on HP EliteBook Notebook PCs - Page 7
Adding SATA Drivers to an Installation CD - drivers windows 7
 |
View all HP EliteBook 2560p manuals
Add to My Manuals
Save this manual to your list of manuals |
Page 7 highlights
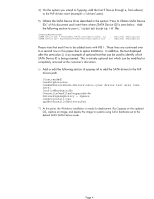
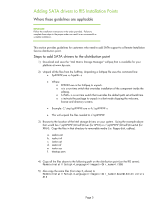
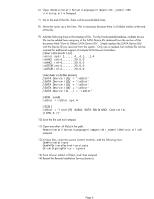
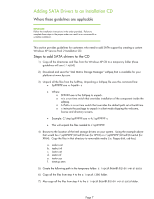
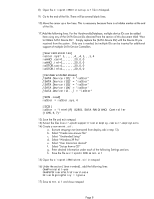
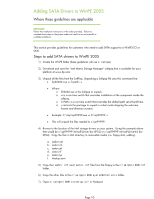
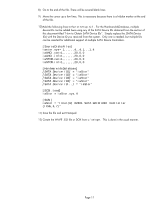
Adding SATA Drivers to an Installation CD Where these guidelines are applicable IMPORTANT: Follow the installation instructions in the order provided. Failure to complete these steps in the proper order can result in an unsuccessful or unstable installation. This section provides guidelines for customers who need to add SATA support by creating a custom Windows XP Service Pack 2 Installation CD. Steps to add SATA drivers to the CD 1) Copy all the directories and files from the Windows XP CD to a temporary folder (these guidelines will use c:\xpcd) 2) Download and save the "Intel Matrix Storage Manager" softpaq that is available for your platform at www.hp.com. 3) Unpack all the files from the SoftPaq. Unpacking a Softpaq file uses this command line: • Sp#####.exe -e -f -s • Where o SP####.exe is the Softpaq to unpack. o -e is a run time switch that overrides installation of the component inside the softpaq. o -f is a run time switch that overrides the default path set at build time. o -s instructs the package to unpack in silent mode skipping the welcome, license and directory screens. • Example: C:\tmp\sp99999.exe -e -fc:\sp99999 -s • This will unpack the files needed to c:\sp99999. 4) Browse to the location of the Intel storage drivers on your system. Using the example above that would be c:\sp99999\Winall\Driver (for XP32) or c:\sp99999\Winall\Driver64 (for XP64). Copy the files in that directory to removable media (i.e. floppy disk, usb key). a. iaahci.cat b. iaahci.inf c. iastor.cat d. iastor.inf e. iastor.sys f. txtsetup.oem 5) Create the following path in the temporary folder: c:\xpcd\$oem$\$1\drivers\sata 6) Copy all the files from step 4 to the c:\xpcd\i386 folder. 7) Also copy all the files from step 4 to the c:\xpcd\$oem$\$1\drivers\sata folder. Page 7
-
 1
1 -
 2
2 -
 3
3 -
 4
4 -
 5
5 -
 6
6 -
 7
7 -
 8
8 -
 9
9 -
 10
10 -
 11
11 -
 12
12 -
13
-
14
-
15
-
16
-
17
-
18
-
19
-
20
 |
 |