HP HP-380467-003 Upgrading and Servicing Guide - Page 18
SATA2, SATA1, To CPU, Primary
 |
UPC - 846084030171
View all HP HP-380467-003 manuals
Add to My Manuals
Save this manual to your list of manuals |
Page 18 highlights
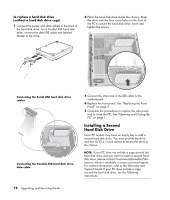
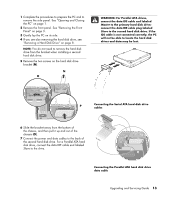
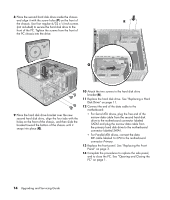
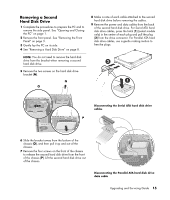
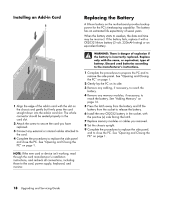
8 Place the second hard disk drive inside the chassis and align it with the screw holes (P) on the front of R the chassis. Use four regular 6/32 x ¼-inch screws (not included) to secure the hard disk drive to the front of the PC. Tighten the screws from the front of the PC chassis into the drive. Q 9 Place the hard disk drive bracket over the new second hard disk drive, align the four tabs with the holes on the front of the chassis, and then slide the bracket toward the bottom of the chassis until it snaps into place (Q). 10 Attach the two screws to the hard disk drive bracket (R). 11 Replace the hard disk drive. See "Replacing a Hard Disk Drive" on page 11. 12 Connect the end of the data cable to the motherboard: • For Serial ATA drives, plug the free end of the narrow data cable from the second hard disk drive to the motherboard connector labeled SATA2 and plug the narrow data cable from the primary hard disk drive to the motherboard connector labeled SATA1. • For Parallel ATA drives, connect the data IDE cable labeled To CPU to the motherboard connector Primary. 13 Replace the front panel. See "Replacing the Front Panel" on page 3. 14 Complete the procedures to replace the side panel, and to close the PC. See "Opening and Closing the PC" on page 1. 14 Upgrading and Servicing Guide
-
 1
1 -
2
-
3
-
4
-
5
-
6
-
7
-
8
-
9
-
10
-
11
-
12
-
 13
13 -
 14
14 -
 15
15 -
 16
16 -
 17
17 -
 18
18 -
 19
19 -
 20
20 -
 21
21 -
 22
22 -
 23
23 -
24
 |
 |
