HP Integrity rx1620 Installation (Smart Setup) Guide, Windows Server 2003, v5. - Page 29
Authorize a RIS server in Active Directory, Use the Client Installation Wizard
 |
View all HP Integrity rx1620 manuals
Add to My Manuals
Save this manual to your list of manuals |
Page 29 highlights
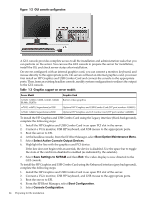
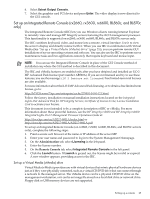
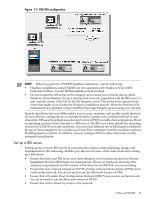
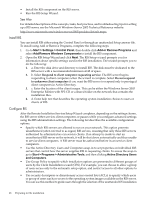
appropriate for their account privileges. By default, when an operating system image is added to a RIS server, the image is available to all users serviced by that RIS server. To configure settings for new clients for RIS, complete the following steps: 1. Open Active Directory Users and Computers. 2. In the console tree, go to Active Directory Users and Computers > Applicable domain > Applicable organizational unit (such as Computers/Applicable RIS server) and right-click the applicable RIS server. 3. Click Properties. In the Properties dialog box, go to the Remote Install tab and click Advanced Settings. 4. In the Advanced Settings dialog box, go to the New Clients tab. 5. Select the client computer naming format you want to use, or click Customize to create a client computer naming format. 6. To specify where to create the client computer account, click one of the following options: • Default directory service location • Same location as the user setting up the client computer • The following directory service location 7. If you choose the last option, click Browse and specify where to create the computer accounts. Authorize a RIS server in Active Directory A RIS server must be authorized in Active Directory to be able to respond to clients requesting service. If RIS is installed on a server that is not an authorized DHCP server, or added to a DHCP server that is not authorized in Active Directory, you must complete the following steps: 1. Log in to the domain in which the RIS server resides. (The account you use must be a member of the Enterprise Admins group.) 2. From the Start menu, point to Programs and Administrative Tools and click DHCP from the list. This starts the DHCP Management snap-in. 3. Right-click the DHCP root node in the scope pane, and then click Manage Authorized Servers. 4. Click Authorize, enter the IP address or name of the RIS server, and then click OK. When prompted to ensure that this is the correct RIS server to authorize, click Yes. The server will not respond to client requests until the changes to Active Directory have taken effect. For these rights to apply immediately, on the domain controller on which your rights have been set, complete the following steps: 1. On the Start menu, click Run. 2. Enter the cmd command. 3. At the command prompt, enter: secedit /refreshpolicy /MACHINE_POLICY Use the Client Installation Wizard The following installation options are included in the Client Installation Wizard (CIW). Automatic setup is available by default. RIS uses Group Policy settings to allow access to the automatic setup option only, and to restrict all users and administrators from the rest of the installation options described in the following list: • Automatic Setup-This option allows you to select which operating system to install, but it does not prompt you for specific configuration settings. If only one operating system option is offered, you are not prompted, and an unattended installation of the operating system image starts automatically. • Custom Setup-This option allows you to override the automatic computer naming process and the default location within the Active Directory where client computer accounts will Setting up PXE/RIS 29
-
 1
1 -
2
-
3
-
4
-
5
-
6
-
7
-
8
-
9
-
10
-
11
-
12
-
13
-
14
-
15
-
16
-
17
-
18
-
19
-
20
-
21
-
22
-
23
-
 24
24 -
 25
25 -
 26
26 -
 27
27 -
 28
28 -
 29
29 -
 30
30 -
 31
31 -
 32
32 -
 33
33 -
 34
34 -
35
-
36
-
37
-
38
-
39
-
40
-
41
-
42
-
43
-
44
-
45
-
46
-
47
-
48
-
49
-
50
-
51
-
52
-
53
-
54
-
55
-
56
-
57
-
58
-
59
-
60
-
61
-
62
-
63
-
64
-
65
-
66
-
67
-
68
-
69
-
70
-
71
-
72
-
73
-
74
-
75
-
76
-
77
-
78
-
79
-
80
-
81
-
82
-
83
-
84
-
85
-
86
-
87
-
88
-
89
-
90
-
91
-
92
-
93
-
94
-
95
-
96
 |
 |
