HP Integrity rx1620 Installation (Smart Setup) Guide, Windows Server 2003, v5. - Page 44
Load the system image, CAUTION, IMPORTANT
 |
View all HP Integrity rx1620 manuals
Add to My Manuals
Save this manual to your list of manuals |
Page 44 highlights
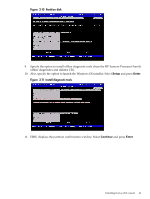
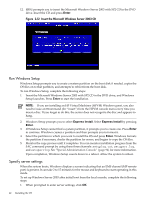
Reinstalling the operating system involves loading the image from the Reinstallation media onto the boot disk and, after Windows Server 2003 is loaded, specifying the server settings. CAUTION: Reinstallation overwrites all files on the boot disk. The boot disk is determined by bus search order and might not be the disk you expect it to be. HP recommends disconnecting or unplugging all drives from the server except the boot disk. This includes all SAN storage, too. Load the system image To reinstall Windows Server 2003 from a headless console, complete the following steps: 1. From the headless console, log in to the MP using a terminal emulator such as HyperTerminal or PuTTY. 2. Boot the server to EFI. 3. Because Windows Server 2003 cannot create a boot entry if one already exists, you must delete the existing boot entry. To delete the boot entry: a. Do one of the following: • If you are using the Enhanced EFI Boot Manager Menu (grey background), select EFI Boot Manager Menu > Boot Configuration > Remove Boot Entry. • If you are using the Legacy EFI Boot Manager Menu (black background), select EFI Boot Manager Menu > Boot Option Maintenance Menu > Delete Boot Option(s). b. Arrow down to select the Windows Server 2003 boot entry to delete and press Enter. NOTE: The next step applies to factory-installed systems that require the use of the HP Reinstallation media only. If the Windows boot entries are not all deleted, the boot file bootxxx.efi is not created. 4. Insert the HP Reinstallation media in the DVD drive of the target system. IMPORTANT: If you are installing an HP Virtual Machines (HPVM) Windows guest, you also need to issue an IN command (for "insert") from the HPVM console menu every time you insert a disc. If you forget to do this, the server does not recognize the disc and appears to hang. NOTE: With rx2660, rx3600, rx6600, BL860c, and BL870c servers, you can also use Virtual Media (vMedia) as the source of the reinstallation image. 5. Reboot the server. 6. At the MP> prompt, on the headless console, enter the CO command to launch the live console. NOTE: With rx2660, rx3600, rx6600, BL860c, and BL870c servers, you can also use Remote Serial Console to perform this step. 7. Select EFI Boot Manager menu > Internal Bootable DVD and press Enter. The server boots from the HP Reinstallation media. 8. At the SAC> prompt, enter the cmd command. 9. Switch to a new command channel by pressing Esc+Tab. 10. At the x:\ia64\system32> prompt invoke the installation menu by entering txtrestore. A Warning message appears stating that all data, including the partition table, will be lost upon reinstallation. 11. Select Y to continue. 44 Installing the OS
-
 1
1 -
2
-
3
-
4
-
5
-
6
-
7
-
8
-
9
-
10
-
11
-
12
-
13
-
14
-
15
-
16
-
17
-
18
-
19
-
20
-
21
-
22
-
23
-
24
-
25
-
26
-
27
-
28
-
29
-
30
-
31
-
32
-
33
-
34
-
35
-
36
-
37
-
38
-
 39
39 -
 40
40 -
 41
41 -
 42
42 -
 43
43 -
 44
44 -
 45
45 -
 46
46 -
 47
47 -
 48
48 -
 49
49 -
50
-
51
-
52
-
53
-
54
-
55
-
56
-
57
-
58
-
59
-
60
-
61
-
62
-
63
-
64
-
65
-
66
-
67
-
68
-
69
-
70
-
71
-
72
-
73
-
74
-
75
-
76
-
77
-
78
-
79
-
80
-
81
-
82
-
83
-
84
-
85
-
86
-
87
-
88
-
89
-
90
-
91
-
92
-
93
-
94
-
95
-
96
 |
 |
