HP LaserJet 1010 HP LaserJet 1010/1012/1015 Printer - Software Technical Refer - Page 58
Configuration, Print all Text as Black
 |
View all HP LaserJet 1010 manuals
Add to My Manuals
Save this manual to your list of manuals |
Page 58 highlights
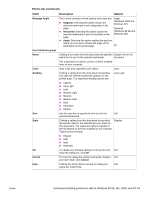
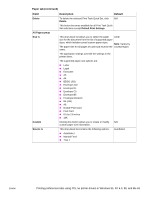
Finishing tab (continued) Field Description Current Setting This read-only control denotes the quality setting currently applied to the printer. Graphic Settings group Complex Graphics This control consists of two options: ! Use HP MEt ! Use More Memory Default N/A Use HP MEt Note: The Use More Memory option is not intended for general use. Use it only if you receive printer memory error messages while printing complex pages. Rendering Mode This control consists of the following options: Automatic ! Automatic ! Send Graphics as Vector ! Send Graphics as Raster ! Send Page as Raster Output Settings group Resolution Clicking this drop-down list allows you to select from 600 dpi the following options: ! 600 dpi ! FastRes 1200 Resolution Enhancement technology (REt) Scale Patterns (WYSIWYG) Print all Text as Black Font Settings OK Cancel As resolution is increased, the quality of print on the page is improved. However, using higher resolution might also result in longer printing times. This control consists of two options: On ! On Selecting this option allows the printer to refine the print quality of the characters by smoothing out jagged edges that can occur with longer printing times. ! Off Selecting this option disables the REt function of the printer. Use this option if graphics or images, particularly scanned images, are not printing clearly. Select this check box for the most reliable printing. Clearing this check box may cause differences between on-screen appearance and printed output. Selected Selecting this check box allows the printer to print all text characters as black, regardless of the document's text color setting. The exception is white text, which stays white. Unselected Select this check box to print TrueType as Bitmaps. Unselected To update any changed settings on the printer and N/A close the dialog box, click OK. To close the dialog box without saving the changes N/A you have made, click Cancel. 58 Chapter 5 - Configuration ENWW
-
 1
1 -
2
-
3
-
4
-
5
-
6
-
7
-
8
-
9
-
10
-
11
-
12
-
13
-
14
-
15
-
16
-
17
-
18
-
19
-
20
-
21
-
22
-
23
-
24
-
25
-
26
-
27
-
28
-
29
-
30
-
31
-
32
-
33
-
34
-
35
-
36
-
37
-
38
-
39
-
40
-
41
-
42
-
43
-
44
-
45
-
46
-
47
-
48
-
49
-
50
-
51
-
52
-
 53
53 -
 54
54 -
 55
55 -
 56
56 -
 57
57 -
 58
58 -
 59
59 -
 60
60 -
 61
61 -
 62
62 -
 63
63 -
64
-
65
-
66
-
67
-
68
-
69
-
70
-
71
-
72
-
73
-
74
-
75
-
76
-
77
-
78
-
79
-
80
-
81
-
82
-
83
-
84
-
85
-
86
-
87
-
88
-
89
-
90
-
91
-
92
-
93
-
94
-
95
-
96
-
97
-
98
-
99
-
100
-
101
-
102
-
103
-
104
-
105
-
106
-
107
-
108
-
109
-
110
-
111
-
112
-
113
-
114
 |
 |
