HP M5035 HP LaserJet M5025/M5035 MFP - (multiple language) Getting Started Gui - Page 5
ilustração 2.
 |
UPC - 882780574533
View all HP M5035 manuals
Add to My Manuals
Save this manual to your list of manuals |
Page 5 highlights
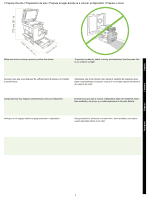
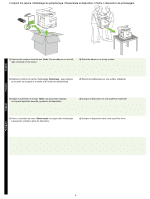
• Prepare the hardware • Préparation du matériel • Prepare el hardware • Prepare o hardware 3) Remove all of the orange tape and cardboard packaging. 4) Remove the orange tray locks from tray 2 (callout 1) and tray 3 (callout 2). 3) Retirez la bande adhésive orange et l'emballage en carton. 4) Retirez les verrous oranges du bac 2 (schéma 1) et du bac 3 (schéma 2). 3) Retire la cinta adhesiva de color naranja y el envoltorio de cartón. 4) Retire los bloqueos de color naranja de la bandeja 2 (ilustración 1) y la bandeja 3 (ilustración 2). 3) Retire toda a fita laranja e a embalagem de papelão. 4) Retire as travas cor de laranja das bandejas 2 (ilustração 1) e 3 (ilustração 2). 4
-
 1
1 -
 2
2 -
 3
3 -
 4
4 -
 5
5 -
 6
6 -
 7
7 -
 8
8 -
 9
9 -
 10
10 -
 11
11 -
12
-
13
-
14
-
15
-
16
-
17
-
18
-
19
-
20
-
21
-
22
-
23
-
24
-
25
-
26
-
27
-
28
-
29
-
30
-
31
-
32
-
33
-
34
-
35
-
36
 |
 |

4
3)
Remove all of the orange tape and cardboard packaging.
4)
Remove the orange tray locks from tray 2 (callout 1) and tray 3 (callout 2).
3)
Retirez la bande adhésive orange et l’emballage en carton.
4)
Retirez les verrous oranges du bac 2 (schéma 1) et du bac 3 (schéma 2).
3)
Retire toda a fita laranja e a embalagem de papelão.
4)
Retire as travas cor de laranja das bandejas 2 (ilustração 1) e 3
(ilustração 2).
3)
Retire la cinta adhesiva de color naranja y el envoltorio de cartón.
4)
Retire los bloqueos de color naranja de la bandeja 2 (ilustración 1)
y la bandeja 3 (ilustración 2).
• Prepare the hardware • Préparation du matériel • Prepare el hardware • Prepare o hardware