HP MSA 2040 HP MSA/P2000 Controller Module Replacement Instructions (718625-00 - Page 2
Transporting CompactFlash single-controller - quickspecs
 |
View all HP MSA 2040 manuals
Add to My Manuals
Save this manual to your list of manuals |
Page 2 highlights
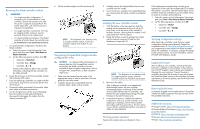
Removing the failed controller module IMPORTANT: • In a single-controller configuration, if transporting the CompactFlash to a new controller, remove the controller only after the cache is copied to CompactFlash. The Cache Status LED is off when the cache is copied to CompactFlash. • In a single-controller environment, I/O must be stopped and the enclosure must be powered off prior to the replacement. • In a dual-controller environment, if the failed controller is first shut down, the controller may be hot-replaced in an operational enclosure. 1. In a dual-controller configuration, shut down the failed controller: a. Select the system in the Configuration View panel and then select Tools > Shut Down or Restart Controller. b. Set the following options and then click OK: • Operation-Shut down • Controller Type-Storage • Controller-A or B The blue OK to Remove LED on the controller illuminates, indicating that the controller can be safely removed. 2. Locate the enclosure in which the controller module OK to Remove LED is blue. 3. If you are replacing a controller in a single-controller environment, stop all I/O and remove power from the enclosure. 4. Disconnect cables connected to the module. Label each cable to facilitate reconnection. 5. Turn the thumbscrews until the screws disengage from the module (1) and rotate both latches downward to disengage the module from the internal connector (2). 6. Pull the module straight out of the enclosure (3). 3. Carefully remove the CompactFlash from the new controller and set it aside. 4. Insert into the new controller the CompactFlash that you removed from the failed controller and labeled Data. NOTE: The illustration is for reference only. In a single-controller system, remove the controller module from module A, top location. Installing the new controller module 1. With the latches in the open position, slide the module into the enclosure as far as it will go (1). Press firmly on the top-center of the module to facilitate insertion, ensuring that the module is well seated and flush with the chassis. 2. Rotate the latches upward to engage the module with the internal connector (2) and turn the thumbscrews finger-tight (3). Transporting CompactFlash (single-controller configurations only) CAUTION: In single-controller configurations, to prevent data loss, the CompactFlash must be moved from the failed controller to the new controller. In dual-controller configurations, do not transport the CompactFlash, as data corruption might occur. 1. Make sure that transporting the cache is the appropriate action to take as specified in the user guide for your MSA model. 2. Carefully remove the CompactFlash from the controller, label it Data, and set it aside. NOTE: The illustration is for reference only. In a single-controller system, insert the controller module into module A, top location. 3. Reconnect the cables. After installing a controller in an operational, dual-controller system, the new controller automatically begins initializing. If the firmware versions differ between the two controllers, the Partner Firmware Update feature brings the older firmware to the later firmware level. 4. In operational systems, if additional hardware components, such as a second controller, need replacing or installing, wait 30 minutes before proceeding with those procedures. This time frame ensures that the controller(s) and their ownership of vdisks are fully stabilized. Verifying proper operation Examine the module status as indicated in Table 1. Page 2 If the replacement controller does not boot up as expected or if the Fault/Service Required LED is amber, the module is not online. Check the event log for errors, and then restart the controller to put the module online. To restart a controller, do the following: 1. Select the system in the Configuration View panel, and select Tools > Shut Down or Restart Controller. 2. Set the following options and then click OK: • Operation-Restart • Controller Type-Storage • Controller-A or B Verifying configuration settings After replacing a controller, verify that your system configuration settings are set properly. Repeat the commands shown in "Recording configuration settings" and compare the current values with those recorded before the installation. If necessary, change the settings to their previous values. For more information, see the HP MSA SMU Reference Guide. Updating firmware After installing a new controller, verify that the latest firmware is installed on all controllers in the enclosure. Go to the HP Support Center website and navigate to the page for your enclosure. If newer firmware is available, download the firmware to your local system and install that latest version on the controllers. For more information on firmware updates, see the HP MSA SMU Reference Guide. Returning failed items In materials shipped with the replacement, HP specifies whether the failed component must be returned. Follow the provided instructions. Additional resources HP Support Center: http://www.hp.com/go/hpsc HP Product Bulletin (QuickSpecs): http://www.hp.com/ go/productbulletin HP SPOCK: http://www.hp.com/storage/spock HP Servers: http://www.hp.com/go/servers HP MSA: http://www.hp.com/go/msa
-
 1
1 -
 2
2
 |
 |
