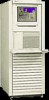
HP Model 748 Installing the A4505A PCI Module Upgrade
HP Model 748 - VME Workstation Manual
 |
View all HP Model 748 manuals
Add to My Manuals
Save this manual to your list of manuals |
HP Model 748 manual content summary:
- HP Model 748 | Installing the A4505A PCI Module Upgrade - Page 1
Installing the A4505A PCI Module Upgrade HP Part No. A4500-90603 Edition E0297 Printed in U.S.A. - HP Model 748 | Installing the A4505A PCI Module Upgrade - Page 2
© Hewlett-Packard Co. 1997 Printing History First Printing: February 1997 UNIX is a registered trademark in the United States and other countries, licensed exclusively through X/Open Company Limited. NOTICE The information contained in this document is subject to change without notice. HEWLETT- - HP Model 748 | Installing the A4505A PCI Module Upgrade - Page 3
• Boot ROM for Model 743 VMEbus board computer support HIL devices. You must remove any devices connected to the HIL interface connector on the EISA tray. Before removing your HIL keyboard, use the SAM utility to make sure that the P/S2 driver is configured in the HP-UX kernel. Refer to the manual HP - HP Model 748 | Installing the A4505A PCI Module Upgrade - Page 4
Procedure If you need keyboard and mouse support, you need a Hewlett-Packard P/S2 compatible keyboard and mouse to discharges from your body to ground. Attach the static-grounding wrist strap by following the instructions on the package that contains the strap. Be sure to attach one end of the - HP Model 748 | Installing the A4505A PCI Module Upgrade - Page 5
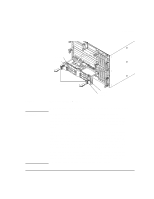
4 Slot 3 Removing the EISA Module 5 Note that the slots are numbered on the front of the tray from 1 to 4. This PCI tray only supports option cards with +5 volt bus signalling. If your workstation application requires several accessory cards and mass storage devices, power budgeting may be required - HP Model 748 | Installing the A4505A PCI Module Upgrade - Page 6
Procedure Cards for slots 1 and 2 are installed component side up; cards for slots 3 and 4 are installed component side down. Loosen the card retainer captive screw (see Figure 2) for the appropriate slot, and then remove the card retainer, as shown in Figure 3. Card Retainer Captive Screw Figure 2 - HP Model 748 | Installing the A4505A PCI Module Upgrade - Page 7
Cover Plate 6 Remove the slot cover plate by pulling it out of the PCI module, as shown in Figure 3. 7 Refer to your PCI card installation manual, and set any configuration switches or jumpers that may be required for your application. 7 - HP Model 748 | Installing the A4505A PCI Module Upgrade - Page 8
Procedure 8 Install the PCI card in the slot, as shown in Figure 4. Make sure its connector is completely seated in the PCI backplane. PCI Option Card Figure 4 Installing a PCI Option Card 9 Replace the PCI card retainer, and then tighten its screw. 8 - HP Model 748 | Installing the A4505A PCI Module Upgrade - Page 9
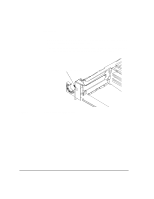
Procedure 10 Slide the PCI module into the VMEbus chassis, as shown in Figure 5, and tighten its handle screws. Figure 5 Installing the PCI Module into the VMEbus Chassis 9 - HP Model 748 | Installing the A4505A PCI Module Upgrade - Page 10
the ejector handles to the outside of the board and remove the board computer from the Model 748 card cage. c Remove any option cards, if installed. Refer to the Model 743 Owner's Guide for specific instructions for you option card. Before removing the Boot ROM, note its orientation. The replacement - HP Model 748 | Installing the A4505A PCI Module Upgrade - Page 11
. 13 Log in as root and use the SAM utility to configure the HP-UX kernel for PCI support. 14 When SAM has started, choose the Kernel Configuration -> menu. 15 Peripherals and your PCI card's installation guide for information on the PCI accessory card application, loading the software, and running - HP Model 748 | Installing the A4505A PCI Module Upgrade - Page 12
Procedure 12
-
 1
1 -
 2
2 -
 3
3 -
 4
4 -
 5
5 -
 6
6 -
 7
7 -
8
-
9
-
10
-
11
-
12
 |
 |

Installing the A4505A PCI Module Upgrade
HP Part No.
A4500-90603
Edition E0297
Printed in U.S.A.