HP N7710 User Guide
HP N7710 - ScanJet Document Sheetfeed Scanner Manual
 |
UPC - 882780998599
View all HP N7710 manuals
Add to My Manuals
Save this manual to your list of manuals |
HP N7710 manual content summary:
- HP N7710 | User Guide - Page 1
HP Scanjet N7710 User Guide - HP N7710 | User Guide - Page 2
- HP N7710 | User Guide - Page 3
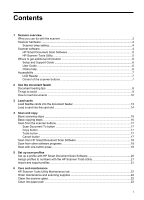
you can do with the scanner 3 Scanner hardware ...4 Scanner lamp setting ...4 Scanner software ...4 HP Smart Document Scan Software 5 HP Scanner Tools Utility ...5 Where to get additional information 6 Setup and Support Guide ...6 User Guide ...6 Online help ...6 Accessibility ...7 LCD Reader - HP N7710 | User Guide - Page 4
Clean the feed roller ...24 Replace the feed roller and separation pad 26 7 Troubleshooting Scanner error codes ...28 Scanner initialization or hardware problems 29 Scanner does not start ...29 Scanner has stopped working correctly 30 Scanner operation problems 30 Scanner will not turn on ...31 - HP N7710 | User Guide - Page 5
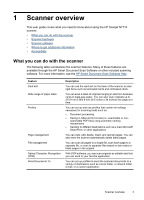
This user guide covers what you need to know about using the HP Scanjet N7710 scanner. • What you can do with the scanner • Scanner hardware • Scanner software • Where to get additional information • Accessibility What you can do with the scanner The following table summarizes the scanner features - HP N7710 | User Guide - Page 6
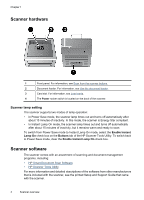
of scanning and document-management programs, including: • HP Smart Document Scan Software • HP Scanner Tools Utility For more information and detailed descriptions of the software from other manufacturers that is included with the scanner, see the printed Setup and Support Guide that came with - HP N7710 | User Guide - Page 7
Start, point to Programs or All Programs, point to HP, point to Scanjet, point to N7710, and then click HP Scanner Tools Utility. Use the Buttons tab to assign HP Smart Document Scan Software profiles to numbers for quick access from the scanner front panel. For more information, see Set up scan - HP N7710 | User Guide - Page 8
Support Guide • User Guide • Online help • Help for other software programs Setup and Support Guide Use the printed Setup and Support Guide that came with the scanner to set up and connect the scanner, test the installation, and troubleshoot installation problems. User Guide This scanner User Guide - HP N7710 | User Guide - Page 9
display. The LCD Reader enables accessibility software tools to verbalize what is being shown on the scanner front panel. To use the LCD Reader, follow these steps: 1. On your hard drive, navigate to the C:\Program Files\Common Files\Hewlett-Packard \Scanjet\N7710 directory. 2. To start the program - HP N7710 | User Guide - Page 10
to scan rigid items such as laminated cards, embossed cards, or cards with raised lettering (available on the HP Scanjet 7800 and N7710). • The maximum capacity of the document feeder is 50 sheets of 75 g/m2 (20 lb paper). When using heavier paper, the maximum capacity is decreased. • Be sure that - HP N7710 | User Guide - Page 11
Extremely thin, translucent paper Photos Paper with adhesive notes or flags attached Overhead transparencies • Do not exceed the maximum capacity of the document feeder: 50 sheets of 75 g/m2 (20 lb paper). When using heavier paper, the maximum capacity is decreased. • When placing a stack of - HP N7710 | User Guide - Page 12
Adjust the paper guides to the width of the documents. Take care not to overtighten the guides, which can restrict paper feeding. When scanning small originals such as checks, it is especially important that the paper guides fit snugly against the edges of the original. 10 Use the document feeder - HP N7710 | User Guide - Page 13
that will be pointing into the feeder in one direction, and then fan that same edge in the opposite direction. 4. Align the edges of the documents by tapping the bottom of the stack against the table top. Rotate the stack 90 degrees and repeat. How to load - HP N7710 | User Guide - Page 14
, do not drop the stack into the feeder and do not tap the top edge of the stack after you have placed it in the document feeder. 6. Verify that the paper guides are aligned with the edges of the stack. 7. Begin scanning. 12 Use the - HP N7710 | User Guide - Page 15
laminated cards and embossed cards.) This topic describes the specifications for flexible cards. For paper specifications, see Load cards. The scanner document feeder can process flexible cards that meet the following specifications: Minimum size: Maximum size: Minimum weight: Maximum weight: 50 - HP N7710 | User Guide - Page 16
cards. The card slot accepts cards with raised characters. (Use the document feeder to scan flexible items such as business cards.) The scanner card slot can process rigid cards that meet the following specifications: Minimum size: Maximum size: 31.8 mm x 63.5 mm (1.3 inches x 2.5 inches) 54 - HP N7710 | User Guide - Page 17
(continued) Minimum thickness: Maximum thickness: 0.10 mm (0.004 inches) 0.84 mm (0.033 inches) The capacity of the card slot is 1 card at a time. Load a card into the card slot face down with the long dimension parallel to the side of the scanner and the top of the card toward the left as you - HP N7710 | User Guide - Page 18
topics describe how to scan or copy originals using the scanner and the scanner software. • Basic scanning steps • Basic copying steps • Scan from the scanner buttons • Scan from HP Smart Document Scan Software • Scan from other software programs • Scan with one button press Basic scanning steps The - HP N7710 | User Guide - Page 19
button. 2. Press the Copy button ( ) to scan an original document and send it to the computer's default printer. Tools button Use the Tools button to open the HP Scanner Tools Utility where you can configure the scanner front panel buttons, assign profiles, and view maintenance information. For - HP N7710 | User Guide - Page 20
the pulldown tray on the front of the scanner. 3. Follow the onscreen instructions to complete the scan. For more information, see the HP Smart Document Scan Software help. Scan from other software programs You can scan an image or document directly into a software program if the program is ISIS or - HP N7710 | User Guide - Page 21
In order for a scan to complete automatically, the selected HP Smart Document Scan Software profile must include the following settings: • On the Profile tab, the Enable document review and option to scan more pages check box must be cleared. • Additional settings on the Destination tab, such as - HP N7710 | User Guide - Page 22
originals at 200 dpi color to a searchable PDF file and e-mail that file to a co-worker, you can create a profile with the necessary settings to accomplish this task. Use the HP Smart Document Scan Software to set up and modify profiles. Use the HP Scanner Tools Utility to assign each profile to - HP N7710 | User Guide - Page 23
on the HP Smart Document Scan Software menu bar. Assign profiles to numbers with the HP Scanner Tools Utility Use the HP Scanner Tools Utility on the scanner front panel. • Click Start, point to Programs or All Programs, point to HP, point to Scanjet, point to N7710, and then click HP Scanner Tools - HP N7710 | User Guide - Page 24
care for and maintain the scanner. • HP Scanner Tools Utility Maintenance tab • Order maintenance and scanning supplies • Clean the scanner glass • Clean the paper path • Clean the feed roller • Replace the feed roller and separation pad Occasional cleaning of the scanner helps ensure high-quality - HP N7710 | User Guide - Page 25
then reconnect the USB cable and power supply to the scanner. Clean the paper path If scanned images have streaks or scratches, use the HP paper-path cleaning cloth to clean the paper path. To order more HP paper-path cleaning cloths, go to www.hp.com/support. To clean the paper path, follow these - HP N7710 | User Guide - Page 26
images, clean the feed roller. To order more HP paper-path cleaning cloths, go to www.hp.com/support. To clean the feed roller, follow these steps: 1. Press the Power switch to the off position, and then disconnect the USB cable and power supply from the scanner. 2. Open the scanner hatch. 24 - HP N7710 | User Guide - Page 27
towards each other, and then lower the feed roller cover. 4. Use an HP paper-path cleaning cloth to clean the feed roller and the small rubber pad that is located below it. NOTE: If you do not have an HP paper-path cleaning cloth, use a lint-free cloth that has been dampened with isopropyl alcohol - HP N7710 | User Guide - Page 28
, lint-free cloth. 10. Close the scanner hatch, and then reconnect the USB cable and power supply to the scanner. 11. Press the Power switch to the on position, and then update the scanner maintenance history: a. Press the Tools ( ) button on the scanner front panel to open on the HP Scanner Tools - HP N7710 | User Guide - Page 29
and installation instructions. To order the replacement kit, go to www.hp.com/support. To replace the feed roller and separation pad, follow these steps: 1. Press the Power switch to the off position, and then disconnect the USB cable and power supply from the scanner. 2. Replace the feed roller and - HP N7710 | User Guide - Page 30
scanner. The Windows Device Manager tool is available on the Hardware tab of the Systems tool in the Control Panel. 3. If the computer does not recognize the scanner, uninstall and then reinstall the scanner software. 4. If the problem persists, contact HP Support. Error 04 Paper Jam A document - HP N7710 | User Guide - Page 31
paper meets the size and weight specifications, as specified in the scanner User Guide. 4. Replace the paper into the document feeder. If this error occurs when there is no paper feed error, the misfeed (multipick) detection sensor is not working correctly. Contact HP Support. NOTE: You can disable - HP N7710 | User Guide - Page 32
the following applications: • HP Scanjet N7710 Document ISIS/TWAIN • HP Scanjet N7710 Utilities 6. Reinstall using the HP Scanning Software CD that came with your scanner. When you insert the CD, an installation dialog box launches automatically. Scanner operation problems • Scanner will not turn on - HP N7710 | User Guide - Page 33
LED is still not on, the power supply might be defective. Contact HP Support for assistance. Scanner lamp stays on To turn the lamp off, turn off the scanner, wait 30 seconds, and then turn the scanner back on. Scanner does not scan right away Make sure the power rocker switch on the back of the - HP N7710 | User Guide - Page 34
HP scanning software. Verify the Disable front panel buttons setting in the HP Scanner Tools Utility. 2. A cable might be loose. Ensure that the USB cable and the power supply are securely connected. 3. Turn off the scanner, wait 30 seconds, and then turn the scanner back on. 32 Troubleshooting - HP N7710 | User Guide - Page 35
which HP Smart Document Scan Software profile is assigned to the selected number. If necessary, change which profile is assigned to that number. For more information, see the HP Scanner Tools Utility help. Scanner paper path problems • Paper jamming, skewing, misfeeds, or multiple-page feeds • Paper - HP N7710 | User Guide - Page 36
. After 60 seconds, reconnect the power supply to the scanner and then turn on the computer, in that order. 4. Try to rescan. 5. If the paper still does not feed properly, see the Product Support section of the printed Setup and Support Guide that came with the scanner. The bottom of the scanned - HP N7710 | User Guide - Page 37
clean and unwrinkled. • Use a cleaning cloth in the scanner paper path. • Clean the scanner glass. • Clean the feed roller manually. An item loaded in the scanner the paper guides touch the edges of the original. Clear jams from the scanner paper path To clear a paper jam: 1. Open the scanner hatch. - HP N7710 | User Guide - Page 38
Close the scanner hatch until it snaps into place. 5. Reload the unscanned originals in the document feeder. 6. Resume scanning. Contact HP Support For support contact information, see the printed Setup and Support Guide that came with the scanner or visit www.hp.com/support. 36 Troubleshooting - HP N7710 | User Guide - Page 39
profile, follow these steps: 1. Open the HP Smart Document Scan Software. 2. Select a scan profile, and then click Edit. 3. Turn on compression: ▲ On the Scan tab of the Profile Settings dialog box, select the Use scanner compression (for optimal speed) check box. 4. Set how much compression - HP N7710 | User Guide - Page 40
of 10 creates the smallest variable color drop out range. Only those colors that very closely approximate the specified colors are eliminated from the scan. To select colors to eliminate from a scan in an HP Smart Document Scan Software profile, follow these steps: 1. Open the HP Smart Document Scan - HP N7710 | User Guide - Page 41
for 5 HP Smart Document Scan Software features 3 help 6 scan from 18 set up profiles 20 I import profiles 21 ISIS-compliant programs scan from 18 J jams troubleshoot 35 L lamp troubleshoot 4, 31 LCD Reader 7 lines troubleshoot 32 long-page support 37 M maintenance clean feed roller 24 clean paper - HP N7710 | User Guide - Page 42
from HP Smart Document Scan Software 18 from other programs 18 rigid cards 14 select profiles 16 with one button press 18 Scan Document To button use 17 Scanner hardware compression feature 37 scanner lamp troubleshoot 4, 31 screen reader 7 separation pad replace 26 Setup and Support Guide 6 skewed
-
 1
1 -
 2
2 -
 3
3 -
 4
4 -
 5
5 -
 6
6 -
 7
7 -
8
-
9
-
10
-
11
-
12
-
13
-
14
-
15
-
16
-
17
-
18
-
19
-
20
-
21
-
22
-
23
-
24
-
25
-
26
-
27
-
28
-
29
-
30
-
31
-
32
-
33
-
34
-
35
-
36
-
37
-
38
-
39
-
40
-
41
-
42
 |
 |

HP Scanjet
N7710
User Guide