HP Officejet 4400 User Guide - Page 13
Print on specialty media, Printer Properties
 |
View all HP Officejet 4400 manuals
Add to My Manuals
Save this manual to your list of manuals |
Page 13 highlights
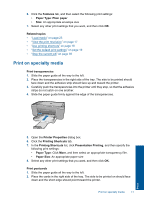
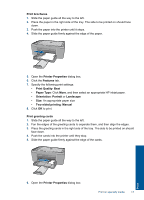
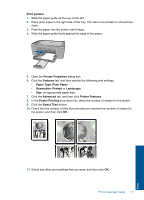
6. Click the Features tab, and then select the following print settings: • Paper Type: Plain paper • Size: An appropriate envelope size 7. Select any other print settings that you want, and then click OK. Related topics • "Load media" on page 23 • "View the print resolution" on page 17 • "Use printing shortcuts" on page 18 • "Set the default print settings" on page 19 • "Stop the current job" on page 93 Print on specialty media Print transparencies 1. Slide the paper guide all the way to the left. 2. Place the transparencies in the right side of the tray. The side to be printed should face down and the adhesive strip should face up and toward the printer. 3. Carefully push the transparencies into the printer until they stop, so that the adhesive strips do not catch on one another. 4. Slide the paper guide firmly against the edge of the transparencies. 5. Open the Printer Properties dialog box. 6. Click the Printing Shortcuts tab. 7. In the Printing Shortcuts list, click Presentation Printing, and then specify the following print settings: • Paper Type: Click More, and then select an appropriate transparency film. • Paper Size: An appropriate paper size 8. Select any other print settings that you want, and then click OK. Print postcards 1. Slide the paper guide all the way to the left. 2. Place the cards in the right side of the tray. The side to be printed on should face down and the short edge should point toward the printer. Print on specialty media 11 Print
-
 1
1 -
2
-
3
-
4
-
5
-
6
-
7
-
 8
8 -
 9
9 -
 10
10 -
 11
11 -
 12
12 -
 13
13 -
 14
14 -
 15
15 -
 16
16 -
 17
17 -
 18
18 -
19
-
20
-
21
-
22
-
23
-
24
-
25
-
26
-
27
-
28
-
29
-
30
-
31
-
32
-
33
-
34
-
35
-
36
-
37
-
38
-
39
-
40
-
41
-
42
-
43
-
44
-
45
-
46
-
47
-
48
-
49
-
50
-
51
-
52
-
53
-
54
-
55
-
56
-
57
-
58
-
59
-
60
-
61
-
62
-
63
-
64
-
65
-
66
-
67
-
68
-
69
-
70
-
71
-
72
-
73
-
74
-
75
-
76
-
77
-
78
-
79
-
80
-
81
-
82
-
83
-
84
-
85
-
86
-
87
-
88
-
89
-
90
-
91
-
92
-
93
-
94
-
95
-
96
-
97
-
98
-
99
-
100
-
101
-
102
-
103
-
104
-
105
-
106
 |
 |