HP Officejet 4400 User Guide - Page 75
The printout is blank, Solution 1: Place the original correctly on the glass
 |
View all HP Officejet 4400 manuals
Add to My Manuals
Save this manual to your list of manuals |
Page 75 highlights
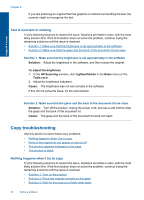
Solve a problem Cause: The product detected only a portion of the image due to dust or debris on the glass. The printout is blank Try the following solutions to resolve the issue. Solutions are listed in order, with the most likely solution first. If the first solution does not solve the problem, continue trying the remaining solutions until the issue is resolved. • Solution 1: Place the original correctly on the glass • Solution 2: Check the ink levels in the print cartridges Solution 1: Place the original correctly on the glass Solution: Load your original print side down on the right front corner of the glass. Cause: The original was placed incorrectly on the glass. If this did not solve the issue, try the next solution. Solution 2: Check the ink levels in the print cartridges Solution: Check the estimated ink levels remaining in the print cartridges. NOTE: Ink level warnings and indicators provide estimates for planning purposes only. When you receive a low-ink warning message, consider having a replacement cartridge available to avoid possible printing delays. You do not need to replace the print cartridges until print quality becomes unacceptable. If there is ink remaining in the print cartridges, but you are still noticing a problem, print a self-test report to determine if there is a problem with the print cartridges. If the self-test report shows a problem, clean the print cartridges. If the problem persists, you might need to replace the print cartridges. Cause: The print cartridges needed to be cleaned or there was insufficient ink. Copy troubleshooting 73
-
 1
1 -
2
-
3
-
4
-
5
-
6
-
7
-
8
-
9
-
10
-
11
-
12
-
13
-
14
-
15
-
16
-
17
-
18
-
19
-
20
-
21
-
22
-
23
-
24
-
25
-
26
-
27
-
28
-
29
-
30
-
31
-
32
-
33
-
34
-
35
-
36
-
37
-
38
-
39
-
40
-
41
-
42
-
43
-
44
-
45
-
46
-
47
-
48
-
49
-
50
-
51
-
52
-
53
-
54
-
55
-
56
-
57
-
58
-
59
-
60
-
61
-
62
-
63
-
64
-
65
-
66
-
67
-
68
-
69
-
 70
70 -
 71
71 -
 72
72 -
 73
73 -
 74
74 -
 75
75 -
 76
76 -
 77
77 -
 78
78 -
 79
79 -
 80
80 -
81
-
82
-
83
-
84
-
85
-
86
-
87
-
88
-
89
-
90
-
91
-
92
-
93
-
94
-
95
-
96
-
97
-
98
-
99
-
100
-
101
-
102
-
103
-
104
-
105
-
106
 |
 |