HP PageWide Managed P75050 Air Flow Repair Kit Install Guide - Page 3
Reinstall Tip, Caution
 |
View all HP PageWide Managed P75050 manuals
Add to My Manuals
Save this manual to your list of manuals |
Page 3 highlights
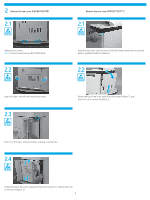
1.7 1.8 Grasp the air flow assembly by the outside edges, and rotate the top of the assembly down and away from the printer. REINSTALL TIP: It might take considerable force to install the assembly. An audible click is heard when the assembly is fully engaged. The assembly cannot be installed if the bottom retainers are not correctly installed. Slide the airflow assembly straight out of the printer to release it. CAUTION: Do not damage the FFC or the eject motor on the left side of the airflow assembly when removing it. NOTE: Slide the assembly as straight out as possible to avoid binding interference with the chassis. It might take a considerable pulling force to release the bottom retainers. 1.9 Remove the airflow assembly. NOTE: To prevent damage to the airflow star wheels, never place the assembly on a hard surface (set on a foam pad if available). 3
-
 1
1 -
 2
2 -
 3
3 -
 4
4 -
 5
5 -
 6
6 -
 7
7 -
 8
8 -
 9
9 -
10
-
11
-
12
 |
 |
