HP Pavilion dv7-2000 HP Pavilion dv7 Entertainment PC - Maintenance and Servic - Page 93
Remove the Subwoofer, Remove the three Phillips PM2.5×5.0 broadhead screws
 |
View all HP Pavilion dv7-2000 manuals
Add to My Manuals
Save this manual to your list of manuals |
Page 93 highlights
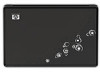
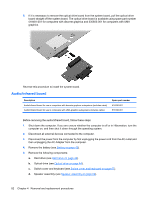
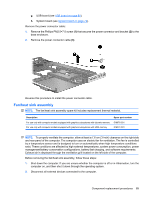
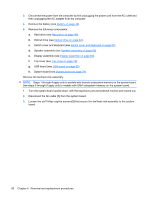
3. Disconnect the power from the computer by first unplugging the power cord from the AC outlet and then unplugging the AC adapter from the computer. 4. Remove the battery (see Battery on page 43). 5. Remove the following components: a. Hard drive (see Hard drive on page 48). b. Optical drive (see Optical drive on page 44). c. Switch cover and keyboard (see Switch cover and keyboard on page 57). d. Speaker assembly (see Speaker assembly on page 62). e. Display assembly (see Display assembly on page 64). f. Top cover (see Top cover on page 74). g. USB board (see USB board on page 83). Remove the Subwoofer: 1. Remove the three Phillips PM2.5×5.0 broadhead screws (1) that secure the subwoofer to the base enclosure. 2. Ensure the rubber grommets (2) that contained the broadhead screws are still in place. 3. Remove the subwoofer (3). Reverse this procedure to install the subwoofer. Component replacement procedures 85
-
 1
1 -
2
-
3
-
4
-
5
-
6
-
7
-
8
-
9
-
10
-
11
-
12
-
13
-
14
-
15
-
16
-
17
-
18
-
19
-
20
-
21
-
22
-
23
-
24
-
25
-
26
-
27
-
28
-
29
-
30
-
31
-
32
-
33
-
34
-
35
-
36
-
37
-
38
-
39
-
40
-
41
-
42
-
43
-
44
-
45
-
46
-
47
-
48
-
49
-
50
-
51
-
52
-
53
-
54
-
55
-
56
-
57
-
58
-
59
-
60
-
61
-
62
-
63
-
64
-
65
-
66
-
67
-
68
-
69
-
70
-
71
-
72
-
73
-
74
-
75
-
76
-
77
-
78
-
79
-
80
-
81
-
82
-
83
-
84
-
85
-
86
-
87
-
 88
88 -
 89
89 -
 90
90 -
 91
91 -
 92
92 -
 93
93 -
 94
94 -
 95
95 -
 96
96 -
 97
97 -
 98
98 -
99
-
100
-
101
-
102
-
103
-
104
-
105
-
106
-
107
-
108
-
109
-
110
-
111
-
112
-
113
-
114
-
115
-
116
-
117
-
118
-
119
-
120
-
121
-
122
-
123
-
124
-
125
-
126
-
127
-
128
-
129
-
130
-
131
-
132
-
133
-
134
-
135
-
136
-
137
-
138
-
139
-
140
-
141
-
142
-
143
-
144
-
145
-
146
-
147
-
148
-
149
-
150
-
151
-
152
-
153
-
154
-
155
-
156
-
157
-
158
-
159
-
160
-
161
-
162
-
163
-
164
 |
 |