HP Pavilion t300 HP Pavilion Desktop PCs - (English) Users Guide 5990-6416 - Page 111
removing the front panel
 |
View all HP Pavilion t300 manuals
Add to My Manuals
Save this manual to your list of manuals |
Page 111 highlights
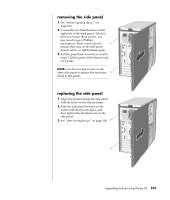
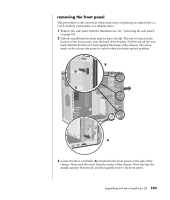
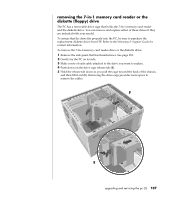
removing the front panel This procedure is only necessary when removing or replacing an optical drive, a 7-In-1 memory card reader, or a diskette drive. 1 Remove the side panel with the thumbscrews. See "removing the side panel" on page 101. 2 Unlock or pull back the front panel release tab (A). This tab is located at the bottom of the front panel, near the hard drive bracket. Pull the tab all the way back until the bottom of it rests against the frame of the chassis. The arrow mark on the release tab points to unlock when it is in the unlock position. B A 3 Locate the three small tabs (B) attached to the front panel on the side of the chassis. Press each tab away from the centre of the chassis. Press the top, the middle and the bottom tab, and then gently remove the front panel. upgrading and servicing the pc (1) 103
-
 1
1 -
2
-
3
-
4
-
5
-
6
-
7
-
8
-
9
-
10
-
11
-
12
-
13
-
14
-
15
-
16
-
17
-
18
-
19
-
20
-
21
-
22
-
23
-
24
-
25
-
26
-
27
-
28
-
29
-
30
-
31
-
32
-
33
-
34
-
35
-
36
-
37
-
38
-
39
-
40
-
41
-
42
-
43
-
44
-
45
-
46
-
47
-
48
-
49
-
50
-
51
-
52
-
53
-
54
-
55
-
56
-
57
-
58
-
59
-
60
-
61
-
62
-
63
-
64
-
65
-
66
-
67
-
68
-
69
-
70
-
71
-
72
-
73
-
74
-
75
-
76
-
77
-
78
-
79
-
80
-
81
-
82
-
83
-
84
-
85
-
86
-
87
-
88
-
89
-
90
-
91
-
92
-
93
-
94
-
95
-
96
-
97
-
98
-
99
-
100
-
101
-
102
-
103
-
104
-
105
-
 106
106 -
 107
107 -
 108
108 -
 109
109 -
 110
110 -
 111
111 -
 112
112 -
 113
113 -
 114
114 -
 115
115 -
 116
116 -
117
-
118
-
119
-
120
-
121
-
122
-
123
-
124
-
125
-
126
-
127
-
128
-
129
-
130
-
131
-
132
-
133
-
134
-
135
-
136
-
137
-
138
-
139
-
140
-
141
-
142
-
143
-
144
-
145
-
146
-
147
-
148
-
149
-
150
-
151
-
152
-
153
-
154
-
155
-
156
 |
 |
