HP Pavilion t300 HP Pavilion Desktop PCs - (English) Users Guide 5990-6416 - Page 79
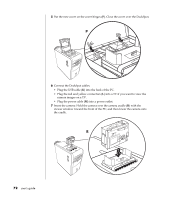
To prepare the new cover, push the two black dots on the inside to free
 |
View all HP Pavilion t300 manuals
Add to My Manuals
Save this manual to your list of manuals |
Page 79 highlights
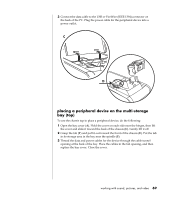
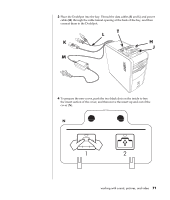
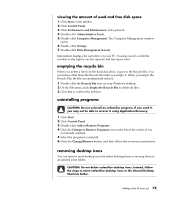
3 Place the DockSpot into the bay. Thread the data cables (K and L) and power cable (M) through the cable tunnel opening at the back of the bay, and then connect them to the DockSpot. T L K H J M hp dvd writer & cd-writer expansion / bay hp pavilion 0000xxx 4 To prepare the new cover, push the two black dots on the inside to free the insert section of the cover, and then move the insert up and out of the cover (N). N working with sound, pictures, and video 71
-
 1
1 -
2
-
3
-
4
-
5
-
6
-
7
-
8
-
9
-
10
-
11
-
12
-
13
-
14
-
15
-
16
-
17
-
18
-
19
-
20
-
21
-
22
-
23
-
24
-
25
-
26
-
27
-
28
-
29
-
30
-
31
-
32
-
33
-
34
-
35
-
36
-
37
-
38
-
39
-
40
-
41
-
42
-
43
-
44
-
45
-
46
-
47
-
48
-
49
-
50
-
51
-
52
-
53
-
54
-
55
-
56
-
57
-
58
-
59
-
60
-
61
-
62
-
63
-
64
-
65
-
66
-
67
-
68
-
69
-
70
-
71
-
72
-
73
-
 74
74 -
 75
75 -
 76
76 -
 77
77 -
 78
78 -
 79
79 -
 80
80 -
 81
81 -
 82
82 -
 83
83 -
 84
84 -
85
-
86
-
87
-
88
-
89
-
90
-
91
-
92
-
93
-
94
-
95
-
96
-
97
-
98
-
99
-
100
-
101
-
102
-
103
-
104
-
105
-
106
-
107
-
108
-
109
-
110
-
111
-
112
-
113
-
114
-
115
-
116
-
117
-
118
-
119
-
120
-
121
-
122
-
123
-
124
-
125
-
126
-
127
-
128
-
129
-
130
-
131
-
132
-
133
-
134
-
135
-
136
-
137
-
138
-
139
-
140
-
141
-
142
-
143
-
144
-
145
-
146
-
147
-
148
-
149
-
150
-
151
-
152
-
153
-
154
-
155
-
156
 |
 |
working with sound, pictures, and video
71
3
Place the DockSpot into the bay. Thread the data cables (
K
and
L
) and power
cable (
M
) through the cable tunnel opening at the back of the bay, and then
connect them to the DockSpot.
hp dvd writer & cd-writer
expansion / bay
J
T
M
K
L
H
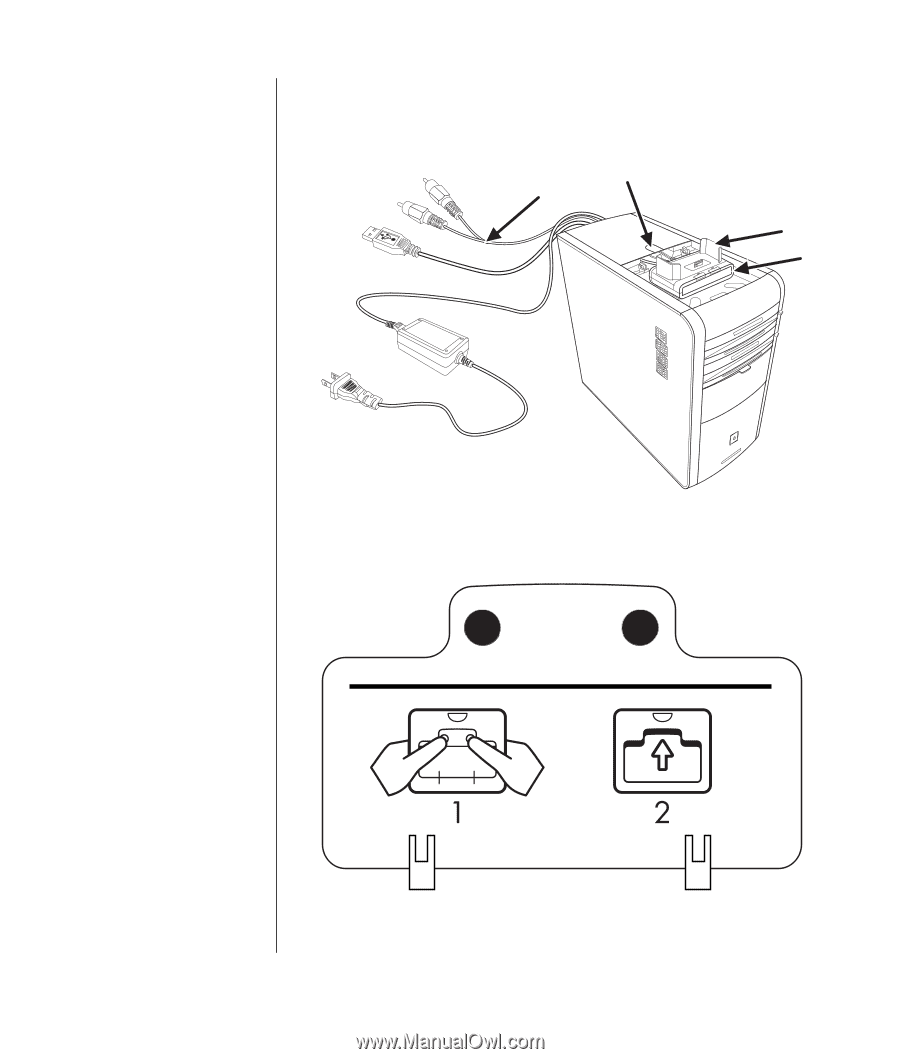
4
To prepare the new cover, push the two black dots on the inside to free
the insert section of the cover, and then move the insert up and out of the
cover (
N
).
N