HP Photosmart 850 HP Photosmart 850 digital camera - (English) User Guide - Page 17
Choosing the language, Setting the date and time, Controller, Menu/OK
 |
View all HP Photosmart 850 manuals
Add to My Manuals
Save this manual to your list of manuals |
Page 17 highlights
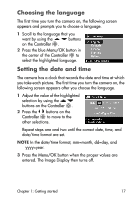
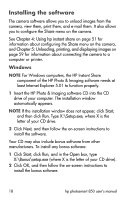
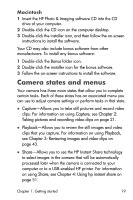
Choosing the language The first time you turn the camera on, the following screen appears and prompts you to choose a language. 1 Scroll to the language that you want by using the buttons on the Controller . 2 Press the blue Menu/OK button in the center of the Controller to select the highlighted language. Setting the date and time The camera has a clock that records the date and time at which you take each picture. The first time you turn the camera on, the following screen appears after you choose the language. 1 Adjust the value of the highlighted selection by using the buttons on the Controller . 2 Press the buttons on the Controller to move to the other selections. Repeat steps one and two until the correct date, time, and date/time format are set. NOTE In the date/time format, mm=month, dd=day, and yyyy=year. 3 Press the Menu/OK button when the proper values are entered. The Image Display then turns off. Chapter 1: Getting started 17
-
 1
1 -
2
-
3
-
4
-
5
-
6
-
7
-
8
-
9
-
10
-
11
-
 12
12 -
 13
13 -
 14
14 -
 15
15 -
 16
16 -
 17
17 -
 18
18 -
 19
19 -
 20
20 -
 21
21 -
 22
22 -
23
-
24
-
25
-
26
-
27
-
28
-
29
-
30
-
31
-
32
-
33
-
34
-
35
-
36
-
37
-
38
-
39
-
40
-
41
-
42
-
43
-
44
-
45
-
46
-
47
-
48
-
49
-
50
-
51
-
52
-
53
-
54
-
55
-
56
-
57
-
58
-
59
-
60
-
61
-
62
-
63
-
64
-
65
-
66
-
67
-
68
-
69
-
70
-
71
-
72
-
73
-
74
-
75
-
76
-
77
-
78
-
79
-
80
-
81
-
82
-
83
-
84
-
85
-
86
-
87
-
88
-
89
-
90
-
91
-
92
-
93
-
94
-
95
-
96
-
97
-
98
-
99
-
100
-
101
-
102
-
103
-
104
-
105
-
106
-
107
-
108
-
109
-
110
-
111
-
112
 |
 |
