HP Photosmart C4400 Basics Guide
HP Photosmart C4400 - All-in-One Printer Manual
 |
View all HP Photosmart C4400 manuals
Add to My Manuals
Save this manual to your list of manuals |
HP Photosmart C4400 manual content summary:
- HP Photosmart C4400 | Basics Guide - Page 1
HP Photosmart C4400 All-in-One series Basics Guide - HP Photosmart C4400 | Basics Guide - Page 2
such products and services. Nothing herein should be construed as constituting an additional warranty. HP shall not be liable for technical or editorial errors or omissions contained herein. © 2007 Hewlett-Packard Development Company, L.P. Windows, Windows 2000, and Windows XP are U.S. registered - HP Photosmart C4400 | Basics Guide - Page 3
paper...4 Avoid paper jams...7 Print 10 x 15 cm (4 x 6 inch) photos 7 Scan an image...8 Make a copy...9 Replace the print cartridges...9 Clean the HP All-in-One...12 2 Troubleshooting and support Uninstall and reinstall the software 14 Hardware setup troubleshooting 15 Clear paper jams...16 Print - HP Photosmart C4400 | Basics Guide - Page 4
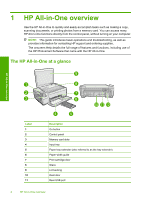
guide introduces basic operations and troubleshooting, as well as provides information for contacting HP support and ordering supplies. The onscreen Help details the full range of features and functions, including use of the HP Photosmart Software that came with the HP All-in-One. The HP All-in-One - HP Photosmart C4400 | Basics Guide - Page 5
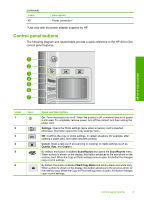
unplug the power cord. Settings: Opens the Photo settings menu when a memory card is inserted. Otherwise, this button opens the Copy settings menu. OK: Confirms the copy or photo settings. In certain situations (for example, after clearing a paper jam), this button resumes printing. Cancel: Stops - HP Photosmart C4400 | Basics Guide - Page 6
The Setup Guide provides instructions for setting up your HP All-in-One and installing software. Make sure you follow the steps in the Setup Guide in order. If you have problems during setup, see Troubleshooting in the last section of the Setup Guide, or see "Troubleshooting and support" on page - HP Photosmart C4400 | Basics Guide - Page 7
3. Close the lid. To load full-size paper 1. Slide the paper-width guide to its outermost position. HP All-in-One overview NOTE: If you are using letter or A4 paper or smaller, make sure the tray extender is open all the way. When you use legal-size paper, leave the tray extender closed. TIP: Tap - HP Photosmart C4400 | Basics Guide - Page 8
in the input tray 1. Slide the paper-width guide to its outermost position. HP All-in-One overview 2. Insert the stack of photo paper into the far-right side of the input tray with the short edge forward and the print side down. Slide the stack of photo paper forward until it stops. If the photo - HP Photosmart C4400 | Basics Guide - Page 9
achieve the best print quality, HP recommends using HP papers that are specifically designed for the type of project you are printing along with genuine HP ink. HP papers and HP ink are specifically designed to work well together to provide high-quality output. HP All-in-One overview 1 xD-Picture - HP Photosmart C4400 | Basics Guide - Page 10
to the print queue. Scan an image You can start a scan from your computer or from the control panel of the HP All-in-One. This section explains how to scan from the control panel of the HP All-in-One only. NOTE: You can also use the software you installed with the HP All-in-One to scan images. Using - HP Photosmart C4400 | Basics Guide - Page 11
cartridges. Following these instructions might also help solve print quality issues related to the cartridges. NOTE: When the ink level for the print cartridge is low, a message appears on your computer screen. You can also check the ink levels by using the software installed with the HP All-in-One - HP Photosmart C4400 | Basics Guide - Page 12
. HP All-in-One overview 1 Print cartridge slot for the tri-color print cartridge 2 Print cartridge slot for the black and photo print cartridges TIP: If you are removing the black print cartridge in order to install the photo print cartridge, store the black print cartridge in the print cartridge - HP Photosmart C4400 | Basics Guide - Page 13
HP All-in-One overview 1 Copper-colored contacts 2 Plastic tape with pink pull tab (must be removed before installing) 3 Ink nozzles under tape CAUTION: Do not touch the copper-colored contacts or ink nozzles. Also, do not re-tape the print cartridges. Doing so can result in clogs, ink failure, and - HP Photosmart C4400 | Basics Guide - Page 14
can purchase an HP Cleaning Kit for Inkjet Printers and All-in-Ones (Q6260A) that provides everything needed to safely clean your HP device. For more information, go to: www.shopping.hp.com/accessories-store/printer. To clean the glass 1. Turn off the product, unplug the power cord, and raise the - HP Photosmart C4400 | Basics Guide - Page 15
residual alcohol. CAUTION: Be careful not to spill alcohol on the glass or exterior of the product, as this might damage it. 5. Plug in the power cord, and then turn on the product. HP All-in-One overview Clean the HP All-in-One 13 - HP Photosmart C4400 | Basics Guide - Page 16
the installation CD, you can download the software from www.hp.com/support. 7. Follow the onscreen instructions and the instructions provided in the Setup Guide that came with the product. When the software installation is complete, the HP Digital Imaging Monitor icon appears in the Windows system - HP Photosmart C4400 | Basics Guide - Page 17
having a problem, contact HP support for service. Go to: www.hp.com/support. If prompted, choose your country/region, and then click Contact HP for technical support. Cause: You might need assistance to enable the product or software to function properly. Troubleshooting and support Hardware setup - HP Photosmart C4400 | Basics Guide - Page 18
the print cartridges are installed properly and have ink Solution: Check that the print cartridges are installed properly and have ink. Cause: There might have been a problem with one or more of the print cartridges. If this did not solve the issue, try the next solution. Solution 5: Load paper in - HP Photosmart C4400 | Basics Guide - Page 19
the current job. Print cartridge troubleshooting If you are experiencing problems with printing, you might have a problem with one of the print cartridges. For more information, see "Replace the print cartridges" on page 9 in this guide. Support process If you have a problem, follow these steps - HP Photosmart C4400 | Basics Guide - Page 20
printing) • Input voltage(0957-2231): AC 100 to 240 V ~ 600 mA 50-60 Hz • Output voltage: DC 32 V===375 mA, 16 V===500 mA NOTE: Use only with the power adapter supplied by HP. Environmental specifications • Recommended operating marketing name (HP Photosmart C4400 All-in-One series, etc.) or - HP Photosmart C4400 | Basics Guide - Page 21
maintenance or modification; b. Software, media, parts, or supplies not provided or supported by HP; c. Operation outside the product's specifications; d. Unauthorized modification or misuse. 4. For HP printer products, the use of a non-HP cartridge or a refilled cartridge does not affect either - HP Photosmart C4400 | Basics Guide - Page 22
Chapter 3 Technical information 20 Technical information - HP Photosmart C4400 | Basics Guide - Page 23
-
 1
1 -
 2
2 -
 3
3 -
 4
4 -
 5
5 -
 6
6 -
 7
7 -
8
-
9
-
10
-
11
-
12
-
13
-
14
-
15
-
16
-
17
-
18
-
19
-
20
-
21
-
22
-
23
 |
 |
Basics Guide
HP Photosmart C4400 All-in-One series