HP Photosmart C4400 Basics Guide - Page 10
Scan an image, To print one or more small-size photos, Settings, Borderless, Prints/Total, Print
 |
View all HP Photosmart C4400 manuals
Add to My Manuals
Save this manual to your list of manuals |
Page 10 highlights
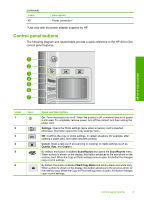
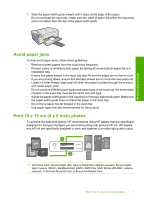
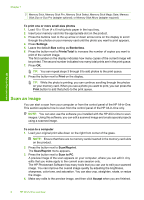
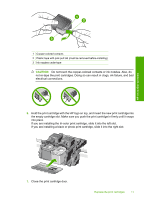
HP All-in-One overview Chapter 1 2 Memory Stick, Memory Stick Pro, Memory Stick Select, Memory Stick Magic Gate, Memory Stick Duo or Duo Pro (adapter optional), or Memory Stick Micro (adapter required) To print one or more small-size photos 1. Load 10 x 15 cm (4 x 6 inch) photo paper in the input tray. 2. Insert your memory card into the appropriate slot on the product. 3. Press the buttons next to the up arrow or down arrow icons on the display to scroll through the photos on your memory card until the photo you want to print appears. 4. Press Settings. 5. Leave the default Size setting as Borderless. 6. Press the button next to Prints/Total to increase the number of copies you want to print of the current image. The first number on the display indicates how many copies of the current image will be printed. The second number indicates how many total prints are in the print queue. 7. Press OK. TIP: You can repeat steps 3 through 8 to add photos to the print queue. 8. Press the button next to Print on the display. TIP: While the photo is printing, you can continue scrolling through the photos on your memory card. When you see a photo you want to print, you can press the Print button to add that photo to the print queue. Scan an image You can start a scan from your computer or from the control panel of the HP All-in-One. This section explains how to scan from the control panel of the HP All-in-One only. NOTE: You can also use the software you installed with the HP All-in-One to scan images. Using this software, you can edit a scanned image and create special projects using a scanned image. To scan to a computer 1. Load your original print side down on the right front corner of the glass. NOTE: Ensure that there are no memory cards inserted in the memory card slots on the product. 2. Press the button next to Scan/Reprint. The Scan/Reprint menu appears. 3. Press the button next to Scan to PC. A preview image of the scan appears on your computer, where you can edit it. Any edits that you make apply to the current scan session only. The HP Photosmart Software has many tools that you can use to edit your scanned image. You can improve the overall image quality by adjusting the brightness, sharpness, color tone, and saturation. You can also crop, straighten, rotate, or resize the image. 4. Make any edits to the preview image, and then click Accept when you are finished. 8 HP All-in-One overview
-
 1
1 -
2
-
3
-
4
-
 5
5 -
 6
6 -
 7
7 -
 8
8 -
 9
9 -
 10
10 -
 11
11 -
 12
12 -
 13
13 -
 14
14 -
 15
15 -
16
-
17
-
18
-
19
-
20
-
21
-
22
-
23
 |
 |
