HP Photosmart M22 HP Photosmart M22/23 Digital Camera with HP Instant Share - - Page 41
Flash, Auto Flash, Red Eye, Remove Red Eyes, of the red-eye phenomenon
 |
View all HP Photosmart M22 manuals
Add to My Manuals
Save this manual to your list of manuals |
Page 41 highlights
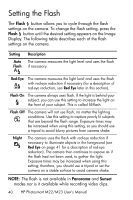
If the flash setting is anything other than the default Auto Flash setting, the icon for the setting will appear in the Live View screen. The new setting remains in effect until it is changed again or until the camera is turned off. The flash setting resets to the default Auto Flash setting when you turn the camera off. NOTE: To restore the flash setting to what it was when you last turned the camera off, hold down the button as you turn the camera back on. Red Eye The red-eye phenomenon is caused by light from the flash reflecting off the subjects' eyes, which sometimes makes a human's eyes appear red or an animal's eyes appear green or white in the captured image. When you use a flash setting with red-eye reduction, the camera flashes quickly up to three times to minimize the subject's pupils, thus reducing the effect of the red-eye phenomenon, before the camera uses the main flash. It will take longer to take a picture using red-eye reduction, because the shutter is delayed for the additional flashes. Therefore, make sure your subjects wait for the additional flashes. TIP: You can also remove red-eyes in pictures you have already taken. See Remove Red Eyes on page 71. Taking Pictures and Recording Video Clips 41
-
 1
1 -
2
-
3
-
4
-
5
-
6
-
7
-
8
-
9
-
10
-
11
-
12
-
13
-
14
-
15
-
16
-
17
-
18
-
19
-
20
-
21
-
22
-
23
-
24
-
25
-
26
-
27
-
28
-
29
-
30
-
31
-
32
-
33
-
34
-
35
-
 36
36 -
 37
37 -
 38
38 -
 39
39 -
 40
40 -
 41
41 -
 42
42 -
 43
43 -
 44
44 -
 45
45 -
 46
46 -
47
-
48
-
49
-
50
-
51
-
52
-
53
-
54
-
55
-
56
-
57
-
58
-
59
-
60
-
61
-
62
-
63
-
64
-
65
-
66
-
67
-
68
-
69
-
70
-
71
-
72
-
73
-
74
-
75
-
76
-
77
-
78
-
79
-
80
-
81
-
82
-
83
-
84
-
85
-
86
-
87
-
88
-
89
-
90
-
91
-
92
-
93
-
94
-
95
-
96
-
97
-
98
-
99
-
100
-
101
-
102
-
103
-
104
-
105
-
106
-
107
-
108
-
109
-
110
-
111
-
112
-
113
-
114
-
115
-
116
-
117
-
118
-
119
-
120
-
121
-
122
-
123
-
124
-
125
-
126
-
127
-
128
-
129
-
130
-
131
-
132
-
133
-
134
-
135
-
136
-
137
-
138
-
139
-
140
-
141
-
142
-
143
-
144
-
145
-
146
-
147
-
148
-
149
-
150
-
151
-
152
-
153
-
154
-
155
-
156
-
157
-
158
-
159
-
160
-
161
-
162
-
163
-
164
-
165
-
166
-
167
-
168
-
169
-
170
-
171
-
172
-
173
-
174
-
175
-
176
-
177
-
178
-
179
-
180
 |
 |
