HP Photosmart Premium e-All-in-One Printer - C310 Reference Guide
HP Photosmart Premium e-All-in-One Printer - C310 Manual
 |
View all HP Photosmart Premium e-All-in-One Printer - C310 manuals
Add to My Manuals
Save this manual to your list of manuals |
HP Photosmart Premium e-All-in-One Printer - C310 manual content summary:
- HP Photosmart Premium e-All-in-One Printer - C310 | Reference Guide - Page 1
PHOTOSMART PREMIUM e-ALL-IN-ONE C310 SERIES Start setup here... 1 Verify box contents. Inside... Setup troubleshooting 2 Get to know your HP Photosmart 3 Features and tips 4 What's new? Web Services 5 Network Printer Setup 6 * Not included with all models 2 Unpack printer. Remove all - HP Photosmart Premium e-All-in-One Printer - C310 | Reference Guide - Page 2
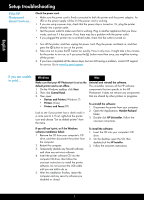
you have completed all the above steps, but are still having a problem, contact HP support for service. Go to www.hp.com/support. If you are unable to print... Windows Mac Make sure that your HP Photosmart is set as the default printer and is not offline. 1. On the Windows taskbar, click Start - HP Photosmart Premium e-All-in-One Printer - C310 | Reference Guide - Page 3
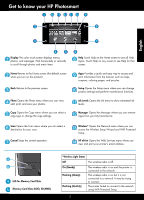
Get to know your HP Photosmart English Display The color touch screen displays menus, photos where you can access the Wireless Setup Wizard and WiFi Protected Setup. HP ePrint Opens the Web Services menu where can view and print your printer's email address. a b s a LED for Memory Card Slots b - HP Photosmart Premium e-All-in-One Printer - C310 | Reference Guide - Page 4
and Readme file that are installed with the HP Photosmart software. •• Onscreen Help includes instructions on product features and troubleshooting. It also provides product specifications, legal notices, environmental, regulatory, and support information, plus links to more information online on - HP Photosmart Premium e-All-in-One Printer - C310 | Reference Guide - Page 5
Wireless button on the HP Photosmart front panel. •• Select the Web Services menu from the printer display. From here, you can turn the service on or off, display the printer's email address, and print an information page. HP ePrint Print from anywhere HP's free ePrint service provides an easy way - HP Photosmart Premium e-All-in-One Printer - C310 | Reference Guide - Page 6
USB to wireless connection: 1. Click Start, click HP, click Photosmart C310 series, then click USB to Wireless. Keep your USB cable connected until prompted to disconnect it. 2. Follow the instructions on the displayed screens. •• Click Next to move from one screen to the next. •• Click Help to get - HP Photosmart Premium e-All-in-One Printer - C310 | Reference Guide - Page 7
may have a router problem. Try restarting both the printer and the router by turning off the power on each. Then, turn them both on again. Your computer may not be connected to your network. Make sure that the computer is connected to the same network to which the HP Photosmart is connected. Your - HP Photosmart Premium e-All-in-One Printer - C310 | Reference Guide - Page 8
to the customer or any HP support contract with the customer. However, if printer failure or damage is attributable to the use of a non-HP or refilled cartridge or an expired ink cartridge, HP will charge its standard time and materials charges to service the printer for the particular failure or - HP Photosmart Premium e-All-in-One Printer - C310 | Reference Guide - Page 9
PHOTOSMART PREMIUM e-ALL-IN-ONE SÉRIE C310 Commencez la configuration ici... 1 Vérifiez le contenu de l'emballage. À l'intérieur... Dépannage concernant l'installation 10 Apprenez à connaître votre appareil HP Photosmart 11 Fonctionnalités et conseils 12 Nouveautés : Services Web 13 - HP Photosmart Premium e-All-in-One Printer - C310 | Reference Guide - Page 10
contactez le support HP pour obtenir une assistance. Consultez le site www.hp.com/support. Windows Assurez-vous que votre appareil HP Photosmart est défini CD du logiciel d'impression dans le lecteur de CD, puis suivez les instructions à l'écran pour installer le logiciel. Ne branchez le câble USB - HP Photosmart Premium e-All-in-One Printer - C310 | Reference Guide - Page 11
Apprenez à connaître votre appareil HP Photosmart Français Ecran L'écran tactile affiche les menus de configuration sans fil et à la configuration WPS (WiFi Protected Setup). HP ePrint Ouvre le menu Services Web, à partir duquel vous pouvez afficher, modifier et imprimer l'adresse électronique - HP Photosmart Premium e-All-in-One Printer - C310 | Reference Guide - Page 12
qui sont installés avec le logiciel HP Photosmart. •• L'aide en ligne contient des instructions relatives aux fonctionnalités et au dépannage Windows XP, Vista, Win 7 : Cliquez sur Démarrer > Tous les programmes > HP > Photosmart série C310 > Aide. •• Mac OS X v10.5 et v10.6 : Dans le Finder, - HP Photosmart Premium e-All-in-One Printer - C310 | Reference Guide - Page 13
le bouton Sans fil sur le panneau de commande de l'imprimante HP Photosmart. •• Sélectionnez le menu Services Web sur l'écran de l'imprimante. Depuis ce menu, vous pouvez activer ou désactiver le service, afficher l'adresse électronique de l'imprimante et imprimer une page d'informations. Imprimez - HP Photosmart Premium e-All-in-One Printer - C310 | Reference Guide - Page 14
à une connexion sans fil : 1. Cliquez sur Démarrer, sur HP, sur Photosmart série C310, puis cliquez sur Passage d'une connexion USB à une connexion sans fil fil. Sélectionnez l'Assistant de configuration sans fil. 2. Suivez les instructions à l'écran. Pour obtenir de l'aide supplémentaire à propos - HP Photosmart Premium e-All-in-One Printer - C310 | Reference Guide - Page 15
-les. Votre ordinateur n'est peut-être pas connecté à votre réseau. Assurez-vous que l'ordinateur est connecté au même réseau que l'appareil HP Photosmart. Votre ordinateur est peut-être connecté à un réseau privé virtuel (VPN). Désactivez temporairement le VPN avant de poursuivre l'installation. La - HP Photosmart Premium e-All-in-One Printer - C310 | Reference Guide - Page 16
ée HP est valable uniquement en cas d'impossibilité d'exécuter les instructions de programmation. HP ne de la garantie ni d'un contrat de support HP. Toutefois, si la panne ou les HP est valable dans tout pays dans lequel le produit HP couvert est distribué par HP. Des contrats apportant des services - HP Photosmart Premium e-All-in-One Printer - C310 | Reference Guide - Page 17
PHOTOSMART PREMIUM e-ALL-IN-ONE C310 SERIES Inicie la configuración aquí... Lea Esto 1 Verifique el contenido de la caja. Contenido... Solución de problemas de instalación 18 Conozca HP Photosmart 19 Funciones y sugerencias 20 Novedades Servicios Web 21 Configuración de impresora en red 22 - HP Photosmart Premium e-All-in-One Printer - C310 | Reference Guide - Page 18
todos los pasos anteriores y sigue sin resolver el problema, contacte con el servicio de asistencia de HP. Vaya a www.hp.com/support. Si no puede imprimir... Windows Mac Asegúrese de que la HP Photosmart se haya definido como la impresora predeterminada y no esté fuera de línea. 1. En la barra - HP Photosmart Premium e-All-in-One Printer - C310 | Reference Guide - Page 19
Conozca HP Photosmart Español Pantalla La pantalla táctil en color muestra los men menú Red, donde puede acceder al Asistente de configuración inalámbgrica y la Configuración protegida inalámbrica. HP ePrint Abre el menú de servicios Web donde puede ver e imprimir la dirección de correo electrónico - HP Photosmart Premium e-All-in-One Printer - C310 | Reference Guide - Page 20
del producto. Para acceder a la ayuda en pantalla desde el ordenador: •• Windows XP, Vista, Win 7: Haga clic en Inicio > Todos los programas > HP > Photosmart C310 series > Ayuda. •• Mac OS X v10.5 y v10.6: En el Buscador, seleccione Ayuda > Ayuda de Mac. En Visor de ayuda, elija Ayuda del producto - HP Photosmart Premium e-All-in-One Printer - C310 | Reference Guide - Page 21
ePrint, la impresora debe estar conectada a una red con conexión a Internet. •• Pulse el botón Conexión inalámbrica del panel frontal de la HP Photosmart. •• Seleccione el menú Servicios Web en la pantalla de la impresora. Desde aquí, puede activar o desactivar el servicio, ver la dirección email de - HP Photosmart Premium e-All-in-One Printer - C310 | Reference Guide - Page 22
los siguientes pasos. De USB a conexión inalámbrica Windows Para cambiar de USB a una conexión inalámbrica: 1. Haga clic en Inicio, HP, seleccione Photosmart C310 series, y haga clic en De USB a conexión inalámbrica. Mantenga el cable USB conectado hasta que se le pida que lo desconecte. 2. Siga - HP Photosmart Premium e-All-in-One Printer - C310 | Reference Guide - Page 23
Para descargar la Utilidad de diagnósticos de red, vaya a: www.hp.com/go/wirelessprinting. Puede tratarse de un problema del router. Intente reiniciar de que el equipo que utiliza está conectado a la misma red que HP Photosmart. El ordenador puede estar conectado a una red privada virtual (VPN). - HP Photosmart Premium e-All-in-One Printer - C310 | Reference Guide - Page 24
90 días 1 año La garantía es válida hasta que se agote la tinta HP o hasta que se alcance la fecha de "fin de garantía" indicada en el cartucho válida su garantía solo se deberá comunicar al Centro de Asistencia Telefónica de HP (Teléfonos: 1800-88-8588 o para la Ciudad de Mexico 55-5258-9922
-
 1
1 -
 2
2 -
 3
3 -
 4
4 -
 5
5 -
 6
6 -
 7
7 -
8
-
9
-
10
-
11
-
12
-
13
-
14
-
15
-
16
-
17
-
18
-
19
-
20
-
21
-
22
-
23
-
24
 |
 |
© 2010 Hewlett-Packard Development Company, L.P.
Printed in [English]
Printed in [French]
*CN503-90062*
*CN503-90062*
CN503-90062
4
1
3
2
Important!
Do
not
connect a USB cable unless prompted by the software!
(Windows
®
only)
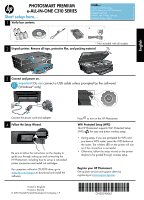
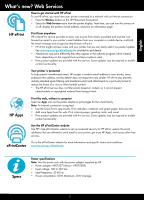
Unpack printer. Remove all tape, protective film, and packing material.
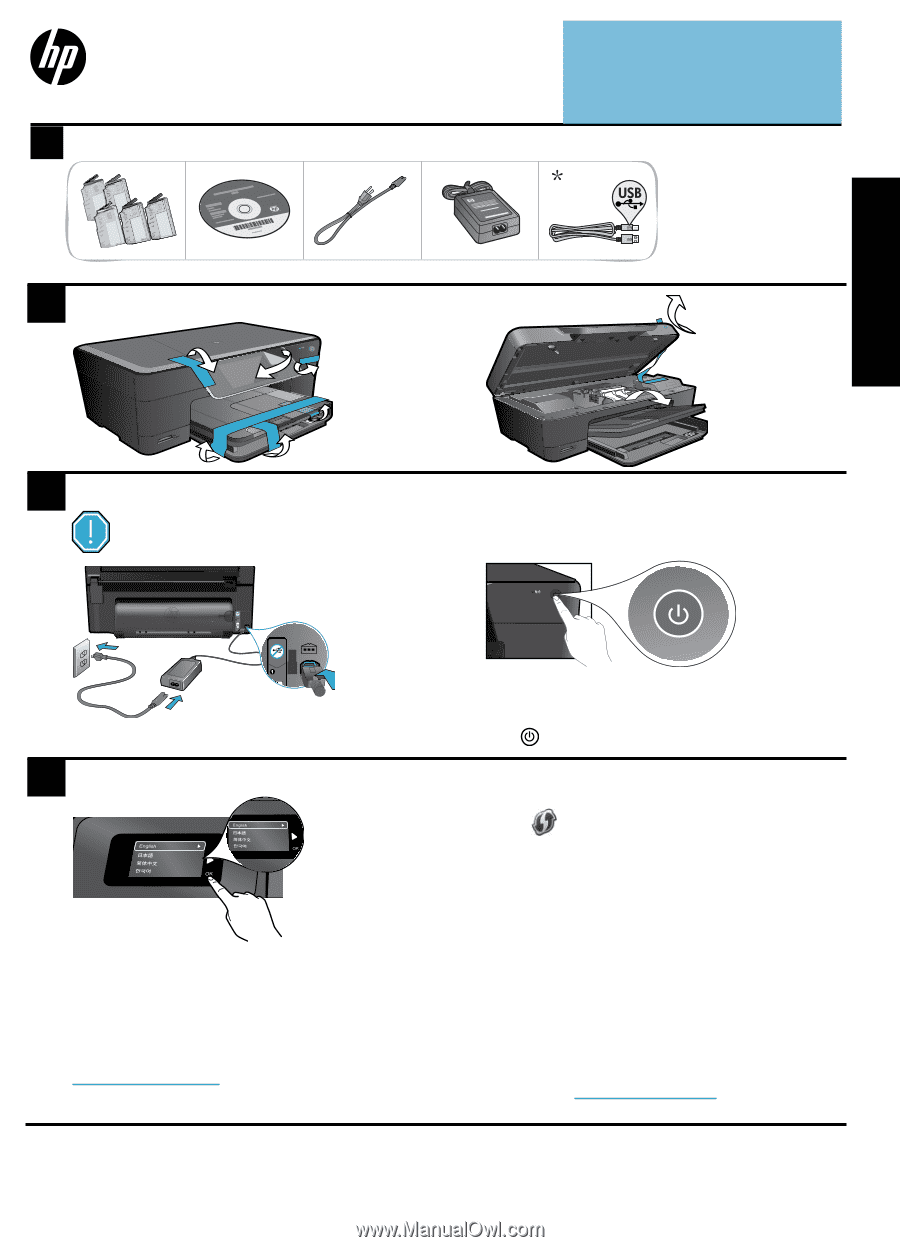
Follow the Setup Wizard.
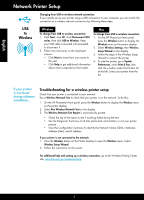
Connect and power on.
Connect the power cord and adapter.
Press
to turn on the HP Photosmart.
Be sure to follow the instructions on the display to
guide you through setting up and connecting the
HP Photosmart, including how to set up a networked
printer connection and install ink cartridges.
For computers without a CD/DVD drive, go to
www.hp.com/support
to download and install the
software.
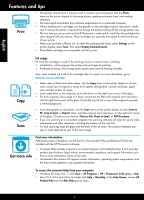
Verify box contents.
WiFi Protected Setup (WPS)
This HP Photosmart supports WiFi Protected Setup
(WPS)
for easy one-button wireless setup.
•
During setup, if you are prompted for WPS and
you have a WPS router, press the WPS button on
the router. The wireless LED on the printer will turn
on if the connection is successful.
•
Otherwise, follow the setup wizard on the printer
display to be guided through wireless setup.
* Not included with all models
PHOTOSMART PREMIUM
e-ALL-IN-ONE C310 SERIES
Start setup here...
Inside...
Setup troubleshooting
2
Get to know your HP Photosmart
3
Features and tips
4
What’s new? Web Services
5
Network Printer Setup
6
Register your HP Photosmart.
Get quicker service and support alerts by
registering at
www.register.hp.com
.
USB
English