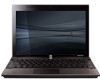
HP ProBook 5220m HP ProBook Notebook PC User Guide - SuSE Linux
HP ProBook 5220m - Notebook PC Manual
 |
View all HP ProBook 5220m manuals
Add to My Manuals
Save this manual to your list of manuals |
HP ProBook 5220m manual content summary:
- HP ProBook 5220m | HP ProBook Notebook PC User Guide - SuSE Linux - Page 1
HP ProBook Notebook PC User Guide - HP ProBook 5220m | HP ProBook Notebook PC User Guide - SuSE Linux - Page 2
Company, L.P. Bluetooth is a trademark services. Nothing herein should be construed as constituting an additional warranty. HP shall not be liable for technical or editorial errors or omissions contained herein. First Edition: May 2010 Document Part Number: 617330-001 Product notice This user guide - HP ProBook 5220m | HP ProBook Notebook PC User Guide - SuSE Linux - Page 3
Safety warning notice WARNING! To reduce the possibility of heat-related injuries or of overheating the computer, do not place the computer directly on your lap or obstruct the computer air vents. Use the computer only on a hard, flat surface. Do not allow another hard surface, such as an adjoining - HP ProBook 5220m | HP ProBook Notebook PC User Guide - SuSE Linux - Page 4
iv Safety warning notice - HP ProBook 5220m | HP ProBook Notebook PC User Guide - SuSE Linux - Page 5
components ...8 Wireless antennas ...8 Additional hardware components 10 Identifying the labels ...10 2 Pointing devices and keyboard ...12 mouse 14 Using the keyboard ...15 Using hotkeys ...15 Initiating Suspend 16 Opening the Print Options window 16 Displaying battery status 16 Switching the - HP ProBook 5220m | HP ProBook Notebook PC User Guide - SuSE Linux - Page 6
TouchPad and keyboard 18 3 22 Installing multimedia device ...23 Video ...24 Connecting battery power ...30 Inserting or removing the battery 31 Charging a battery ...32 Maximizing battery discharge time 33 Managing low battery levels 33 Identifying low battery levels 33 Resolving a low battery - HP ProBook 5220m | HP ProBook Notebook PC User Guide - SuSE Linux - Page 7
33 Resolving a low battery level when a charged battery is available 34 Resolving a low battery level when no power source is available 34 Resolving a low battery level when the computer cannot exit Hibernation 34 Calibrating a battery ...34 Step 1: Fully charge the battery 34 Step 2: Disable - HP ProBook 5220m | HP ProBook Notebook PC User Guide - SuSE Linux - Page 8
Removing a digital card ...50 8 Memory modules ...51 9 Security ...54 Protecting the computer ...54 Using passwords 59 Using firewall software ...59 Setting up automatic online updates 60 Installing a security cable ...60 10 Computer Setup ...61 Starting Computer Setup ...61 Using Computer Setup ... - HP ProBook 5220m | HP ProBook Notebook PC User Guide - SuSE Linux - Page 9
features on most computer models. To see a list of hardware installed in the computer, select Computer > Control Center > YaST > Hardware (4) Right TouchPad control* Description To turn the TouchPad on and off, quickly double-tap the TouchPad off indicator. NOTE: When the TouchPad is active, - HP ProBook 5220m | HP ProBook Notebook PC User Guide - SuSE Linux - Page 10
Wireless light (7) Sound mute light Description ● Off: the TouchPad is on. ● Amber: the TouchPad is off. To switch between active and inactive, quickly wireless device, such as a wireless local area network (WLAN) device and/or a Bluetooth® device (select models only), is on. ● Amber: All wireless - HP ProBook 5220m | HP ProBook Notebook PC User Guide - SuSE Linux - Page 11
Power button Component Power button Description ● When the computer is off, press the button to turn on the computer. ● When the computer is on, press the button to shut down the computer. ● When the computer is in the Suspend state, press the button briefly to exit Suspend. ● When the computer is - HP ProBook 5220m | HP ProBook Notebook PC User Guide - SuSE Linux - Page 12
Keys Component (1) fn key (2) Embedded numeric keypad keys (3) Function keys Front components Description Executes frequently used system functions when pressed in combination with a function key. To enable the embedded numeric keypad keys, press the fn and num lk keys simultaneously. The embedded - HP ProBook 5220m | HP ProBook Notebook PC User Guide - SuSE Linux - Page 13
in the computer are fully charged. If the computer is not plugged into an external power source, the light stays off until the battery reaches a low battery level. Supports the following optional digital card formats: ● Memory Stick (MS) ● Memory Stick Pro (MSP) ● Memory Stick Duo (adapter required - HP ProBook 5220m | HP ProBook Notebook PC User Guide - SuSE Linux - Page 14
connected to the network. Connects a high-performance eSATA component, such as an eSATA external hard drive, or connects an optional USB device. Connects an optional video or audio device, such as a high definition television, or any compatible digital or audio component. 6 Chapter 1 Features - HP ProBook 5220m | HP ProBook Notebook PC User Guide - SuSE Linux - Page 15
components Component (1) Battery release latches (2) (2) Battery bay (3) Service access door release latches (2). (4) Vents (3) (5) Service access bay Description Release the battery from the battery bay. Holds the battery and the subscriber identity module (SIM). Release the service access door - HP ProBook 5220m | HP ProBook Notebook PC User Guide - SuSE Linux - Page 16
off the display if the display cover is closed while the power is on. Records sound. On: The webcam is in use. Records audio and video and captures still photographs. Wireless antennas Your computer has at least two antennas that send and receive signals from one or more - HP ProBook 5220m | HP ProBook Notebook PC User Guide - SuSE Linux - Page 17
wireless signals to communicate with wireless wide-area networks (WWANs). (2) WLAN antennas (2)* Send and receive wireless signals to communicate with wireless area immediately around the antennas free from obstructions. To see wireless regulatory notices, refer to the section of the Regulatory, - HP ProBook 5220m | HP ProBook Notebook PC User Guide - SuSE Linux - Page 18
Component (1) Power cord* (2) AC adapter (3) Battery *Power cords vary in appearance by country or region provide information you may need when you troubleshoot system problems or travel internationally with the computer: ● Service tag-Provides important information, including the following - HP ProBook 5220m | HP ProBook Notebook PC User Guide - SuSE Linux - Page 19
available when you contact technical support. The service tag label is affixed inside the battery bay. ● Regulatory label-Provides a wireless local area network (WLAN) device or an optional Bluetooth® device (select models only). If your computer model includes one or more wireless devices - HP ProBook 5220m | HP ProBook Notebook PC User Guide - SuSE Linux - Page 20
devices and keyboard Component (1) TouchPad off indicator (2) TouchPad (3) Left TouchPad control (4) Right TouchPad control Description ● When the TouchPad is active, the light is off. ● When the TouchPad is inactive, the light is amber. To switch between active and inactive, quickly double-tap - HP ProBook 5220m | HP ProBook Notebook PC User Guide - SuSE Linux - Page 21
off The TouchPad is turned on at the factory. When the TouchPad is active, the light is off. To turn the TouchPad on or off, quickly double-tap the TouchPad off indicator. Navigating To move the pointer, touch and slide your finger across the TouchPad surface in the direction you want - HP ProBook 5220m | HP ProBook Notebook PC User Guide - SuSE Linux - Page 22
. A USB mouse can also be connected to the system using the ports on an optional docking device or expansion product. 14 Chapter 2 Pointing devices and keyboard - HP ProBook 5220m | HP ProBook Notebook PC User Guide - SuSE Linux - Page 23
keyboard Open the Print Options window Show battery power information Switch Decrease screen brightness Increase screen brightness Turn wireless features on and off Mute or restore fn+f11 fn+f12 To use a hotkey command on the computer keyboard, follow either of these steps: ● Briefly press the fn key - HP ProBook 5220m | HP ProBook Notebook PC User Guide - SuSE Linux - Page 24
press the power button or press any key on the keyboard. Opening the Print Options window Press fn+f2 (or Ctrl+P) to launch the print option of the application on the current active window. Displaying battery status Press fn+f3 to display the battery status. Switching the screen image Press fn+f4 to - HP ProBook 5220m | HP ProBook Notebook PC User Guide - SuSE Linux - Page 25
wireless features on and off Press fn+f9 to turn the wireless feature on or off. Note that this hotkey cannot be used to establish a wireless connection embedded numeric keypad and also supports an optional external numeric keypad or an optional external keyboard that includes a numeric keypad - HP ProBook 5220m | HP ProBook Notebook PC User Guide - SuSE Linux - Page 26
functions of keys on the embedded numeric keypad between their standard keyboard functions and their keypad functions by using the fn key or key on the external keypad, not on the computer. Cleaning the TouchPad and keyboard Dirt and grease on the TouchPad can cause the pointer to jump around on - HP ProBook 5220m | HP ProBook Notebook PC User Guide - SuSE Linux - Page 27
the keyboard regularly to prevent keys from sticking and to remove dust, lint, and particles that can become trapped beneath the keys. A can of compressed air with a straw extension can be used to blow air around and under the keys to loosen and remove debris. Cleaning the TouchPad and keyboard 19 - HP ProBook 5220m | HP ProBook Notebook PC User Guide - SuSE Linux - Page 28
to music ● Integrated microphone for recording your own audio ● Integrated webcam (select models only) that allows you to capture and share video ● Preinstalled multimedia software that allows you to play and manage your music and pictures ● Hotkeys that provide fast access to volume control - HP ProBook 5220m | HP ProBook Notebook PC User Guide - SuSE Linux - Page 29
Component (2) Webcam (select models only) (3) Audio-out (headphone) jack/Audio-in (microphone) jack (4) Speakers (2) Description Records audio and video and captures still photographs. Produces sound when connected to optional powered stereo speakers, headphones, ear buds, or a headset. Also - HP ProBook 5220m | HP ProBook Notebook PC User Guide - SuSE Linux - Page 30
disc into a connected external optical drive. 2. When the installation wizard opens, follow the on-screen instructions. 3. Restart the computer if you are prompted to do internal microphone or connect an external microphone ● Download music from the Internet ● Create multimedia presentations using - HP ProBook 5220m | HP ProBook Notebook PC User Guide - SuSE Linux - Page 31
install any drivers required by the external device. NOTE: A driver . 3. When the Sound window opens, click the Sounds support one HDMI device connected to the HDMI port, while simultaneously supporting an image on the computer display or any other supported external display. NOTE: To transmit video - HP ProBook 5220m | HP ProBook Notebook PC User Guide - SuSE Linux - Page 32
HDMI port: 1. Connect one end of the HDMI cable to the HDMI port on the computer. 2. Connect the other end of the cable to the video device, according to the device manufacturer's instructions. 3. Press f4 on the computer to switch the image between the display devices connected to the computer - HP ProBook 5220m | HP ProBook Notebook PC User Guide - SuSE Linux - Page 33
that the external optical drive is connected to your computer before beginning these steps. 1. Turn on the computer. 2. Press the release button (1) on the external optical drive bezel to release the disc tray. 3. Pull out the tray (2). 4. Hold the disc by the edges and position the disc label-side - HP ProBook 5220m | HP ProBook Notebook PC User Guide - SuSE Linux - Page 34
is displayed, click No. ● You may need to restart the CD or DVD to resume playback. Removing an optical disc (CD or DVD) 1. Press the release button (1) on the drive bezel to release the disc tray, and then gently pull out the tray (2) until it stops. 26 Chapter 3 Multimedia - HP ProBook 5220m | HP ProBook Notebook PC User Guide - SuSE Linux - Page 35
software, you can use the webcam to take a photo, record a video, or make an audio recording. You can preview the photo, video recording, or audio recording, and save it on your computer hard drive. NOTE: Cheese is installed, and designed for use with the integrated webcam. To access Cheese, click - HP ProBook 5220m | HP ProBook Notebook PC User Guide - SuSE Linux - Page 36
the screen clears. Your work is saved to memory, letting you exit Suspend faster than exiting Hibernation. : To prevent possible audio and video degradation, loss of audio or video playback functionality, or loss of 15 minutes of inactivity when running on battery power and 30 minutes of inactivity - HP ProBook 5220m | HP ProBook Notebook PC User Guide - SuSE Linux - Page 37
to charge. ● If the computer is turned on, the battery meter icon in the notification area changes appearance. When you disconnect external AC power, the following events occur: ● The computer switches to battery power. ● The display brightness is automatically decreased to save battery life. To - HP ProBook 5220m | HP ProBook Notebook PC User Guide - SuSE Linux - Page 38
. If the computer contains a charged battery and is running on external AC power supplied through the AC adapter, the computer switches to battery power if the AC adapter is disconnected from the computer. NOTE: The display brightness is decreased to save battery life when you disconnect AC power - HP ProBook 5220m | HP ProBook Notebook PC User Guide - SuSE Linux - Page 39
the computer upside down on a flat surface, with the battery bay toward you. 2. Insert the battery into the battery bay (1) until it is seated. The battery release latches (2) automatically lock the battery into place. To remove the battery: 1. Turn the computer upside down on a flat surface, with - HP ProBook 5220m | HP ProBook Notebook PC User Guide - SuSE Linux - Page 40
or cooler than room temperature. To prolong battery life and optimize the accuracy of battery charge displays, follow these recommendations: ● If you are charging a new battery, charge it fully before turning on the computer. ● Charge the battery until the battery light turns off. NOTE: If the - HP ProBook 5220m | HP ProBook Notebook PC User Guide - SuSE Linux - Page 41
while on battery power. Maximum discharge time gradually shortens as the battery storage capacity naturally degrades. Tips for maximizing battery discharge time: ● Lower the brightness on the display. ● Remove the battery from the computer when it is not being used or charged. ● Store the battery in - HP ProBook 5220m | HP ProBook Notebook PC User Guide - SuSE Linux - Page 42
once a month. It also is not necessary to calibrate a new battery. Step 1: Fully charge the battery WARNING! Do not charge the computer battery while you are onboard aircraft. NOTE: The battery charges whether the computer is off or in use, but it charges faster when the computer is off. To fully - HP ProBook 5220m | HP ProBook Notebook PC User Guide - SuSE Linux - Page 43
into external power and maintain external power until the battery is fully recharged. When the battery is recharged, the battery light on the computer turns off. You can use the computer while the battery is recharging, but the battery will charge faster if the computer is off. 2. If the computer - HP ProBook 5220m | HP ProBook Notebook PC User Guide - SuSE Linux - Page 44
risk of fire or burns, do not disassemble, crush, or puncture a battery; short the external contacts on a battery; or dispose of a battery in fire or water. Do not expose a battery to temperatures above 60˚C (140˚F). Replace the battery only with a battery approved for this computer. Refer to the - HP ProBook 5220m | HP ProBook Notebook PC User Guide - SuSE Linux - Page 45
charging properly, or when the battery storage capacity has reached a "weak" condition. A message refers you to the HP Web site for more information about ordering a replacement battery. If the battery is possibly covered by an HP warranty, instructions . Contact technical support for information on - HP ProBook 5220m | HP ProBook Notebook PC User Guide - SuSE Linux - Page 46
emergency procedures in the sequence provided: ● Press and hold the power button for at least 5 seconds. ● Disconnect the computer from external power and remove the battery. 38 Chapter 4 Power management - HP ProBook 5220m | HP ProBook Notebook PC User Guide - SuSE Linux - Page 47
keyboard or move the computer while an optional external optical drive is writing to a disc. The write process is sensitive to vibration. When the battery is the only source of power, be sure that the battery is sufficiently charged removing the hard drive from the service access bay. Do not remove - HP ProBook 5220m | HP ProBook Notebook PC User Guide - SuSE Linux - Page 48
computer upside down on a flat surface, with the battery bay toward you. 6. Remove the battery. 7. Slide the service access door latches (1) inward. Slide the service access door toward the battery bay. Then lift up the forward edge of the service access door and remove the door (2). 8. Disconnect - HP ProBook 5220m | HP ProBook Notebook PC User Guide - SuSE Linux - Page 49
out of the service access bay. To install a hard drive: 1. Pull up the hard drive tab (1) and insert the hard drive into the service access bay. 2. service access door (1) with the notches in the service access bay, and replace the door. 5. Press down on the door (2) until the until the release - HP ProBook 5220m | HP ProBook Notebook PC User Guide - SuSE Linux - Page 50
6. Slide the lock latch (4) to the right to lock the door into place. NOTE: You can identify the lock latch by the red marking on the latch. 7. Replace the battery. 8. Turn the computer right-side up. 42 Chapter 5 Drives - HP ProBook 5220m | HP ProBook Notebook PC User Guide - SuSE Linux - Page 51
external device, such as a USB keyboard, mouse, drive, printer, scanner, or hub. Some USB devices may require additional support software, which is usually included with the device. For more information about device-specific software, refer to the manufacturer's instructions. Your computer has 3 USB - HP ProBook 5220m | HP ProBook Notebook PC User Guide - SuSE Linux - Page 52
remove the USB device. Refer to the USB device user documentation for complete instructions on device removal. Using USB legacy support USB legacy support (enabled by default) permits the following actions: ● Using a USB keyboard, mouse, or hub connected to a USB port on the computer during startup - HP ProBook 5220m | HP ProBook Notebook PC User Guide - SuSE Linux - Page 53
the device icon and select Unmount. NOTE: Wait 10 seconds for the system to finish the operation, and drive to a USB port on the computer. NOTE: HP external USB optical drives should be connected to the powered drivers, or to learn which computer port to use, refer to the manufacturer's instructions. - HP ProBook 5220m | HP ProBook Notebook PC User Guide - SuSE Linux - Page 54
, click No. ● You may need to restart the CD or DVD to resume audio and video playback. Inserting an optical disc (CD or DVD) 1. Turn on the computer. 2. Press the release button (1) on the drive bezel to release the disc tray. 3. Pull out the tray (2). 4. Hold the disc by the edges to avoid - HP ProBook 5220m | HP ProBook Notebook PC User Guide - SuSE Linux - Page 55
are 2 ways to remove a disc, depending on whether the disc tray opens normally or not. When the disc tray opens 1. Press the release button (1) on the drive bezel to release the disc tray, and then gently pull out the tray (2) until it stops. 2. Remove the disc (3) from the tray by gently pressing - HP ProBook 5220m | HP ProBook Notebook PC User Guide - SuSE Linux - Page 56
the disc in a protective case. Using optional external devices NOTE: For more information about required software and drivers, or to learn which computer port to use, refer to the manufacturer's instructions. To connect an external device to the computer: CAUTION: To reduce the risk of damage to the - HP ProBook 5220m | HP ProBook Notebook PC User Guide - SuSE Linux - Page 57
digital media-equipped cameras and PDAs as well as with other computers. The Media Card Reader supports the following formats: ● Memory Stick ● Memory Stick Pro ● Memory Stick Duo (adapter required) ● Memory Stick Duo Pro (adapter required) ● MultiMediaCard ● MultiMediaCard Plus ● Secure Digital (SD - HP ProBook 5220m | HP ProBook Notebook PC User Guide - SuSE Linux - Page 58
removal. 1. Save your information and close all programs associated with the digital card. NOTE: Refer to the digital card user documentation for complete instructions on safe card removal. 2. Press in on the digital card (1), and then remove it from the slot (2). 50 Chapter 7 External media cards - HP ProBook 5220m | HP ProBook Notebook PC User Guide - SuSE Linux - Page 59
the service access door. The memory capacity of the computer can be upgraded by replacing the existing memory module or adding a second memory module. WARNING! To reduce the risk of electric shock and damage to the equipment, unplug the power cord and remove all batteries before installing a memory - HP ProBook 5220m | HP ProBook Notebook PC User Guide - SuSE Linux - Page 60
removal, place it in an electrostatic-safe container. 9. Insert a new memory module: a. Align the notched edge (1) of the memory module with the tab in the memory module slot. CAUTION: To prevent damage to the memory module, hold the memory module by the edges only. Do not touch the components on - HP ProBook 5220m | HP ProBook Notebook PC User Guide - SuSE Linux - Page 61
both the left and right edges of the memory module, until the retention clips snap into place. 10. Align the tabs on the service access door (1) with the notches in the service access bay. 11. Slide the service access door down (2) until the release latch (3) clicks. 12. Slide the lock latch (4) to - HP ProBook 5220m | HP ProBook Notebook PC User Guide - SuSE Linux - Page 62
of the features described in this chapter may not be supported by your computer or your operating system. Protecting the Setup and are managed by the system BIOS. ● The embedded security password can be enabled in Computer Setup to provide BIOS password protection. The embedded security password - HP ProBook 5220m | HP ProBook Notebook PC User Guide - SuSE Linux - Page 63
. ● If you forget the setup password set in Computer Setup, you cannot turn on the computer or exit Hibernation. Call technical support or your authorized service provider for additional information. ● If you forget both the user password and the master DriveLock password set in Computer Setup, the - HP ProBook 5220m | HP ProBook Notebook PC User Guide - SuSE Linux - Page 64
entered with the same keys. For example, a setup password set with keyboard number keys will not be recognized if you enter it thereafter with embedded to select File > Save changes and exit. Then follow the instructions on the screen. Your preferences go into effect when the computer restarts - HP ProBook 5220m | HP ProBook Notebook PC User Guide - SuSE Linux - Page 65
, and then press f10. 9. To exit DriveLock settings, use the arrow keys to select Esc. 10. To save your preferences, use the arrow keys to select File > Save changes and exit. Then follow the instructions on the screen. Your preferences go into effect when the computer restarts. Entering a DriveLock - HP ProBook 5220m | HP ProBook Notebook PC User Guide - SuSE Linux - Page 66
password field. Then press f10. 6. To save your preferences, use the arrow keys to select File > Save changes and exit. Then follow the instructions on the screen. Your preferences go into effect when the computer restarts. Using Computer Setup security features Securing system devices From the Boot - HP ProBook 5220m | HP ProBook Notebook PC User Guide - SuSE Linux - Page 67
arrow keys to select File > Save changes and exit. Then follow the instructions on the screen. Your preferences go into effect when the computer restarts. Removing information about the computer model. ● Specification information for the processor, cache and memory size, and system ROM. To view - HP ProBook 5220m | HP ProBook Notebook PC User Guide - SuSE Linux - Page 68
a network, or block authorized e-mail attachments. To temporarily solve the problem, disable the firewall, perform the task that you want to perform, check box. 3. Select your preferred options for the automatic online update. Installing a security cable NOTE: A security cable is designed to act as - HP ProBook 5220m | HP ProBook Notebook PC User Guide - SuSE Linux - Page 69
10 Computer Setup Starting Computer Setup Computer Setup is a preinstalled, ROM-based utility that can be used even when the operating system is not working or will not load. NOTE: Some of the Computer Setup menu items listed in this guide may not be supported Then follow the instructions on the - HP ProBook 5220m | HP ProBook Notebook PC User Guide - SuSE Linux - Page 70
Changes And Exit. Then follow the instructions on the screen. Your preferences menu items listed in this guide may not be supported by your computer or your specification information for the processor, cache and memory supported by your computer or your operating system. 62 Chapter 10 Computer Setup - HP ProBook 5220m | HP ProBook Notebook PC User Guide - SuSE Linux - Page 71
is destroyed permanently. Diagnostics menu NOTE: Some of the menu items listed in this section may not be supported by your computer or your operating system. Select HDD Self-Test Options Memory Check To do this Run a comprehensive self-test on any hard drive in the system or on any optional - HP ProBook 5220m | HP ProBook Notebook PC User Guide - SuSE Linux - Page 72
, USB legacy support allows the following: ◦ Use of a USB keyboard in Computer Setup even when a your operating system is not running. ◦ Startup from bootable USB devices, including a hard drive, diskette drive, or optical drive connected by a USB port to the computer. ● Enable/disable BIOS DMA data - HP ProBook 5220m | HP ProBook Notebook PC User Guide - SuSE Linux - Page 73
Select Built-in device options Port options To do this ● Enable/disable embedded WLAN Device Radio. ● Enable/disable embedded Bluetooth Device Radio. ● Enable/disable Network Interface Controller (NIC) ● Enable/disable LAN/WLAN Switching. ● Enable/disable Wake on LAN. ● Enable/disable the - HP ProBook 5220m | HP ProBook Notebook PC User Guide - SuSE Linux - Page 74
37 storing 36 battery bay 7, 11 battery charge, maximizing 33 battery light 32 battery light, identifying 5 battery power 30 battery release latch, identifying 7 battery release latches, identifying 31 battery temperature 36 bays battery 7, 11 service access 7 Bluetooth label 11 boot options - HP ProBook 5220m | HP ProBook Notebook PC User Guide - SuSE Linux - Page 75
18 using 18 keys fn 4 function 4 keypad 4 L labels Bluetooth 11 modem approval 11 regulatory 11 service tag 10 SIM 11 wireless certification 11 WLAN 11 labels, identifying 10 latch, battery release 7 legacy support, USB 61, 64 lights battery 5 caps lock 2 drive 4 E-mail client 2 network activity - HP ProBook 5220m | HP ProBook Notebook PC User Guide - SuSE Linux - Page 76
window hotkey 16 product name and number, computer 10 projector, connecting 24 R readable media 28 regulatory information regulatory label 11 wireless certification labels 11 release latch, battery 7 release latches, battery 43 removing 44 USB hubs 43 USB legacy support 44, 61, 64 USB port, powered - HP ProBook 5220m | HP ProBook Notebook PC User Guide - SuSE Linux - Page 77
-
 1
1 -
 2
2 -
 3
3 -
 4
4 -
 5
5 -
 6
6 -
 7
7 -
8
-
9
-
10
-
11
-
12
-
13
-
14
-
15
-
16
-
17
-
18
-
19
-
20
-
21
-
22
-
23
-
24
-
25
-
26
-
27
-
28
-
29
-
30
-
31
-
32
-
33
-
34
-
35
-
36
-
37
-
38
-
39
-
40
-
41
-
42
-
43
-
44
-
45
-
46
-
47
-
48
-
49
-
50
-
51
-
52
-
53
-
54
-
55
-
56
-
57
-
58
-
59
-
60
-
61
-
62
-
63
-
64
-
65
-
66
-
67
-
68
-
69
-
70
-
71
-
72
-
73
-
74
-
75
-
76
-
77
 |
 |

HP ProBook Notebook PC
User Guide