HP StorageWorks 4/64 HP StorageWorks DC and DC04 SAN Backbone Director Switche - Page 125
DC04 SAN Director Installation, Time and items required for installation
 |
View all HP StorageWorks 4/64 manuals
Add to My Manuals
Save this manual to your list of manuals |
Page 125 highlights
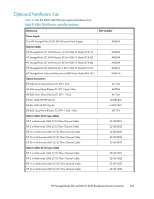
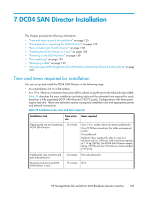
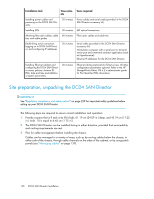
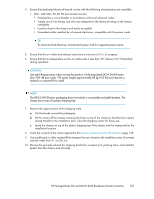
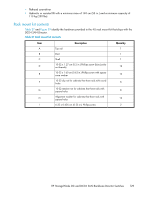
7 DC04 SAN Director Installation This chapter provides the following information: • "Time and items required for installation" on page 125 • "Site preparation, unpacking the DC04 Director" on page 126 • "Items included with the DC Director" on page 128 • "Installing the DC04 Director in a rack" on page 128 • "Powering on the DC04 Director" on page 138 • "Port numbering" on page 139 • "Managing cables" on page 139 • "Using the optional HP StorageWorks DC SAN Backbone Director Inter-Chassis Link (ICL) cable kit" on page 140 Time and items required for installation You can set up and install the DC04 SAN Director in the following ways: • As a standalone unit on a flat surface. • In a 19-in. Electronic Industries Association (EIA) cabinet using the port side exhaust kit (provided). Table 25 describes the main installation and setup tasks and the estimated time required for each, based on a fully populated DC04 SAN Director (192 FC ports). Configurations with fewer ports require less time. These time estimates assume a prepared installation site and appropriate power and network connectivity. Table 25 Installation tasks, time and items required Installation task Time estim- Items required ate Preparing the site and unpacking DC04 SAN Director 30 minutes One 1/2-in. socket wrench (to remove pallet bolts) One #2 Phillips screwdriver (for cable management comb) One pallet jack Hydraulic lift or assisted lift, able to raise to a minimum of 55 in. (140 cm), with a minimum capacity of 113 kg (250 lb). The DC04 SAN Director weighs 68 kg (150 lb) with four FC8-48 port cards installed (192 ports). Installing the rack mount kit and port side exhaust kit. Mounting and securing DC04 SAN Director in rack 30 minutes Port side exhaust kit 15 minutes N/A HP StorageWorks DC and DC04 SAN Backbone Director Switches 125
-
 1
1 -
2
-
3
-
4
-
5
-
6
-
7
-
8
-
9
-
10
-
11
-
12
-
13
-
14
-
15
-
16
-
17
-
18
-
19
-
20
-
21
-
22
-
23
-
24
-
25
-
26
-
27
-
28
-
29
-
30
-
31
-
32
-
33
-
34
-
35
-
36
-
37
-
38
-
39
-
40
-
41
-
42
-
43
-
44
-
45
-
46
-
47
-
48
-
49
-
50
-
51
-
52
-
53
-
54
-
55
-
56
-
57
-
58
-
59
-
60
-
61
-
62
-
63
-
64
-
65
-
66
-
67
-
68
-
69
-
70
-
71
-
72
-
73
-
74
-
75
-
76
-
77
-
78
-
79
-
80
-
81
-
82
-
83
-
84
-
85
-
86
-
87
-
88
-
89
-
90
-
91
-
92
-
93
-
94
-
95
-
96
-
97
-
98
-
99
-
100
-
101
-
102
-
103
-
104
-
105
-
106
-
107
-
108
-
109
-
110
-
111
-
112
-
113
-
114
-
115
-
116
-
117
-
118
-
119
-
 120
120 -
 121
121 -
 122
122 -
 123
123 -
 124
124 -
 125
125 -
 126
126 -
 127
127 -
 128
128 -
 129
129 -
 130
130 -
131
-
132
-
133
-
134
-
135
-
136
-
137
-
138
-
139
-
140
-
141
-
142
-
143
-
144
-
145
-
146
-
147
-
148
-
149
-
150
-
151
-
152
-
153
-
154
-
155
-
156
-
157
-
158
-
159
-
160
-
161
-
162
-
163
-
164
-
165
-
166
-
167
-
168
-
169
-
170
-
171
-
172
-
173
-
174
-
175
-
176
-
177
-
178
-
179
-
180
-
181
-
182
-
183
-
184
-
185
-
186
-
187
-
188
-
189
-
190
-
191
-
192
-
193
-
194
-
195
-
196
-
197
-
198
-
199
-
200
-
201
-
202
-
203
-
204
-
205
-
206
-
207
-
208
-
209
-
210
-
211
-
212
-
213
-
214
-
215
-
216
-
217
-
218
-
219
-
220
-
221
-
222
-
223
-
224
-
225
-
226
-
227
-
228
-
229
-
230
-
231
-
232
-
233
-
234
-
235
-
236
-
237
-
238
-
239
-
240
-
241
-
242
-
243
-
244
-
245
-
246
-
247
-
248
-
249
-
250
-
251
-
252
-
253
-
254
-
255
-
256
 |
 |
