HP T5630w Managing File-Based Write Filter Images on HP Thin Clients - Page 2
HP Client Automation, Commit, HPCA-MgmtApps75.msi, Finish, Control Panel, HP Write Filter - login administrator
 |
UPC - 884962252574
View all HP T5630w manuals
Add to My Manuals
Save this manual to your list of manuals |
Page 2 highlights
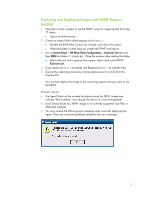
HP Client Automation HP Client Automation Starter, Standard, or Enterprise version 7.5 must be used on thin clients that use FBWF; however, the full management agent cannot be remotely pushed out to a system that supports FBWF. The agent must be manually installed using the following steps: 1. Pick a reference machine and prepare to capture that image for deployment. This machine comes with EWF enabled and FBWF disabled. 2. Log in as an Administrator on the thin client. 3. Do not enable FBWF. Rename the fbwfmgr.exe something else, such as fbwfmgr.bak. The default path to fbwfmgr.exe is c:\windows\system32. 4. Rename fbwflib.dll something else, such as fbwflib.bak. 5. Disable the firewall. 6. Commit the changes by choosing Commit from the Write Filter Status icon in the system tray. 7. Reboot the system. 8. Login as Administrator. 9. Copy the entire win32xpe folder from c:\program files\hewlettpackard\HPCA\managementPortal\media\default\ on the CA server to a USB flash drive. 10. Insert the USB flash driver into the thin client. 11. On the thin client, run HPCA-MgmtApps75.msi. Note You do not have to Commit the changes, as clicking on Finish will automatically Commit the changes to the EWF. 12. When the system reboots, the console shows that the agent is "Installed." 13. On the thin client, change the name of the fbwfmgr.bak to fbwfmgr.exe. 14. On the thin client, change the name of the fbwflib.bak dll.bak to fbwfmgr.exe. 15. Commit the changes by choosing Commit from Control Panel > HP Write Filter Configuration > EWF Main tab > Commit Data to Volume. 16. Reboot the system. 17. Capture the image. 18. Deploy this image to the remaining thin clients. The HP Client Automation agent is pre-installed and is now operational. The above steps are all that is required to capture and deploy images using the Enhanced Write Filter with HP Client Automation. If you want to capture and deploy images using the File-based Write Filter, some additional steps are required. 2
-
 1
1 -
 2
2 -
 3
3 -
 4
4
 |
 |
