HP Vectra VA 6/xxx HP Vectra VA 6/xxx DesKTop PC - User’s Guide, D420 - Page 33
cobra-d2.fb4, Wednesday, May 15, 1996, 02 PM
 |
View all HP Vectra VA 6/xxx manuals
Add to My Manuals
Save this manual to your list of manuals |
Page 33 highlights
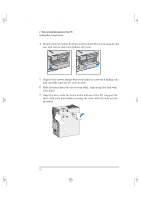
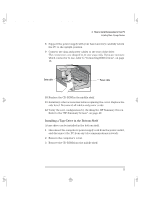
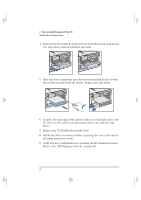
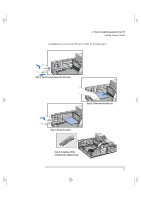
cobra-d2.fb4 Page 26 Wednesday, May 15, 1996 3:02 PM 2 How to Install Accessories In Your PC Installing Accessory Boards Installing the Board 1 Disconnect the computer's power supply cord and any connection to a telecommunications network. 2 Remove the computer's cover and power supply. 3 Find a free slot. Some boards may have preferred locations and special installation instructions detailed in their manuals. 4 Unscrew and remove the slot cover. Store it in a safe place. If the slot cover is tight, loosen the screws on the adjacent slots. (See diagram on facing page.) 5 Hold the board horizontally by its "top" edge. Slide it into the board guide of the chosen slot. Do not bend the board. (See diagram on facing page.) 6 Align the board's connector with the slot's socket and firmly press into the socket. Ensure the board's connector engages completely with the socket and does not touch components on other boards. 7 Secure the board by replacing the slot cover screw. If you loosened the screws on adjacent slots, tighten them. (See diagram on facing page.) 8 If you install a VESA-standard video adapter board which uses the integrated video graphics controller, connect the accessory board's cable to the VESA pass-through connector on the system board. (See diagram on facing page.) 9 Install any other accessories before replacing the power supply and the cover. Reconnect all cables and power cords. 26 English
-
 1
1 -
2
-
3
-
4
-
5
-
6
-
7
-
8
-
9
-
10
-
11
-
12
-
13
-
14
-
15
-
16
-
17
-
18
-
19
-
20
-
21
-
22
-
23
-
24
-
25
-
26
-
27
-
 28
28 -
 29
29 -
 30
30 -
 31
31 -
 32
32 -
 33
33 -
 34
34 -
 35
35 -
 36
36 -
 37
37 -
 38
38 -
39
-
40
-
41
-
42
-
43
-
44
-
45
-
46
-
47
-
48
-
49
-
50
-
51
-
52
-
53
-
54
-
55
-
56
-
57
-
58
-
59
-
60
-
61
-
62
-
63
-
64
-
65
-
66
-
67
-
68
-
69
-
70
-
71
-
72
-
73
-
74
-
75
-
76
-
77
-
78
-
79
-
80
-
81
-
82
-
83
 |
 |