HP Visualize b2000 hp Visualize b2000 UNIX workstation parts removal and repla - Page 75
Installing the I/O Fan, Removing the System Board Fan
 |
View all HP Visualize b2000 manuals
Add to My Manuals
Save this manual to your list of manuals |
Page 75 highlights
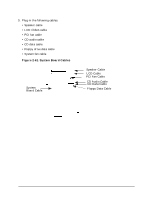
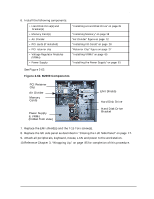
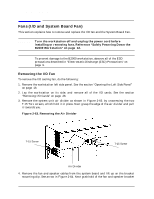
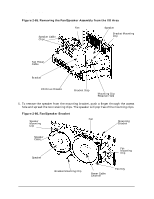
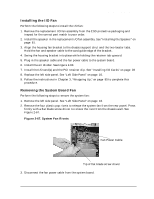
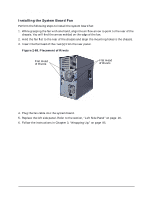
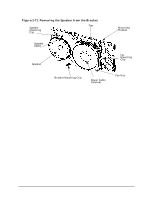
Parts Replacement Procedures Fans (I/O and System Board Fan) Installing the I/O Fan Perform the following steps to install the I/O fan: 1. Remove the replacement I/O fan assembly from the ESD protective packaging and inspect for the correct part match to your order. 2. Install the speaker in the replacement I/O fan assembly. See "Installing the Speaker" on page 81. 3. Align the housing fan bracket to the chassis support strut and the two locator tabs. Hold the fan and speaker cable to the card guide edge of the bracket. 4. Swing the housing bracket into place while holding the retainer tab upward. 5. Plug in the speaker cable and the fan power cable to the system board. 6. Install the air divider. See Figure 2-63. 7. Install the I/O card(s) and the PCI retainer clip. See "Installing I/O Cards" on page 28 8. Replace the left side panel. See "Left Side Panel" on page 16. 9. Follow the instructions in Chapter 3, "Wrapping Up," on page 85 to complete this procedure. Removing the System Board Fan Perform the following steps to remove the system fan: 1. Remove the left side panel. See "Left Side Panel" on page 16. 2. Remove the four plastic pop rivets to release the system fan from the rear panel. Press firmly with a flat blade screw driver to relieve the rivet from the chassis wall. See Figure 2-67. Figure 2-67. System Fan Rivets Fan Power Cable Tip of flat blade screw driver 3. Disconnect the fan power cable from the system board. Chapter 2 75
-
 1
1 -
2
-
3
-
4
-
5
-
6
-
7
-
8
-
9
-
10
-
11
-
12
-
13
-
14
-
15
-
16
-
17
-
18
-
19
-
20
-
21
-
22
-
23
-
24
-
25
-
26
-
27
-
28
-
29
-
30
-
31
-
32
-
33
-
34
-
35
-
36
-
37
-
38
-
39
-
40
-
41
-
42
-
43
-
44
-
45
-
46
-
47
-
48
-
49
-
50
-
51
-
52
-
53
-
54
-
55
-
56
-
57
-
58
-
59
-
60
-
61
-
62
-
63
-
64
-
65
-
66
-
67
-
68
-
69
-
 70
70 -
 71
71 -
 72
72 -
 73
73 -
 74
74 -
 75
75 -
 76
76 -
 77
77 -
 78
78 -
 79
79 -
 80
80 -
81
-
82
-
83
-
84
-
85
-
86
-
87
 |
 |
