HP Xw9400 Diskette Drive Installation - Page 2
Service and Technical, Reference Guide, power supply to the diskette drive. Depending on your system
 |
View all HP Xw9400 manuals
Add to My Manuals
Save this manual to your list of manuals |
Page 2 highlights
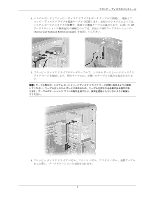
2. Insert the diskette drive in the bracket, and secure the diskette drive by inserting two M3 screws in the rear most holes. NOTE: This step only applies to HP xw8200 Workstation. 3. Slide the drive into the bay. For the HP xw4300 Workstation, HP xw4200 Workstation, and HP xw4100 Workstation, you must add four screws to secure the diskette drive to the chassis. 4. Connect a data cable from the system board to the diskette drive and connect the power cable from the power supply to the diskette drive. Depending on your system, the location of the system board connector and the correct power cable to use might be different. Refer to the Service and Technical Reference Guide for your HP Workstation for product-specific information. 2
-
 1
1 -
 2
2 -
 3
3 -
 4
4 -
 5
5 -
 6
6 -
 7
7 -
 8
8
 |
 |

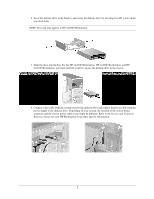
2
2.
Insert the diskette drive in the bracket, and secure the diskette drive by inserting two M3 screws in the
rear most holes.
NOTE: This step only applies to HP xw8200 Workstation.
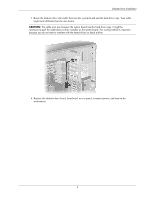
3.
Slide the drive into the bay. For the HP xw4300 Workstation, HP xw4200 Workstation, and HP
xw4100 Workstation, you must add four screws to secure the diskette drive to the chassis.
4.
Connect a data cable from the system board to the diskette drive and connect the power cable from the
power supply to the diskette drive. Depending on your system, the location of the system board
connector and the correct power cable to use might be different. Refer to the
Service and Technical
Reference Guide
for your HP Workstation for product-specific information.