HP Xw9400 Diskette Drive Installation - Page 3
might look different than the one shown. - fan
 |
View all HP Xw9400 manuals
Add to My Manuals
Save this manual to your list of manuals |
Page 3 highlights
Diskette Drive Installation 5. Route the diskette drive data cable between the system board and the hard drive cage. Your cable might look different than the one shown. Ä CAUTION: The cable must stay between the system board and the hard drive cage. It might be necessary to push the cable down so that it catches on the system board. This routing method is important because you do not want to interfere with the heatsink fans or block airflow. 6. Replace the diskette drive bezel, front bezel, access panel, reconnect power, and turn on the workstation. 3
-
 1
1 -
 2
2 -
 3
3 -
 4
4 -
 5
5 -
 6
6 -
 7
7 -
 8
8
 |
 |

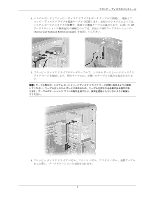
Diskette Drive Installation
3
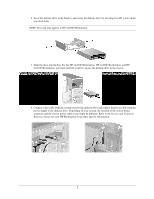
5.
Route the diskette drive data cable between the system board and the hard drive cage. Your cable
might look different than the one shown.
Ä
CAUTION:
The cable must stay between the system board and the hard drive cage. It might be
necessary to push the cable down so that it catches on the system board. This routing method is important
because you do not want to interfere with the heatsink fans or block airflow.
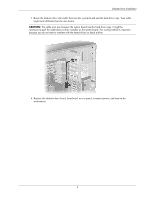
6.
Replace the diskette drive bezel, front bezel, access panel, reconnect power, and turn on the
workstation.